How to Align Print Cartridges in Windows 10
Cartridge alignment is necessary for bidirectional printing
Key notes
- A Windows 10 printer that has alignment problems will not print documents accurately.
- Printer cartridges can become misaligned when dirty or clogged.
- The steps to aligning your print cartridges differ based on the printer’s brand and model.

Aligning printer cartridges are necessary when you have installed new cartridges or if the printer has not been in use for quite some time.
Typical symptoms when you know there is something wrong with the cartridge alignment are when the print output is showing jagged lines or if the print isn’t perfect, particularly along the edges.
Can I align print cartridges?
Fortunately, setting things right here is easy as a few simple steps are all that you need to ensure the print quality is spot on the next time you print any pages.
However, while the basic steps are the same for almost all printers, there might be a few steps unique for each printer brand.
Here are the steps we have mentioned for some of the most used printer brands named HP, Canon, Epson, and Brother printers.
Before we begin, you will also do well to ensure you have the updated printer software for the particular model installed on your PC instead of relying solely on the one that Windows 10 comes with.
What happens if a printer does not have aligned print cartridges?
A printer that has alignment problems will not print papers accurately. Images and text can print at an angle or they may not print at all. A printer can become misaligned if there is any paper stuck in the device, improper installation of cartridges, and using low-quality cartridges.
Furthermore, a printer can become misaligned after the device completes a large print job.
The printer software generally comes included with the means to align print cartridges though mentioned below are the more general ways of doing the same and are equally effective as well in achieving the desired result.
How do I align print cartridges in Windows 10?
1. Launch the HP Printer Assistant software, or launch the app for the printer installed on your device.
2. Select Print & Scan and click on Maintain Your Printer under the Print section.
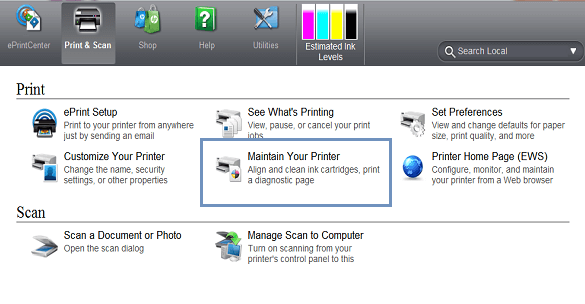
3. This will launch the Toolbox windows that applies to your printer.
4. In the Toolbox windows, select Device Services. Here you will find the list of options needed for printer maintenance.
5. Click on Align Ink Cartridges and follow the on-screen instructions to finish the process.
1. Align print cartridges for HP printers
Aligning print cartridges for a HP printer can be done via the built-in HP Printer Assistant. You need to manually configure it to do the job.
The process will also require printing of a test page, so ensure the printer is ready and that the tray is properly fed with enough paper. Also, in extreme cases, you might have to perform the alignment process a few times until the print of optimum quality is achieved.
Moreover, the manual process will involve printing of test pages comprising of horizontal or vertical lines or a combo of both. You will then be required to enter the number of lines as is required for the system to align the print heads accordingly.
2. For Canon printers
- Launch the Run dialog box. This can be done by pressing and holding on to the Windows + R keys or just typing Run in the Cortana search box and selecting the app from the search result shown.
- In the Run dialog box, type Control Printers and hit OK.
- Select the printer installed on your device or the one you are having issues with. Right-click on it and select Printing Preferences.
- In the Printing Preferences windows, select the Maintenance tab > Custom Settings.
- Select Align heads manually if you’d like to go for a manual process or deselect it if you want it to be done automatically.
- Click on Ok and follow on-screen instructions in either case.
As has been stated earlier, there is going to be a test page with several patterns printed. You will then be required to count the vertical or horizontal lines or both and enter the best combination in another window that shows up.
The software is going to make adjustments to the settings using the info you have provided.
3. Align cartridges for an Epson printer
- Launch the Run dialog box as before.
- Type Control Printers and click on OK.
- In the Devices and Printers page that opens, right-click on the Epson printer that you wish to set right the alignment for and select Printing Preferences.
- In the window that opens, click on the Maintenance
- Click on Print Head Alignment.
- This launches the Print Head Alignment dialog box. Follow on-screen instructions to set things right.
4. For Brother printers
- Launch Run as before and type Control Printers.
- Click on OK to launch the Devices and Printers
- Right-click on the Brother printer that needs its printer cartridges realigned and select Printing Preferences.
- In the Printing Preferences window, select Features.
- Click on Printer Services. This will open the HP Toolbox.
- In the Toolbox windows, click on Align the Print Cartridges.
- Follow on-screen instructions thereafter.
If you are encountering Brother printer scanning issues, check out our dedicated article.
To prepare your printer properly, you should also check your printer ink levels so alignment tests produce accurate results.
Also, as stated above, there are going to be test pages printed and you will have to make the right input based on the test page print to align the print cartridge accordingly.
So there you have it, quite a comprehensive guide to get your cartridges aligned for some of the most well-known printers on Windows 10 PCs.
Read our disclosure page to find out how can you help Windows Report sustain the editorial team. Read more


Improve this guide


User forum
0 messages