How to Install Arduino Drivers & Software on Windows 10
Key notes
- Did you just buy your first Arduino board and you want to start building your very own digital device? For that, you’ll need some software to help you program your development board.
- If you have a Windows 10 computer and the means to connect your Arduino board to it, half the battle is already won. You just need to make sure that your PC can recognize the board without a fault.
- Check out our dedicated Arduino section if you want to find out more about it.
- If you’re interested in programming, our Developer Tools section can help you find interesting articles and tools.

You just bought your first Arduino board and you want to start building your very own digital device. Well, first off, you need to install the Arduino software on your Windows computer as well as the necessary drivers.
In this article, we’ll show how you can install all the tools you need in less than 10 minutes.
How can I download Arduino Nano driver on Windows 10?
In order to avoid Arduino problems on your PC, it’s important that you have the necessary drivers installed.
The lack of drivers will lead to certain issues, such as Arduino port not showing up for example, so you can see why it’s important to keep drivers up to date.
This will also lead to Arduino upload error, therefore visit the official website and download the latest drivers from there.
How to install Arduino software on Windows 10
- Download Arduino IDE to your Windows PC.
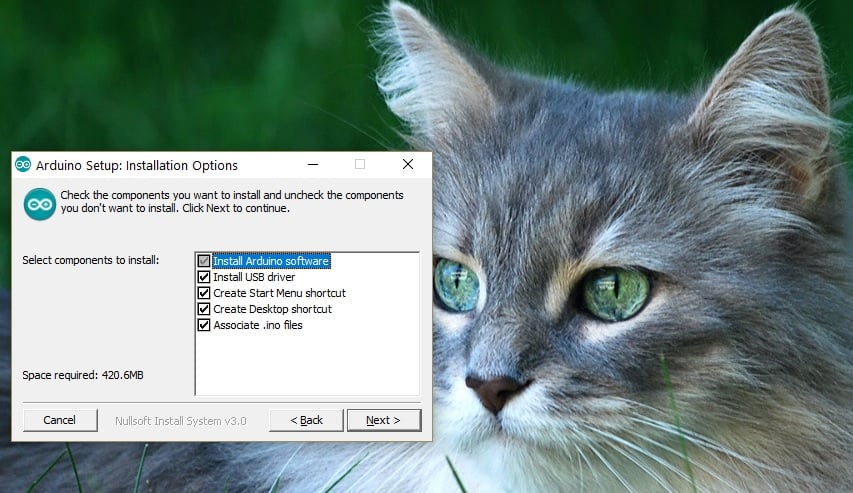
- Wait until the download process completes > install the software and choose the components that you want to install, as well as the install location
- Accept driver installation when prompted by Windows 10
If you choose to select the Zip package, you should know that you need to install the board drivers manually.
How to install Arduino drivers on Windows 10
- Go to Start > type ‘device manager’ > double click the first result to launch the Device Manager.

- Go to Ports > locate the Arduino UNO port
- In case you can’t find that port, go to Other Devices and locate Unknown Device
- Select the Arduino UNO port > click on Update Driver
- Select the option ‘Browse my computer for Driver software’ > go to the Arduino software download location > select the arduino.inf file/Arduino UNO.inf (depending on your software version)
- Wait until Windows finishes the driver install process.
Installing drivers manually can be a hard task if you do this for the first time. Another option is to automatically install your drivers with a professional driver updater tool that can help you save time and safely install the drivers you need in seconds.
Now that you installed the Arduino software and driver on your computer, it’s time to open your first sketch. Select your board type and port and upload a program to make sure that your board is up and running.
That’s pretty much it, follow the steps listed above and you should be able to get your Arduino board started in just a few minutes.
Should you encounter any issues while using your board, Windows Report compiled a list of the most common issues affecting Arduino and their corresponding fixes.
Read our disclosure page to find out how can you help Windows Report sustain the editorial team. Read more


Improve this guide


User forum
0 messages