How to fix Arduino problems on Windows 10/11
Key notes
- Arduino is an open-source electronics platform that anyone can use.
- You need to program it via connectivity to a PC. However, issues with Windows 10 are not uncommon at this phase.
- To read more about this amazing tool, check out our dedicated Arduino Errors page.
- If you need more general troubleshooting guides, check out our Windows 10 Fix page.

If you’re an advanced user, you might be familiar with hardware and software project called Arduino.
Arduino is similar to Raspberry Pi in a way, but users reported problems with Arduino on Windows 10, so today we’re going to show you how to fix problems with your Arduino on Windows 10.
Steps to fix Arduino issues on Windows 10
- Run IDE as Administrator
- Install the driver manually
- Change your date
- Connect the device to a different PC
- Install the necessary certificates
- Reinstall Arduino drivers
- Check if the proper board is selected
- Turn on/off Compatibility mode
- End LVPrcSrv.exe process
- Run Arduino bat file
- Don’t run cygwin
- Disable certain devices
- Check if your device is working properly
In most cases, you can quickly fix Windows 10 Arduino bugs by installing the latest drivers manually. If this method fails to fix your issues, try using compatibility mode.
Now, if the issue persists, just follow the instructions listed below and we’re sure one of these solutions will help you fix the technical glitches you’re experiencing.
1. Run IDE as Administrator
Users reported Serial port ‘COM4’ already in use try quitting any programs that may be using it error message on their Windows 10 PC.
Arduino comes with its own IDE tool that allows you to program it, but it seems that users are unable to start the IDE due to this error.
To fix this problem on your Windows 10 PC, you need to start the IDE tool as administrator. To do that, simply right click the IDE and choose Run as administrator from the menu.
If running the IDE as administrator fixes the problem you’ll have to use this method every time you want to start the application.
If you want, you can set the application to always run with administrative privileges by following these steps:
- Right click Arduino IDE and choose Properties from the menu.
- Go to Compatibility tab and check Run this program as an administrator option.

- Click Apply and OK to save changes.
After running Arduino IDE as an administrator, the problem should be completely resolved.
2. Install the driver manually
Users reported that they can’t connect to Arduino with IDE, and that can be a major problem. In order to fix this issue, you need to install Arduino drivers manually, and you can do that by following these steps:
- Press Windows Key + X to open Win + X menu and choose Device Manager from the menu.

- When Device Manager opens, locate the Arduino device that doesn’t have its driver installed.
- Right click the device and choose Update Driver Software from the menu.

- Choose Browse my computer for driver software.

- Select Let me pick from a list of device drivers on my computer.

- Click the Have Disk button.

- Click the Browse button and locate the driver.

Few users reported that they are unable to install the driver because it’s unsigned. This is a security measure by Windows designed to protect you from potentially malicious drivers.
By using this feature you can only install drivers that are digitally signed and genuine to your PC. Unfortunately, few users reported that this feature caused the problem with Arduino drivers.
If you can’t install Arduino drivers on your Windows 10 PC we recommend that you turn off driver signature enforcement feature by following these steps:
- Open the Start Menu and click the Power button.

- Hold the Shift key on the keyboard and click Restart.
- You’ll see three options available on the screen. Choose Troubleshoot.
- Now choose Advanced options > Startup Settings and click the Restart button.
- When your computer restarts you’ll see a list of options available on the screen. Press F7 or 7 on your keyboard to select Disable driver signature enforcement option.
Now Windows 10 will start normally and you’ll be able to install unsigned drivers without any problems.
You might encounter a warning while trying to install an unsigned driver, but you’ll still be able to install Arduino driver without any problems.
3. Change your date
Few users reported issues while installing Arduino drivers on their system, and it seems that the problem was caused by an expired certificate.
This can prevent the driver from being installed, but you should be able to fix the problem simply by changing your date.
To do that on Windows 10, follow these steps:
- Right click the clock in the Taskbar and choose Adjust time/date option.

- When Date and time window opens make sure that Set time automatically and Set time zone automatically options are disabled. Now click the Change button.

- Change date and time dialog will now appear. Set an earlier date, for example few days or months earlier and click Change.

- After your date is changed try to install the driver again.
- After you install the driver, go to Date and time window again and set the correct date. You can also turn on Set time automatically and Set time zone automatically options.
4. Connect the device to a different PC
According to users, if Windows 10 can’t recognize your Arduino you might want to connect it to a different PC that runs an older version of Windows. Users reported that their device was recognized after connecting it to a different PC.
After finding the Arduino model, they were able to download the driver and install the device on their Windows 10 PC.
5. Install the necessary certificates
If you can’t install Arduino drivers on your Windows 10 PC, you might have a problem with driver certificates. You can easily fix that by installing the necessary certificates on your PC. To do that, you need to follow these steps:
- Open Arduino/drivers directory.
- Locate arduino.cat, right click it and choose Open.
- When new window opens, click the View Signature button.
- Now click Install Certificate button.
After the certificate is installed you should be able to install Arduino drivers without any problems.
6. Reinstall Arduino drivers
Users reported that they keep getting Can’t open device message when they try to start their Arduino.
Apparently, this issue is caused by your drivers, and one of the simplest ways to fix this problem is to reinstall your drivers. To do that, follow these steps:
- Open Device Manager.
- Locate your Arduino in Device Manager and right click it. Choose Uninstall.

- Check Delete driver software for this device and click OK.
- After the driver is removed, restart your PC.
After deleting the driver, simply download the latest version of the driver and install it on your PC. By doing that all driver-related issues with Arduino will be resolved.
7. Check if the proper board is selected
According to users, you can get Can’t open device error message if you don’t select the proper board from Arduino IDE. To avoid this problem be sure to go to Tools section and select the appropriate board.
8. Turn on/off Compatibility mode
Users reported No serial port name defined error message in Arduino IDE, and according to them, this issue is caused by Compatibility mode.
This feature is extremely useful if you want to run older software on Windows 10, but sometimes using the Compatibility mode can lead to certain issues.
To fix this problem with Arduino, you need to disable Compatibility mode by doing the following:
- Locate Arduino IDE shortcut, right click it and choose Properties.
- Navigate to Compatibility tab and make sure that Run this program in compatibility mode for isn’t checked.
- If this option is checked, uncheck it and click Apply and OK to save changes.
Some users claim that you can fix this problem by running Arduino IDE in Compatibility mode for Windows 98/Me.
To do that, repeat the steps above and make sure that you check Run this program in compatibility mode for option. Select an older version of Windows, and click Apply and OK to save changes.

9. End LVPrcSrv.exe process
Users reported that Arduino software freezes when they try to upload a program, and this can be a major problem for users.
Apparently, Logitech process called LVPrcSrv.exe is causing this error to appear and in order to fix it you need to end this process from Task Manager. To do that, follow these simple steps:
- Press Ctrl + Shift + Esc to open Task Manager.
- When Task Manager opens, go to Details tab and look for LVPrcSrv.exe.
- If you find this process, right-click it and choose End task from the menu.
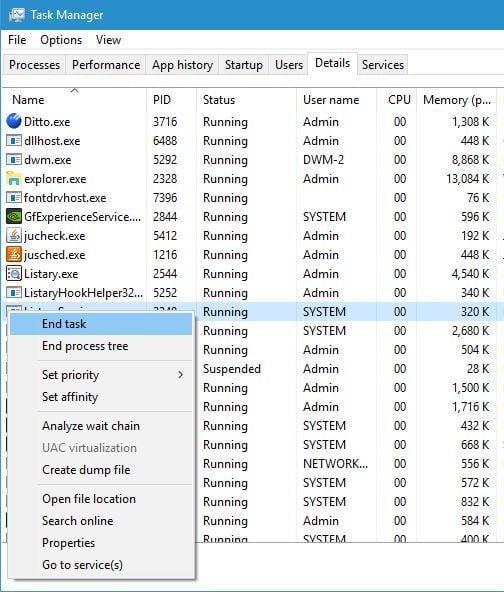
- After the process is closed, close Task Manager and try to run Arduino software again.
If LVPrcSrv.exe is causing this problem on your PC, you’ll have to end this process every time you want to run Arduino software on your PC.
10. Run Arduino bat file
According to users, they are getting Arduino has encountered a problem and needs to close error message on their PC when trying to start Arduino by running the arduino.exe file.
To avoid this problem you can simply start Arduino by double clicking the run.bat file. Keep in mind that Arduino environment can be sometimes slow to start, so you’ll have to be patient.
11. Don’t run cygwin
Users reported that certain issues can occur if you try to compile a sketch in Arduino while having cygwin running in the background. To avoid this problem on your PC, you can simply turn off cygwin while using Arduino.
If that doesn’t help, you might have to delete cygwin1.dll from the Arduino directory and replace it with a cygwin1.dll from your cygwin directory.
12. Disable certain devices
Few users reported that Arduino software takes a long time to start and it seems frozen when you try to open Tools menu. This issue is caused by other devices that can create COM ports on your PC.
A good example of these devices are Bluetooth devices, so if you one of these devices available, be sure to disable it from Device Manager. To do that, you need to follow these steps:
- Open Device Manager.
- Locate the device that you want to disable, right-click it and choose Disable from the menu.

After disabling these devices the loading time of Arduino software should improve.
13. Check if your device is working properly
According to users, issues with Arduino board can occur if your device is broken, therefore it’s advised to try it on a different PC. If you can, be sure to try the device on different computers with different operating systems.
If the issue appears on all devices, it means that your Arduino board is faulty and you should replace it as soon as you can.
As you can see, there are all sorts of problems with Arduino and Windows 10, but in most cases, you should be able to fix these problems simply by installing the proper driver or by checking your security certificates.
[wl_navigator]
Read our disclosure page to find out how can you help Windows Report sustain the editorial team. Read more


Improve this guide


User forum
1 messages