Autoplay Windows: What It Is And How To Fix It Quickly
Autoplay in Windows controls how your PC reacts when you plug in USB drives, SD cards, cameras, or phones.
Windows reads the type of content on each device and offers quick actions that help you open files, import photos, or launch apps without extra steps. This guide explains what Autoplay does and shows you how to enable it or fix it when it stops working.
Table of contents
- What Autoplay Does In Windows?
- Key Functions Of Autoplay
- Difference Between Autoplay And AutoRun
- Why Autoplay Stops Working
- Common Reasons Autoplay Fails
- How To Turn On Autoplay In Windows
- How To Reset Autoplay Actions
- How To Check Required Windows Services
- How To Fix Autoplay With Group Policy
- Advanced Fix For Autoplay Using Registry Editor
- FAQ
What Autoplay Does In Windows?
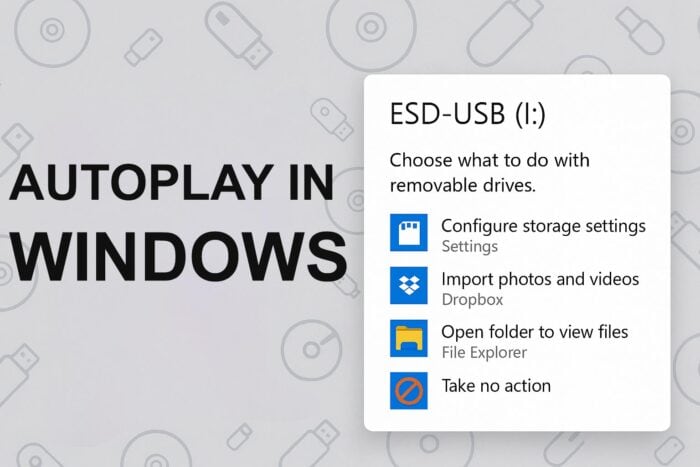
Autoplay scans newly connected storage and identifies the dominant content type so Windows can present the best handling options. You see a small notification that lets you open the device, import photos, or start a media player with a single click.
If you want a full walkthrough of the toggle and available options, you can follow this detailed guide on how to enable Autoplay in Windows 11.
You can review every available option in this guide on Autoplay default settings to understand how Windows handles each device type by default.
Key Functions Of Autoplay
Autoplay improves everyday workflows in several ways:
- It detects removable storage instantly when you plug it in.
- It shows a pop up with context aware actions for that device.
- It launches your preferred app automatically when you choose that option.
- It lets you assign different rules for each device type you use.
- It streamlines photo import and file management tasks on your PC.
Difference Between Autoplay And AutoRun
Autoplay presents options and lets you choose what happens when you connect a device. AutoRun tries to start software stored on the device without asking first. Modern Windows limits AutoRun for security reasons, so Autoplay now handles almost all removable storage actions.
Why Autoplay Stops Working
Autoplay often stops working when Windows disables the feature, when services fail, or when policies override your settings. USB issues can also prevent the system from seeing the device correctly, which blocks the Autoplay prompt.
For a deeper look at common causes and advanced fixes on the latest desktop OS, you can read this guide that explains how to fix Autoplay not working in Windows 11.
Common Reasons Autoplay Fails
Typical causes include:
- The main Autoplay toggle is turned off in Settings.
- The Shell Hardware Detection service is disabled or stopped.
- A Group Policy rule blocks Autoplay for some or all drives.
- Registry values force a custom Autoplay behavior you did not choose.
- USB connection problems prevent proper device detection.
How To Turn On Autoplay In Windows
Turn the feature back on through the main Settings panel.
- Open Settings.
- Select Bluetooth and devices.

- Select AutoPlay.
- Turn on Use AutoPlay for all media and devices.

- Choose default actions for each device type, such as removable drives and memory cards.
How To Reset Autoplay Actions
Reset Autoplay when prompts feel wrong or when nothing happens after you plug in a device.
- Open Control Panel.
- Select Hardware and Sound.

- Select AutoPlay.

- Select Reset all defaults.
- Select Save to confirm your changes.
If you still experience issues on an older system, you can follow this dedicated tutorial that explains how to fix Autoplay not working in Windows 10.
How To Check Required Windows Services
Autoplay relies on the Shell Hardware Detection service to see devices and trigger prompts correctly.
- Press Windows + R and type services.msc, then press Enter.
- Scroll down and double click Shell Hardware Detection.
- Set Startup type to Automatic.
- Select Start if the service is stopped.
- Select Apply, then select OK.
How To Fix Autoplay With Group Policy
Group Policy rules often disable Autoplay on work or school devices, and sometimes on home PCs that reused those settings.
- Press Windows + R and type gpedit.msc, then press Enter.
- Go to Computer Configuration > Administrative Templates > Windows Components > AutoPlay Policies.

- Double click Turn off AutoPlay and set it to Disabled.
- Double click Default behavior for AutoRun and set it to Not configured.
- Select OK to save each change.
Advanced Fix For Autoplay Using Registry Editor
Use this method only when all previous steps fail or when you see custom Autoplay behavior that you cannot change in Settings.
- Press Windows + R, type regedit, and press Enter.
- Go to HKEY_LOCAL_MACHINE\Software\Microsoft\Windows\CurrentVersion\Policies\Explorer
- Look for the values NoAutoRun and NoDriveTypeAutoRun.
- Delete these values, or set each of them to 0.
- Close Registry Editor and restart your PC.
FAQ
Autoplay does not appear when the feature is turned off, when the device fails to mount, or when a service like Shell Hardware Detection stops running.
You can open Settings, go to Bluetooth and devices, then Autoplay, and select a different action for removable drives or memory cards.
Autoplay is safe, but you should avoid opening unknown or untrusted USB drives because they may contain harmful files.
Windows stores separate Autoplay preferences for each device type, so USB drives, SD cards, cameras, and phones can trigger different actions.
Autoplay Windows gives you quick control over external devices and reduces the steps you take each time you plug in storage or media. When it stops working, you can usually restore normal behavior by turning the feature back on, resetting its actions, checking required services, and clearing restrictive policies or registry values. After you apply these fixes, your PC should recognize devices instantly and offer useful actions every time you connect them.
Read our disclosure page to find out how can you help Windows Report sustain the editorial team. Read more


Improve this guide

User forum
0 messages