How to Enable Autoplay in Windows 11 Step by Step

Learn how to enable Autoplay in Windows 11 to automatically open USB drives, CDs, and connected devices. This quick guide will help you activate or customize the feature easily.
Table of contents
How to Enable Autoplay in Windows 11?
1. Open Windows Settings
Start by accessing the main Settings panel where Autoplay options are located.
- Press Windows + I to launch the Settings app.
- Click Bluetooth & devices on the left panel.

2. Access the Autoplay Menu
Now you’ll turn on the general Autoplay toggle for all devices.
- Scroll down and select AutoPlay.
- Ensure the Use AutoPlay for all media and devices switch is turned On.

3. Customize Autoplay Actions
You can now choose what happens when specific devices are connected.
- Under Choose AutoPlay defaults, locate Removable drive and Memory card.
- Open the dropdown next to each option and choose what Windows should do:
- Open folder to view files (File Explorer)
- Ask me every time
- Take no action
- Import photos and videos
- Close Settings when done. Windows will automatically save your preferences.
If you’ve turned on the feature but it still doesn’t react when you plug in a USB drive, see how to fix Autoplay not working on Windows 11 for step-by-step troubleshooting.
How to Enable Autoplay Using Control Panel
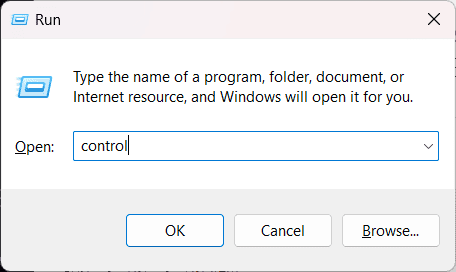
1. Open Control Panel
Start by opening the legacy Control Panel app.
- Press Windows + R to open the Run dialog.
- Type control and press Enter.
2. Locate Autoplay Settings
Find the section where Autoplay options are stored.
- Click Hardware and Sound.
- Select AutoPlay.

3. Turn On Autoplay
Now activate the main Autoplay switch and apply changes.
- Check the box labeled Use AutoPlay for all media and devices.
- Adjust the individual media settings below if needed.
- Click Save to confirm.
If this method doesn’t help, you can follow this Windows 10 Autoplay troubleshooting guide for additional fixes that often apply to Windows 11 as well.
How to Reset Autoplay Settings to Default
1. Open Control Panel
Access the same menu used for Autoplay configuration.
- Go to Hardware and Sound > AutoPlay.
- Scroll to the bottom of the page.
2. Restore Defaults
Reset all settings to their original values.
- Click Reset all defaults.
- Press Save to apply the changes.
- Reconnect your USB drive or device to test Autoplay again.
What Is Autoplay in Windows 11
Autoplay automatically detects and opens connected media such as USB drives, memory cards, and CDs. It can launch specific apps, show media options, or transfer files as soon as a device is plugged in.
If you notice that CDs or DVDs no longer open automatically, check out this guide on fixing Autoplay not working for CDs or DVDs, which also applies to newer versions of Windows.
You can explore a more complete overview of the feature in this detailed guide on Autoplay in Windows, which explains every major option and behavior.
Learn more about how Windows handles connected devices by reviewing the full guide on Autoplay default settings, which explains the available options and how they affect USB drives, memory cards, and other media.
Why Autoplay Might Not Work
If Autoplay still doesn’t respond, these are the most common causes:
- The feature may be blocked by Windows Defender or Group Policy.
- Your device driver might be outdated.
- You could have disabled the Shell Hardware Detection service by mistake.
Running the Hardware and Devices troubleshooter or updating your drivers usually resolves this.
FAQs
Go to Settings > Bluetooth & devices > AutoPlay, then switch it Off.
It’s generally safe, but for unknown USB drives, use “Ask me every time” to avoid running unsafe files automatically.
Yes. Windows 11 saves unique Autoplay preferences for every connected device.
Yes. Autoplay can detect external storage devices, but you may need to set the default action manually under Choose AutoPlay defaults.
Conclusion
Turning on Autoplay in Windows 11 helps streamline how your PC reacts to media devices. Whether it’s opening a USB folder or importing photos automatically, customizing these actions saves time and makes everyday use smoother.
Read our disclosure page to find out how can you help Windows Report sustain the editorial team. Read more


Improve this guide


User forum
0 messages