5 easy ways to stop or block Windows 11 updates in 2022
- Not everyone is excited about the new OS so certain users have been searching for a way to block Windows 11 updates.
- Stopping automatic updates either for a week or forever has never been easier.
- Change some simple settings on your device or use a third-party app and gain control over updates on your Windows 11 device.

Windows 11 is still in the spotlight these days. According to the giant tech company, the new OS will bring its users a completely new and improved experience and meet the needs the people have right now.
So far, users have installed, tested, and reviewed every preview build and opinions are divided. Some say they can’t wait for the final version, some say they’ll stay to Windows 10.
But until the last version will come out, ways to customize the new OS are continuously trending over the Internet.
How often does Windows 11 check for updates?
Like with all the other OSs, Windows 11 automatically checks for updates every day. The exact time might vary, as Microsoft servers cannot check the updates of every device at the same time or they’ll crash.
Whenever there is an update to install, the system will be to download it and find a suitable time to install it, exactly as it did in the previous operating system.
However, there is an interesting change regarding the Windows 11 updates center: the Windows lifecycle and servicing update.
According to Microsoft, Windows 11 will have an annual feature update cadence, unlike the semi-annual cadence of Windows 10:
Windows 11 feature updates will release in the second half of the calendar year and will come with 24 months of support for Home, Pro, Pro for Workstations, and Pro Education editions.
The change to an annual update cadence and slightly longer lifecycle versus Windows 10 is based on user feedback and our overall update approach.
One thing that will also remain the same in the new OS is the security updates that will continue to arrive on the second Tuesday of each month.
Can I remove specific updates?
Although Microsoft doesn’t recommend it, you do have the option to remove specific updates.
Keeping your device updated means you’ll install the latest fixes and security improvements to maximize efficiency and increase protection.
But because sometimes an update does more wrong than good, Microsoft lets you choose which updates you can keep and which you can remove.
All you need to do is head on to the Windows Update center and choose which updates you want to uninstall.
We do recommend keeping your OS updated to avoid and prevent errors and security bugs from occurring.
Nonetheless, if you want to stop Windows 11 automatic updates, there are a few options to choose from, just follow the steps below.
How do I stop a Windows Update in Progress?
You can block an update in progress on your Windows 11 device, but keep in mind that involves not getting the latest security updates and patches.
In order to proceed with stopping in-progress updates for Windows, simply go to the Settings menu and select the Windows Update section.
Selecting the option to pause your updates for one or two weeks will automatically stop Windows 11 from installing updates.
How to stop Windows 11 update notifications?
You can also block Windows 11 update notifications in a few moments using these simple steps:
- Go to the Settings menu.
- Click on the Windows Update section.
- Select Advanced options.
- Set off the Notify me when a restart is required to finish updating option.
- Now you won’t get any Windows 11 updates notifications.
How to stop Windows 11 update pending restart?
You can stop updates that require you to restart your PC easily by simply blocking updates from the settings.
As previously mentioned, it’s possible to pause Windows updates for a few weeks, and that will also stop pending restart updates on your device.
You only have to select Pause updates from the dedicated menu to stop any following updates.
How do I stop Windows 11 automatic updates?
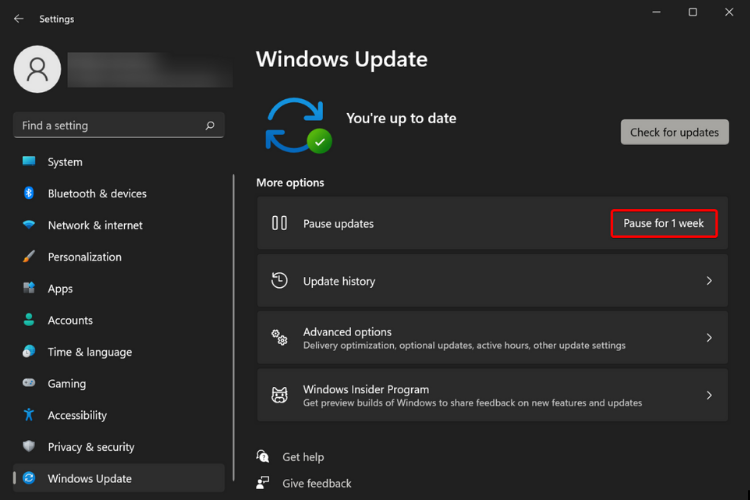
1. Use Windows 11’s Settings
This is the easiest way to pause Windows 11 updates and the handiest one as it takes less than a minute.
But you’ll have to go through these settings every 7 days so if you are looking for something more permanent, move on to the next solution.
2. Change the network settings
2.1. Disable the download update option
- Go to Start and click on Settings.
- Head over to Windows Update.
- Click on Advanced Options.
- Switch the toggle off for the Download updates over metered connections option.
2.2. Switch on the network metered connection
- Once again, click on Start and select the Settings option.
- This time, go to Network and Internet.
- Click on the network (Wi-Fi or Ethernet) of your PC.
- Switch on the Metered connection toggle.
NOTE
3. Use the Local Policies
- Go to Search, look for gpedit.msc and click on the Group Policy Editor once it is displayed in the search results.
- On the left pane, under Local Computer Policy, click on Computer Configuration.
- Double click on Administrative Templates.
- Select the Windows Components option.
- Locate Windows Update and open it.
- Now select Manage end user experience.
- Double-click on the Configure Automatic Updates option.
- Select the Disabled option to turn off automatic updates on your Windows 11 PC.
- Click on Apply and OK to save the settings.
4. Disable the Windows 11 Update Service
- Use the Windows + R keys to open the Run dialog box.
- Type services.msc in the text field and hit Enter.
- Locate Windows Update and double-click it to open the Properties tab.
- Under the General tab, select Disabled from the drop-down menu from Startup type.
- Click on OK and Apply to save the settings.
If you ever want to change the settings, just follow these exact steps but choose the Automatic option from the startup type.
5. Use the Registry Editor
- Press the Windows + R keys to open the Run box.
- Type regedit and hit Enter.
- Navigate to:
HKEY_LOCAL_MACHINE\SOFTWARE\Policies\Microsoft\Windows
- Here you need to create the WindowsUpdate and AU (Automatic Updates) folders. Right-click and choose New > Key to create the WindowsUpdate folder.
- Now, under the newly created folder, right-click again, choose New > Key and rename the folder AU.
- The location should now look like this:
HKEY_LOCAL_MACHINE\SOFTWARE\Policies\Microsoft\Windows/WindowsUpdate/AU
- Right-click on the white space and select New > Dword (32-bit) Value to create the NoAutoUpdate value.
- Now righ-click on the newly created value NoAutoUpdate value and select Modify.
- Set the value to 1.
- Click on OK and restart the PC for the changes to take place.
Windows 11 will show how long updates take to install
Maybe one of the most pleasant surprises regarding Windows 11 was the option to see an estimate of the updates within the first preview build.
According to a Windows blog post, the new OS will give its users more control over updates by showing how long it will take to install an update:
We are providing estimates for how long a restart for updates would take. When your PC is pending reboot for a quality update, you will be able to see estimates on your power menu under Start, in restart notifications, on the Windows Update Settings page and inside the Windows Update icon that shows up at the lower right of Taskbar. This feature is rolling out to a subset of Insiders in the Dev Channel at first so not everyone will see this right away.
Having the estimated time of an update will considerably improve anyone’s workflow, since you can now decide if you have the time to let Windows update itself or not.
As with the previous OS, you can still choose a convenient time for you and with this new feature, your work or leisure time online will no longer be interrupted for an unknown period of time.
Just remember, none of these changes is permanent so if you ever change your mind and want to let Windows update itself automatically, all you need to do is revert the changes you made.
Get more control over your device and learn how to disable Windows 11’s driver update in order to avoid downgrading your GPU on your device.
We hope this guide helped you block Windows 11 automatic updates. If you have any questions or suggestions, head on to the comment section below and we’ll get back to you.