Excel Not Printing: Fix Your Documents with These 5 Methods
Disabling the reliability options should fix this issue quickly
Key notes
- If Excel is not printing your documents, it might be because of the file type or outdated drivers.
- You can fix this issue by disabling the reliability options that are protecting some file types.
- Another excellent fix to this problem is to repair your Office installation online.

Some users have stated in forum posts that Excel is not printing their spreadsheets. In some cases, they can print documents on Word and other apps, but only Excel cannot print.
While this problem can be pretty frustrating, it is easy to fix, as we will show in this guide.
Why is my Excel File not printing?
There are a few reasons Excel might not be printing your documents. This can be due to your configuration or issues with the app. Below are some of the known causes in detail:
- Outdated printer driver: If Excel is not printing all your document’s rows, columns, and images, it might due to issues with your printer driver. The solution to this is to update the driver to the latest version.
- Issues with the file format: For some reason, Excel might have problems printing your spreadsheets in their normal format. You need to change the format to XPS before printing.
- Problems with Excel: In some cases, it might be hard to pinpoint the cause of this issue, especially if the printer prints with other apps but Excel. You need to repair or uninstall the app using an uninstaller program and reinstall it later.
What can I do if Excel is not printing?
1. Check the Printer Selection
- Press the Ctrl key + P to open the print menu on Excel.
- Select the dropdown under Printer on Excel’s print tab.
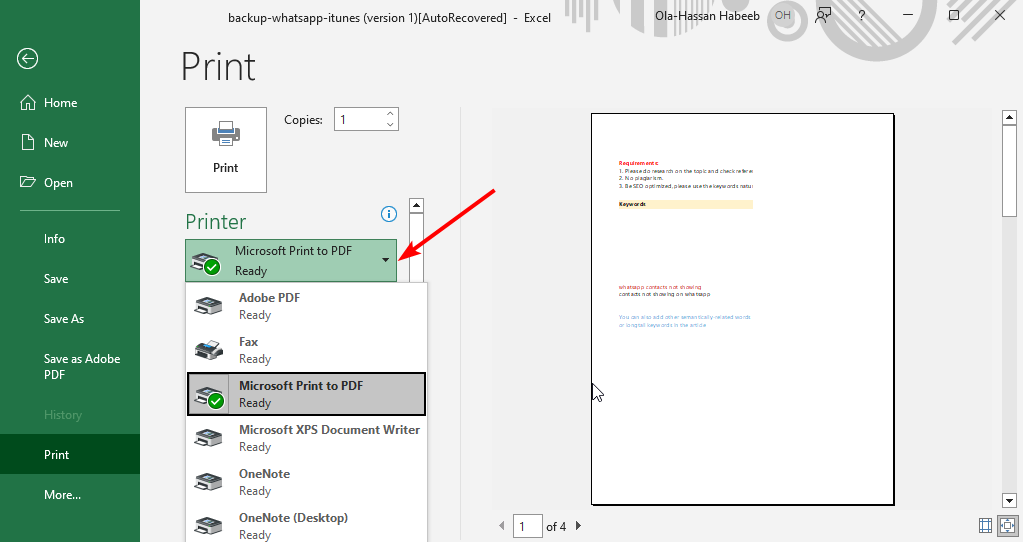
- Now, select the default printer from there before printing.
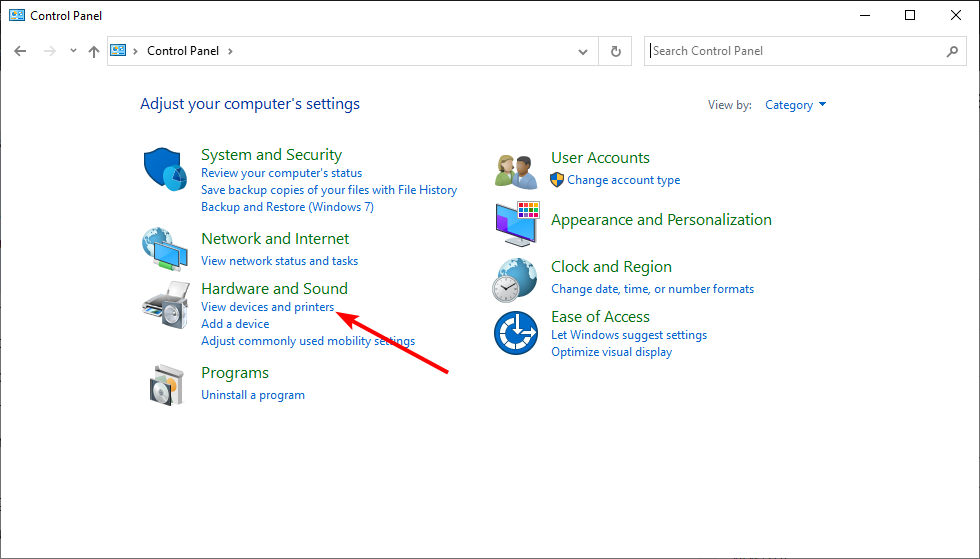
- If unsure of your default printer, press the Windows key, type control, and select Control Panel.

- Select View devices and printers under the Hardware and Sound option.
- Now, right-click your printer and select Set as default printer.
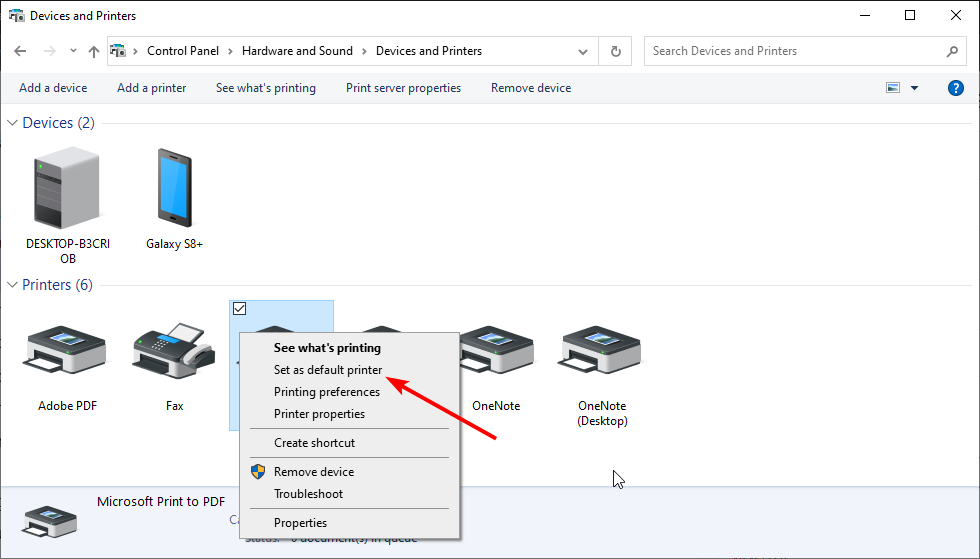
- Finally, go back to the print page and try to print again.
Sometimes, Excel is not printing texts and your files because you are not printing with the default printer. Following the steps above should rectify that quickly.
Also, if you already have your printer as the default, some users have found a way around this issue by setting other printers as the default. Now, they use their printer, a normal printer, to print on Excel with great success. So, you can try the reverse process too.
2. Save the Spreadsheet as an XPS File
- Click the File tab at the top and select the Save as option.
- Choose your preferred location.
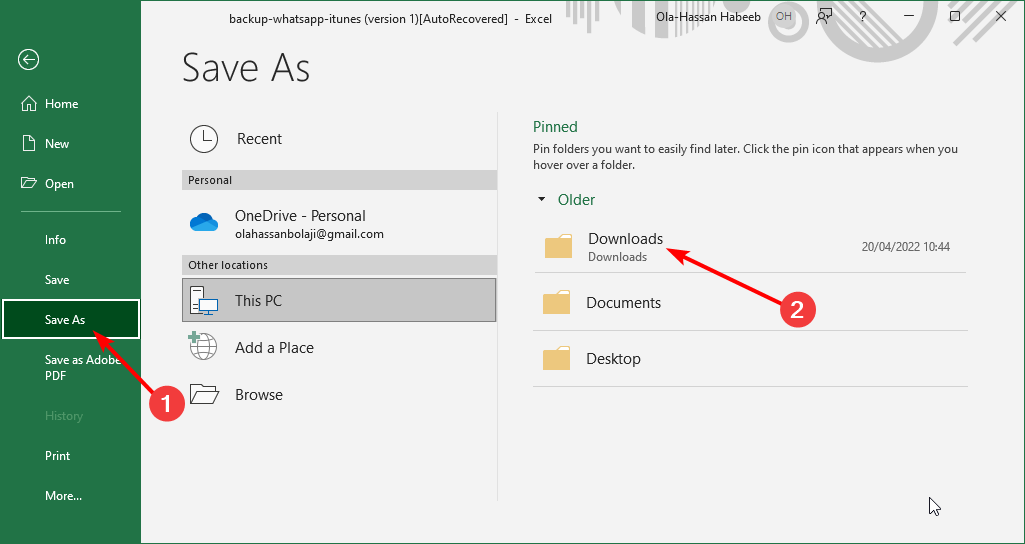
- Click the Save as type dropdown.
- Now, select XPS Document from the options and click Save.
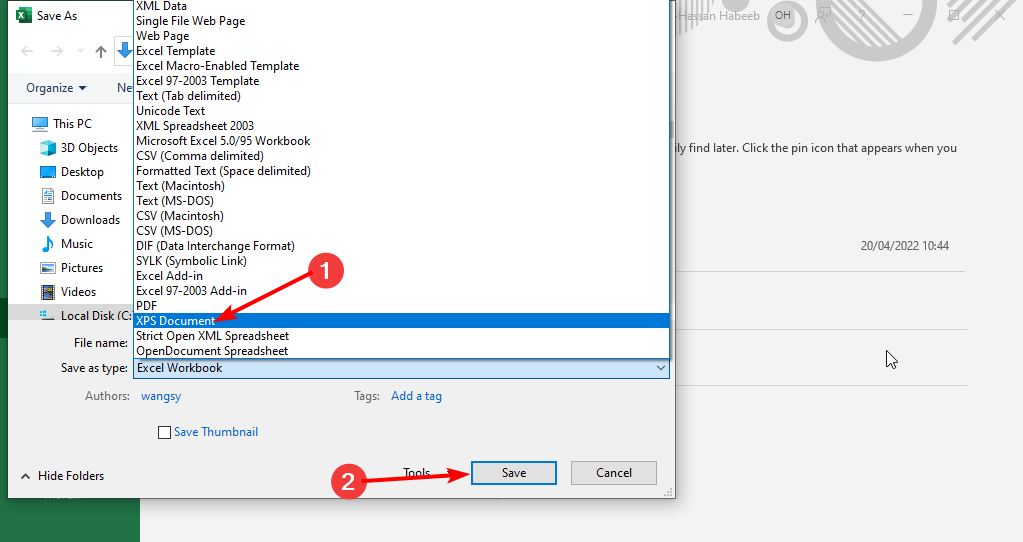
- Finally, press the Ctrl key + P to open the print menu and try to print the document again.
Some users have reported that Excel is not printing their files because of the file type. Changing to the XPS file seems to do the trick here.
3. Update the printer driver
- Press the Windows key + X and select Device Manager.
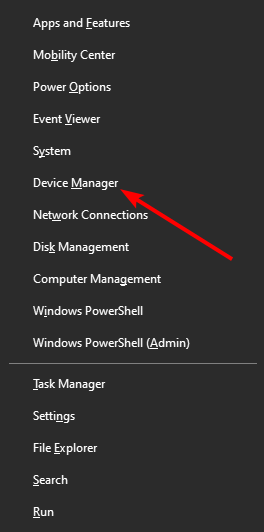
- Double-click the Print queues option to expand it, and right-click your printer driver.
- Now, select the Update driver option.

- Finally, select the Search automatically for drivers option and install any available updates.

Drivers are important for the smooth communication between your hardware and software components. So, if Excel, Word, and PDF files are not printing on your PC, it might be because your driver is outdated.
If you can’t find the updated driver using the method above, you can go to the printer’s manufacturer’s website to download the latest version.
Alternatively, you can save yourself the stress by updating the driver using a reliable tool in Outbyte Driver Updater to update your driver automatically.

Outbyte Driver Updater
Try using Outbyte Driver Updater to locate the right driver versions for your computer in a matter of seconds.4. Disable reliability options
- Launch Excel and click the File tab at the top.
- Select More in the left pane, followed by Options.
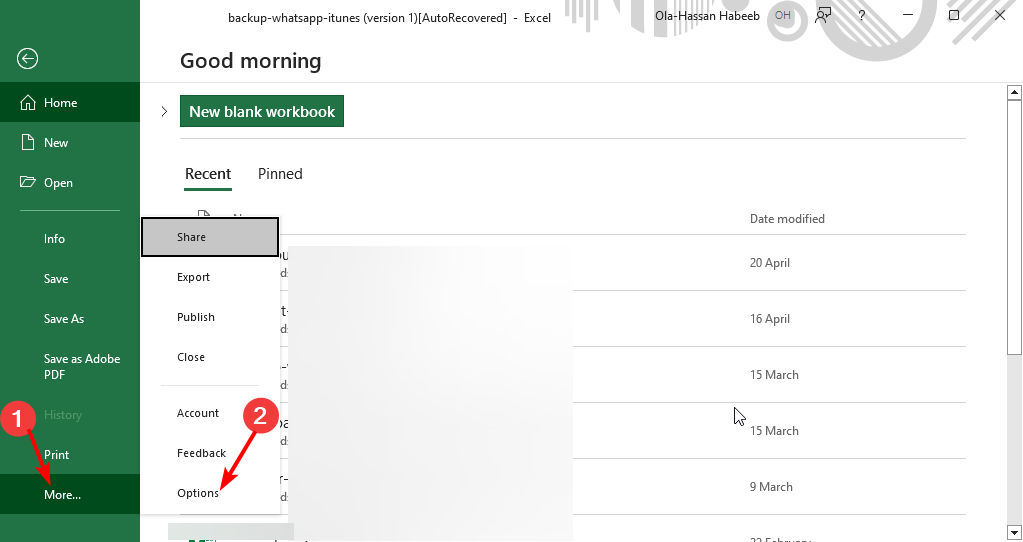
- Now, choose Trust Center.
- From here, click on the Trust Center Settings button.

- Select File Block Settings in the left pane.
- Now, uncheck all the boxes for the options provided for different file types and click OK.
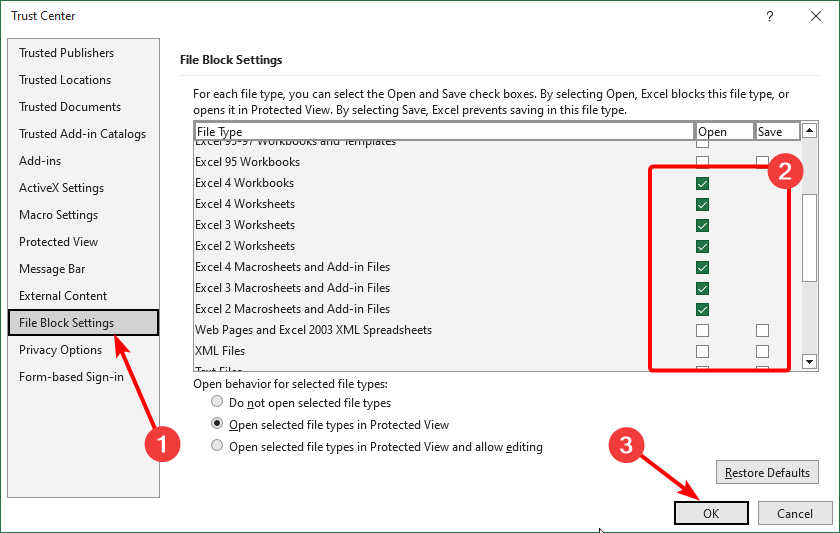
- Choose the Protected View option in the left pane.
- Uncheck the boxes for all the options there.
- Finally, click the OK button and close Excel.

At times, Excel is not printing your document because the file type is protected. You need to undo this setting and relaunch Excel to be able to print.
5. Repair Office
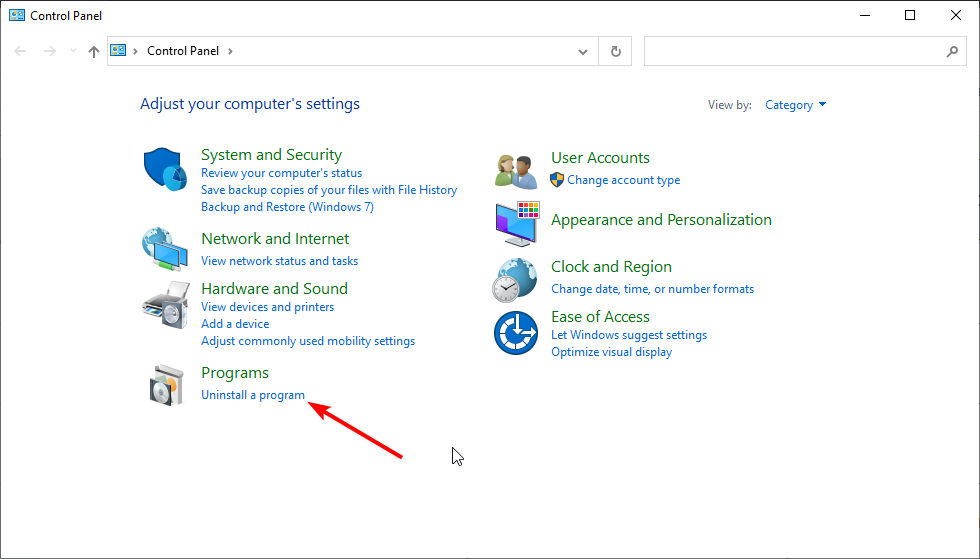
- Press the Windows key + S, type control, and choose Control Panel.
- Click Uninstall a program under Programs.
- Now, right-click the Office program and select Change.
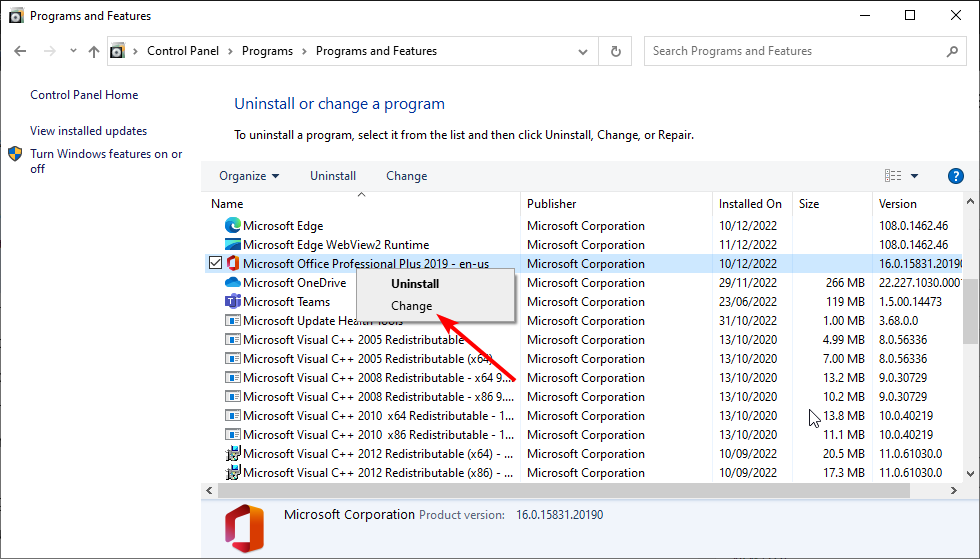
- From here, select Online Repair and click the Repair button.

- Wait for the process to finish and relaunch Excel.
If the above fixes prove abortive and Excel is still not printing your documents, you might need to repair your Microsoft Office installation. This will detect any glitch causing this issue and fix it.
Printing problems on Excel can be annoying, especially if your printer works on other apps. However, it is an issue that has proven solutions, as shown in this guide.
If you still can’t print after applying the fixes above and still have the installation disk, you might need to uninstall Office and reinstall it. Hopefully, it does not come to that.
Feel free to let us know the solution that worked for you in the comments below.
Read our disclosure page to find out how can you help Windows Report sustain the editorial team. Read more


Improve this guide


User forum
0 messages