How to Change the Paper Size on an HP Printer
Optimizing your prints with custom paper sizing
Key notes
- By default, printers use A4-sized paper, but you can change the size to suit your needs via the printer's control panel.
- Find out how you can set custom paper sizes on your HP printer for a cleaner print job.

Depending on the document you wish to print on your HP printer, you might need to change the paper size from the default which is usually Letter or A4. In this guide, we’ll be sharing how to go about it.
How do I set a paper size on my HP printer?
Before you start, ensure the following conditions are met:
- Make sure that your HP printer is on the same network connected to your computer.
- Ensure you have the right type of paper loaded into your printer.
1. By using the paper tray
The length, width, and size of the paper tray will vary depending on your model of HP printer. You can insert your chosen paper size into the tray just make sure it is not over the standard size.
Once loaded, your printer will display a prompt to modify the paper size to match the paper you just replaced it with. Some older models cannot detect the size automatically so you’ll have to do this manually on the print page lest you end up with the printer not printing the right size.
2. By using the HP Printer Control Panel
- Launch your HP printer’s control panel menu by pressing the Home button on the front of your printer. (The exact steps you need to take will depend on your model).
- Select Paper Settings then select Modify.

- Choose a size from the listed options or enter a custom size.
3. By using the HP Smart app
- Launch the HP Smart app on your device or download it if you haven’t already.
- Go to Advanced settings>Settings>Tray and paper management.

- Select a paper size from the options.
4. By using the Settings app
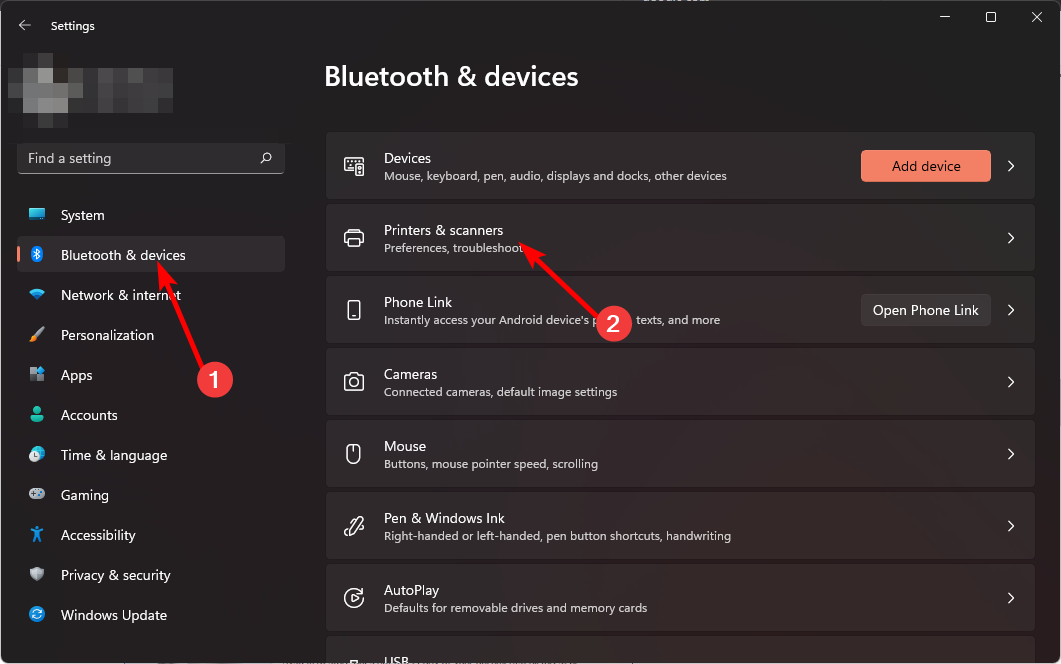
- Hit the Windows key and click on Settings.
- Select Bluetooth & devices then click on Printers & scanners.
- Choose the HP Printer from the list.
- Scroll down and select Printing preferences.

- Navigate to the Paper/Quality tab and select Custom.

- Click on New then fill in the custom width, height, and name for your new paper size then hit OK to save changes. (As a rule of thumb, avoid setting dimensions higher than the default paper size to avoid print job problems).
- Now load the paper and start printing. Remember to select this custom paper size when prompted.
5. By using the Control Panel
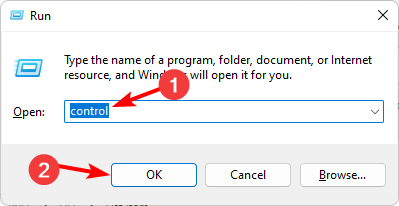
- Hit the Windows + R keys, type control in the dialog box, and hit Enter to open the Control Panel.
- Go to Hardware and Sound>Devices and Printers.

- Scroll down to the Printers section, double-click on your HP printer, and select Printing preferences.

- Navigate to the Paper/Quality tab and select Custom.
- Click on New then fill in the custom width, height, and name for your new paper size then hit OK to save changes.
While the standard paper size works well most of the time, sometimes it isn’t necessary, especially when a smaller size of paper suits the print job.
Changing your HP printer’s paper size can help you avoid issues like printing only half of your document or having to reprint because your printer ran out of paper mid-print job.
If you tend to print on several different types of paper, now you know how to make the adjustment and have more control over your printer and the papers it uses. Further, if you’re on a HP Instant Ink plan, you get to make more savings.
Keep in mind that these instructions may not work for all models and makes of HP printers, but they should at least give you a place to start. If you have any additional questions, suggestions, or comments, leave them in the comment section below.
Read our disclosure page to find out how can you help Windows Report sustain the editorial team. Read more


Improve this guide


User forum
0 messages