FIX: The computer constantly restarts after installing Windows
6 min. read
Updated on
Read our disclosure page to find out how can you help Windows Report sustain the editorial team. Read more
Key notes
- Windows 10 restarting repeatedly after installation is a tricky and dangerous process that might end up leaving your PC inaccessible.
- A never-ending loop of the computer restarting can be inconvenient, but you’ve arrived at the safe zone of finding answers.
- Some of the factors that might cause this difficulty after installing Windows include the antivirus, unwanted automatic updates, hardware concerns, or a failed installation of the operating system.
- Regardless of the circumstance, we will walk you through simple troubleshooting techniques to quickly end the reboot pattern.

A never-ending loop of the computer restarting can be inconvenient, but you’ve arrived at the safe zone of finding answers.
Some of the difficulties that might cause this difficulty after installing Windows include antivirus software, unwanted updates, hardware concerns, or a botched installation of the operating system.
Regardless of the circumstance, we will walk you through simple troubleshooting techniques to quickly end the reboot loop.
Although Windows 10 offers a lot of cool, new features, it can still bring some problems, as well.
In the list below, we’re going to show you what to do if the fresh installation of Windows 10 forces your computer to reboot constantly.
What can I do if the PC reboots after installing Windows 10?
Here are a few other problems that users are facing and can be solved using our guide:
- Windows 10 continuous, endless reboot – Sometimes the PC can get stuck in an endless reboot. Try some of our solutions.
- Windows 10 reboot loop – Usually caused by a problematic update, and to fix it, you need to find and remove that update.
- Windows 10 reboot randomly – Can be caused by hardware problems, so be sure to inspect your hardware.
- Windows 10 install reboot loop – This is a common problem that can be fixed by installing Windows 10 again.
1. Check your antivirus
According to users, sometimes your antivirus can cause this problem, especially if it’s not fully compatible with Windows 10.
Many users reported that this problem occurred with Avast antivirus, but after removing it, the issue was resolved completely.
Keep in mind that you might not be able to access Windows 10 normally due to this problem, so you might have to use Safe Mode to remove Avast.
Once you enter Safe Mode, be sure to uninstall Avast or the antivirus that you’re using and check if that solves the problem.
Keep in mind that antivirus tools might leave behind certain files and registry entries that can cause the problem to reappear.
To completely remove an antivirus, it’s recommended to use a dedicated removal tool. Most antivirus companies offer dedicated removal tools for their software, so be sure to download one for your antivirus.
Once you completely remove your antivirus, check if the problem is resolved. If your antivirus was the problem, you might want to consider switching to a different antivirus solution.
One of the most compatible and trusted antivirus solutions for Windows 10 you could consider trying is ESET HOME Security Essential.
With the multi-layered protection functionality, your PC is continuously monitored even when it is connected to the internet and blocks any malicious activity that may cause damage to your PC.
An intuitively simple interface allows you to identify security concerns at a glimpse, which can be resolved immediately from the interface, such as installing Windows updates.
2. Prevent your PC from rebooting
- Boot your computer in Safe Mode.
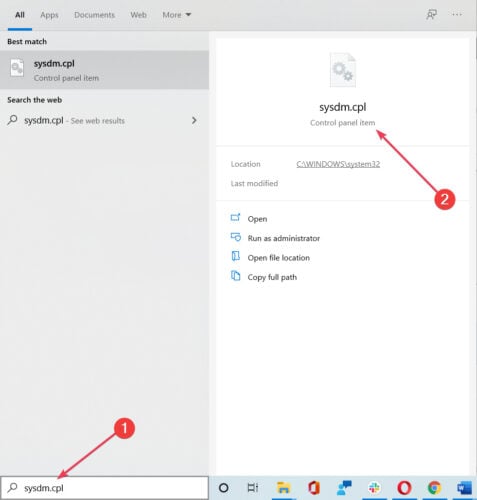
- Go to Search, type sysdm.cpl, and open it from the results.
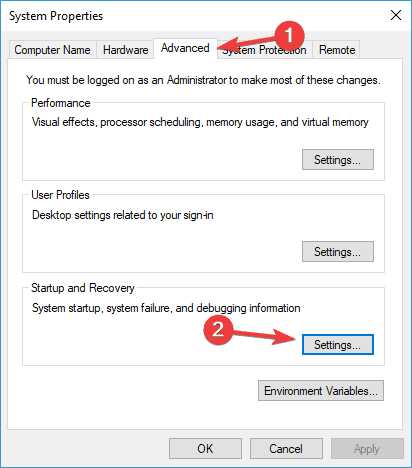
- Click the Advanced tab, and then click the Settings button under Startup and Recovery.
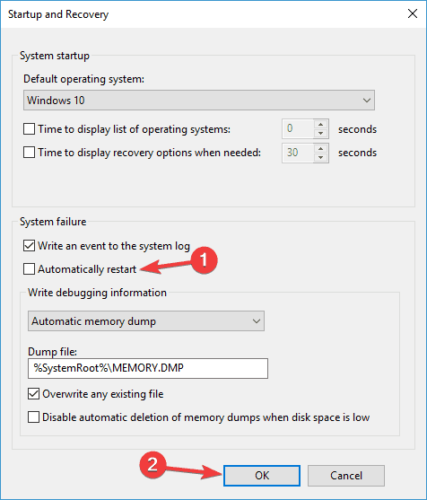
- Uncheck Automatically restart option, then click OK and reboot your computer.
Note: This probably won’t solve your problem but it will provide you with more information. Next time your computer restarts, you’ll probably get a BSoD.
You can use the message or the error code you get from the blue screen to search it on our large collection of BSoD solutions.
3. Fix the Master Boot Record
- Restart your PC several times during the boot sequence until a list of options appears.
- Select Troubleshoot, then Advanced options, and select Command Prompt.
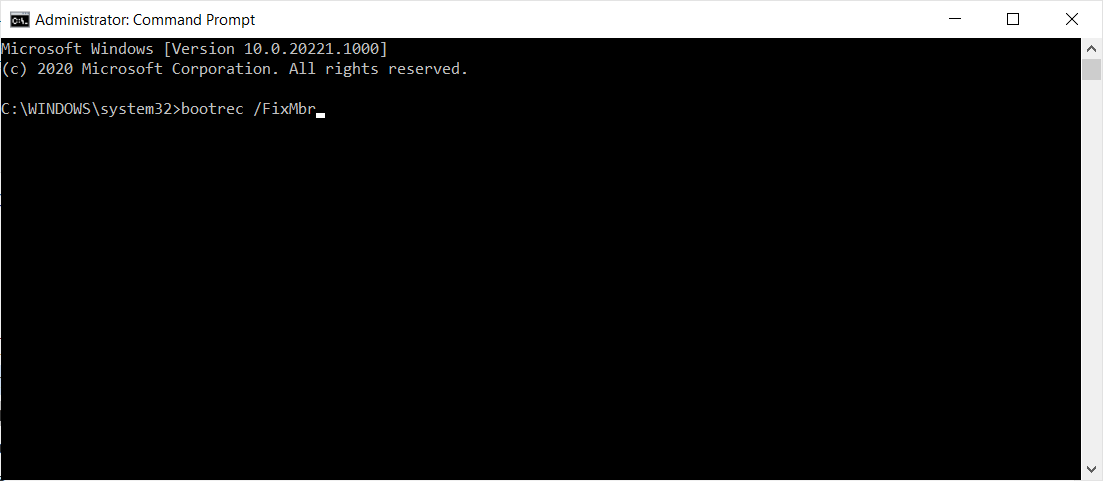
- Run the following commands:
bootrec /FixMbr
bootrec /FixBoot
bootrec /ScanOs
bootrec /RebuildBcd
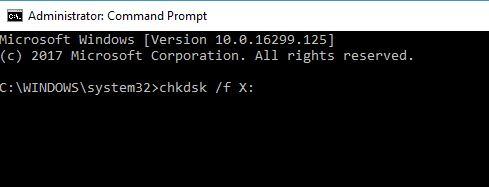
4. Run the chkdsk command
- Restart your PC several times during the boot sequence and start Command Prompt as shown in the previous solution.
- Enter chkdsk /r X: (replace X with the letter that matches your system partition and keep in mind that letters might be changed if you start Command Prompt outside of Windows)
- Keep in mind that this process can take 20 minutes or more, depending on the size of your drive.
5. Roll back to a previous build
- Restart your PC during the boot phase few times until the list of options appears.
- Choose Troubleshoot, then go to Advanced options, select See more recovery options, and choose Go back to the previous build.
- Select your user account and enter your password.
- Click the Go back to the previous build button and follow the instructions on the screen.
Note: Once your PC is restored to the previous build, the problem should be resolved. If you can’t find this setting, you can also use System Restore to go back to the previous build.
If an update caused this problem, you might want to prevent this update from installing. To see how to do that, check out our how to prevent Windows from installing automatic updates article.
6. Check your hardware
Sometimes your hardware can cause this problem to appear, and in order to fix it, you need to disconnect all USB devices from your PC and check if the problem still appears.
Several users claim that the issue was their Wi-Fi adapter, so you might want to try removing it to solve this problem.
In a few instances, users reported that their CPU was the cause, but before you replace any major hardware component, be sure to perform a detailed inspection of your hardware.
7. Check your startup applications
- Start Windows 10 in Safe Mode.
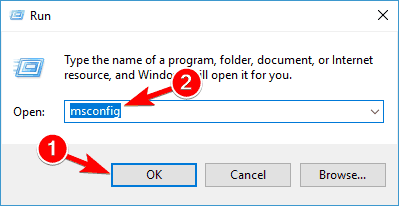
- Press the Windows Key + R and enter services.msc, then click OK or press Enter.
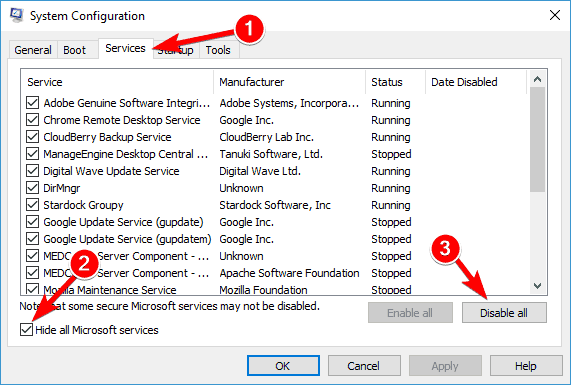
- Navigate to Services tab, check Hide all Microsoft services and click on Disable all.
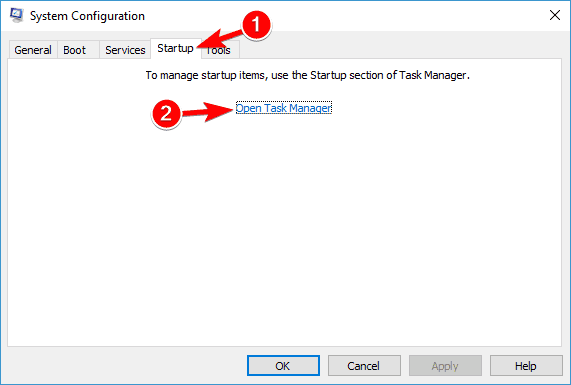
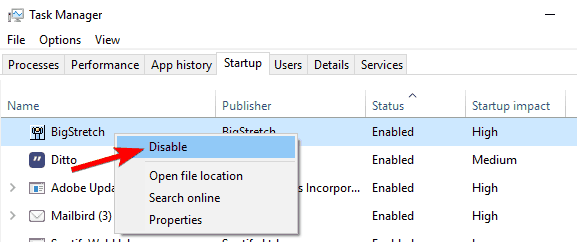
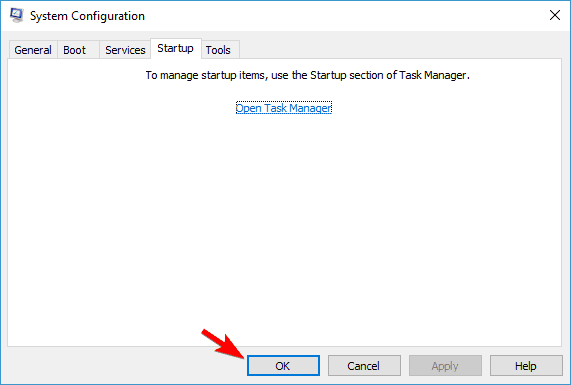
- Go to the Startup tab and click on Open Task Manager.
- Select the first item on the list, right-click it, and choose Disable from the menu. Repeat this step for all the startup applications.
- Close Task Manager, go to the System Configuration window and click Apply and OK to save the changes.
- Restart your PC.
Note: If the problem doesn’t appear anymore, you need to enable disabled startup applications and services one by one or in groups until you find the way that is causing the problem.
Once you find the problematic application, you can remove it or update it and check if that solves the issue.
For any information about the most popular OS, like news, tips, and how to fix various problems, explore our Windows 10 section. Use our Tech Troubleshooting Hub to get answers to any PC general questions and curiosities.
We hope that some of these solutions helped you to solve the restarting problem, if you have any suggestions or comments, please reach out to the comments section below.



User forum
0 messages