Screeching Sound From Laptop Speakers: Use These 7 Fixes
A driver update may be the fastest solution
Key notes
- Computer screeching sounds aren’t that common. However, they’re often signs of an impending total drive failure, so you must act fast.
- You can repair your drivers manually and with dedicated tools; we covered both possibilities below.

You’re not alone if you’re dealing with a screeching sound from your laptop speakers.
Several factors can cause this common issue, but the good news is that it can often be fixed quickly and easily.
In this article, we’ll provide you with some practical solutions to help resolve the screeching sound from your laptop speakers, so you can get back to using your computer in peace.
Why are my speakers making a screeching noise?
There are several reasons why laptop speakers can produce a screeching sound. Here are some of the most common causes:
- Damaged speakers – Physical damage to the speakers can cause them to produce a screeching sound. This can be due to being dropped, bumped, or otherwise impacted.
- Loose connections – The speakers may be loose or not correctly connected to the laptop, causing the sound to come out distorted.
- Outdated audio driver – An outdated audio driver can cause compatibility issues that lead to a screeching sound.
- Background noise – Other programs or processes running on your laptop may interfere with the audio output, causing a screeching sound.
- Malware infection – Malicious software can cause various audio and performance issues, including a screeching sound from the speakers.
- Overloaded audio system – Playing high-quality audio on a laptop with limited resources can cause the audio system to become overloaded, leading to a screeching sound.
- Faulty hardware components – A malfunctioning speaker or audio card can cause the speakers to produce a screeching sound.
- Volume levels too high – If the volume on the laptop is set too high, it can cause the speakers to produce a screeching sound.
Now we are past possible triggers, let us explore some solutions.
How can I fix the screeching sound from laptop speakers?
- Run the audio troubleshooter
- Perform a clean boot
- Reinstall audio drivers
- Update audio drivers
- Use a generic audio driver
- Place your hard drive
- Check volume and BIOS settings
1. Run the audio troubleshooter
- Press Windows + R, type control, and hit Enter.
- Go to the View by option in the top right corner, and select Large icons.
- Click Troubleshooting.
- Click the View all option on the left pane, and locate Playing Audio.
- Run Playing Audio troubleshooter (opens a pop-up window – follow the instructions).
2. Perform a clean boot
- Press Windows + R, type msconfig, and hit Enter.
- Click the Services tab, select Hide all Microsoft services box, then select Disable all.
- Go to the Startup tab, and click Open Task Manager
- Click on the start-up programs and select Disable.
- Close Task Manager, then click OK.
- Reboot your computer.
Performing a clean boot for your computer reduces software-related conflicts that can bring up the root causes of the computer screeching sound.
These conflicts can be caused by apps and services that generally start and run in the background when Windows starts.
You will have a clean boot environment after all these steps are carefully followed, after which you can try and check if the computer screeching sound goes away. If not, try the following solutions.
Can’t open Task Manager? Don’t worry; we’ve got the right solution on how to open Task Manager in Windows 10 or Windows 11.
If you lack time to go through every single troubleshooting tip mentioned below, there’s a shortcut that you need to know about from the very start.
Well, it involves uninstalling and reinstalling your audio driver. In this case, you can complete the procedure by following the above steps.
However, let us remind you that downloading drivers manually may cause conflict with the PC. It’s enough to make a simple mistake and install the wrong one.
That’s one unfortunate scenario only, yet many things can happen when you’re not mainly used to such procedures. So, don’t hesitate to install the Outbyte Driver Updater tool to prevent all potential issues.
Let us tell you more about how it works. Instead of worrying about making the right choice, Outbyte Driver Updater performs an efficient scan for you from a database of over 18 million drivers.
Later on, it does what knows the best – you can see how the download is progressing, and before updating your audio drivers, the app will even perform a quick backup for safekeeping.

Outbyte Driver Updater
Reinstall all drivers automatically with this dedicated software with a comprehensive scan.4. Update audio drivers
- Right-click Start and select Device Manager.
- Expand the Sound, Video, and game controllers option, right-click on the Sound card, and select Update driver.
- Select the option to Automatically search for updates.
- Restart your computer.
Another option is to update your audio drivers. You can apply the above steps or, even better, use the Outbyte Driver Updater tool we’ve told you about.
5. Use the generic audio driver
- Right-click Start and select Device Manager.
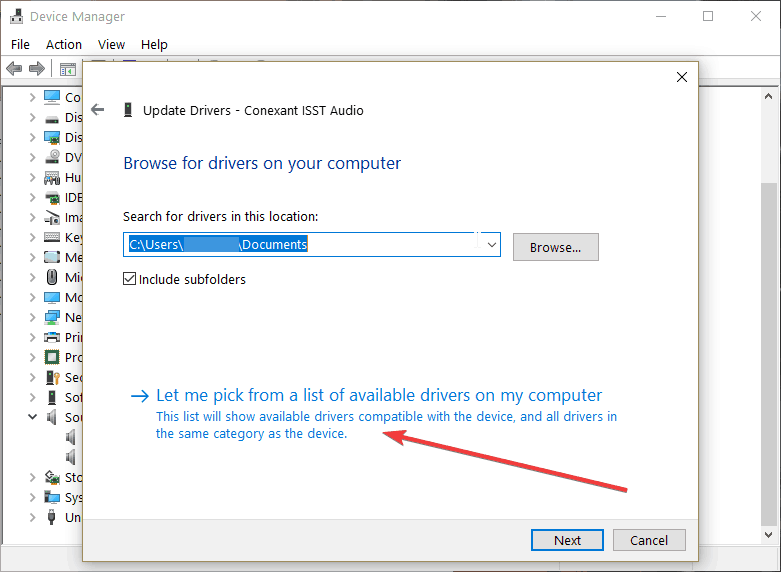
- Expand the Sound, Video, and game controllers option, right-click on the Sound card, and select Update driver.
- Select Browse my computer for driver software.
- Let me pick from a list of device drivers on my computer – that’s the option you need to choose next.
- Select the High Definition Audio device option and follow the installation instructions.
6. Replace your hard drive
If the computer screeching sound persists, then it may be a problem with the hard drive when the heads scrape the platters inside it.
Before you replace the drive, back up all your data from the computer, as the damage may cause data loss.
Check to confirm that it is not the hard drive, as it may be the computer fans making the noise as they also go bad. If you hear clicking sounds, then total drive failure is imminent.
Replace your drive ASAP after backing up your data, then restore it to your computer.
If it is the fans’ fault and not the hard drive, take off the side case and check if all fans are rotating. If there’s a dead one, you can replace it quickly and affordably.
While the side is open, you can also vacuum clean all air vents to remove any accumulated dust.
7. Check volume and BIOS settings
Sometimes the playback recorder may be set to Listen to this device, and this, along with mic amplification, can be set higher than usual, causing a feedback loop.
So the computer screeching sound you hear is an amalgam of the cooling fans, system sounds, and other ambient noises recycled through the mic and amplified continuously through the speakers.
Change the range of sound from high to optimum for the speakers to output.
You can also check your BIOS settings as sometimes – and on different computers – this is set to alarm when the CPU hits a specified level (degrees).
You can raise or lower this threshold and see if the computer screeching sound goes away.
Another reason for the computer screeching sound is your frame rates may be too high for the monitor, so you need to check the monitor refresh rate, usually at 500-60Hz, and set yours to match.
This will stop the noise from the capacitors on your graphics processor unit (GPU).
That would be all! Let us know if these solutions worked by leaving a comment in the section below.
Read our disclosure page to find out how can you help Windows Report sustain the editorial team. Read more


User forum
0 messages