How To Disable Driver Signature Enforcement in Windows 10
Find out how you can disable the driver signature enforcement safely
Key notes
- If you want to install unsigned drivers on your PC, you’ll have to disable the signature enforcement.
- There’s a signing code that you’ll have to modify to do just that.
- Keep in mind that you can disable the signature enforcement temporarily or permanently.

In this guide, you’ll learn four safe and tested ways to disable Driver Signature Enforcement on Windows.
Whether you’re dealing with unsigned device drivers or troubleshooting specific hardware compatibility, this step-by-step guide will help you do it right, without leaving your system exposed.
How do I disable enforcement signature?
1. Change the Startup settings
1. Press and hold the Shift key on your keyboard and click the Restart button.

2. Choose Troubleshoot > Advanced options > Startup Settings and click the Restart button.
3. When your computer restarts you’ll see a list of options. Press F7 on your keyboard to select Disable driver signature enforcement.
4. Your computer will now restart and you’ll be able to install unsigned drivers.
This is the simplest way to disable driver signature enforcement on Windows 10 but bear in mind that this method will only disable driver signature temporarily.
After you restart your computer driver signature enforcement will automatically turn itself on.
To disable driver signature enforcement do the following:
Bear in mind that this method only temporarily disables driver signature enforcement, so be sure to install all the unsigned drivers as soon as you can.
You can automatically install the drivers you need by using dedicated software that installs all of your out-of-date and missing drivers for you.
You can prevent these problems by using an automatic tool that will search and install the correct driver versions on your computer with just a few clicks. That's why we recommend you use Fortect and its Driver Updater feature. Here's how to do it:
- Download and install the Fortect app.
- Launch the software.
- Wait for the app to perform the initial scan of your entire PC or Laptop
- Afterward, navigate to the Driver Updater Section and start the scan process
- After the scan is complete, choose which drivers to update or click the update button

- Register and Activate for the full suite and automatic update, or use the 24-hour trial to update manually all that you have the time to
- Restart your PC to ensure the applied changes.
Disclaimer: In order to perform some operations, this software must be updated to the premium plan.
2. Disable driver signing code
Another solution is to use the Local Group Policy Editor. Keep in mind that you have to be careful while messing with the Policy Editor, and don’t modify anything else.
To disable the driver signing code, follow the steps:
- On your PC open Local Group Policy Editor: press the Win+R hotkeys and in the Run box enter gpedit.msc.

- In Local Group Policy Editor, from the left panel, click on User Configuration.
- Then, from the main window double-click on Administrative Templates.
- From the menu that will open double-click on System and then go to Driver Installation.
- Select the Code signing for device drivers entry.
- Select Enabled and from the dropdown located beneath, change to Ignore.
- Click Ok and apply your changes.
- Restart your Windows 10 system in the end.
3. Put Windows in test mode
If you don’t want to disable driver signing permanently, you can choose to enter the Windows 10 test mode.
In test mode, you can install any drivers you want without experiencing any problems. Don’t forget to go to normal Windows 10 mode after you solve your problem:
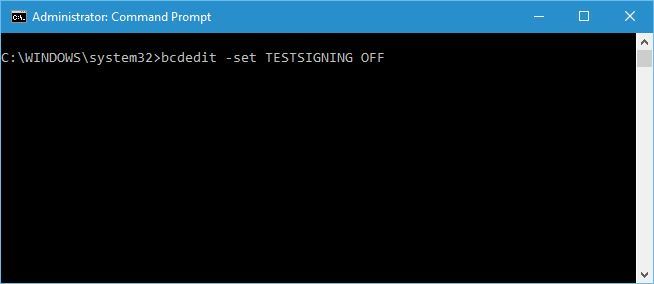
- Open an elevated command prompt window on your PC: right-click on the Windows Start icon and select Command prompt (Admin).
- In cmd type:
bcdedit /set TESTSIGNING OFF - Close the cmd window and restart your computer.
- Install your drivers.
- Revert back to normal mode: open elevated cmd, enter this command and restart your Windows 10 system:
bcdedit /set TESTSIGNING ON
4. Disable driver signature enforcement Windows 10 permanently
The previous solution will only disable driver signature enforcement temporarily. But if you want to disable it permanently, follow these steps:
- Press Windows Key + X to open Power User Menu. Select Command Prompt (Admin) from the menu.

- Once the Command Prompt opens, enter this command and press Enter:
bcdedit.exe /set nointegritychecks on 
- Optional: To enable driver signature enforcement back again, open the Command Prompt as administrator and enter:
bcdedit.exe /set nointegritychecks off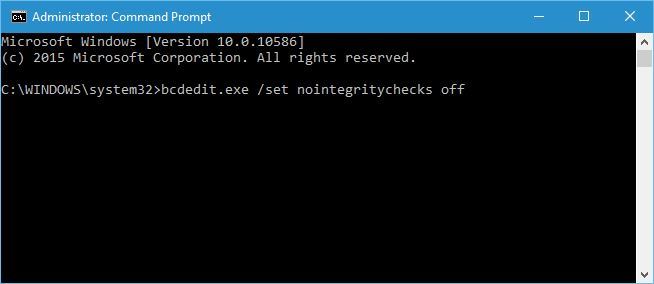
Alternatively, you can disable driver signature enforcement by using these steps:
- Start Command Prompt as administrator.
- When Command Prompt starts, enter the following lines:
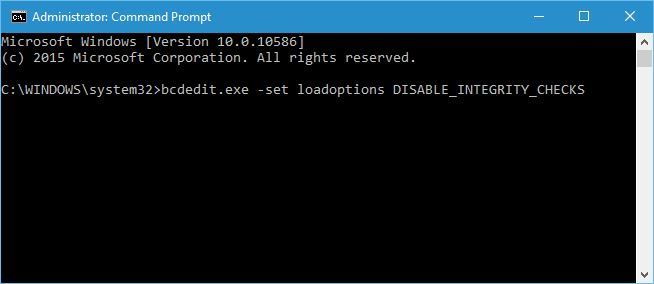
- bcdedit.exe -set loadoptions DISABLE_INTEGRITY_CHECKS
- bcdedit.exe -set TESTSIGNING ON

- bcdedit.exe -set loadoptions DISABLE_INTEGRITY_CHECKS
- Close Command Prompt and restart your PC.
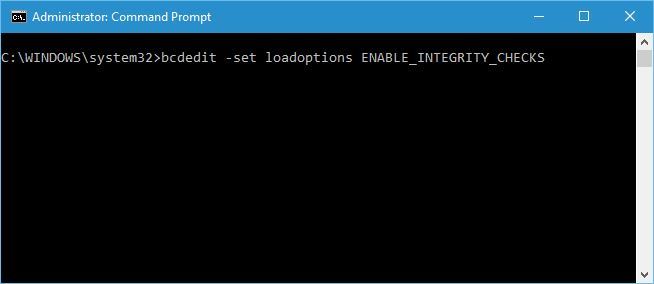
- Optional: To enable driver signature enforcement open Command Prompt as administrator and enter the following:
Bear in mind that using this solution will disable driver signature enforcement permanently, thus making your computer somewhat vulnerable.
Driver signature enforcement is a useful feature that provides extra protection, but sometimes extra protection can cause problems when installing certain drivers.
We hope that you now understand how driver signature enforcement works and how to disable it in Windows 10.
Issues such as Windows cannot verify digital signature – Code 52 will require you to disable signature enforcement, and this is safe to do, as long as you download drivers from official and trusted sources.
So if you encounter The driver has been blocked from loading the message, disabling the signature enforcement might be helpful.
For a more detailed walkthrough tailored to Windows 11, check out this step-by-step guide on disabling driver signature enforcement.
Do you know of any other workarounds? Feel free to share them in the comments section below.
Read our disclosure page to find out how can you help Windows Report sustain the editorial team. Read more


Improve this guide


User forum
13 messages