Fix: Windows Cannot Verify Digital Signature (Code 52)
Key notes
- If you happen to see the Windows cannot verify the digital signature - Code 52 message, you're entitled to suspect a driver-related issue.
- Whenever this error occurs, there's a chance that your USB ports will not recognize any hardware connected to them.
- Downloading and updating the drivers manually might be the answer to this problem, so apply the below procedures in that regard.
- Note that another quick tip involves resetting your BIOS by using the UEFI Firmware Settings.

Error Code 52 is considered to be a Device Manager issue because it’s caused by one’s device drivers and it can occur on any OS version, from Windows 7 to the newest Windows 11.
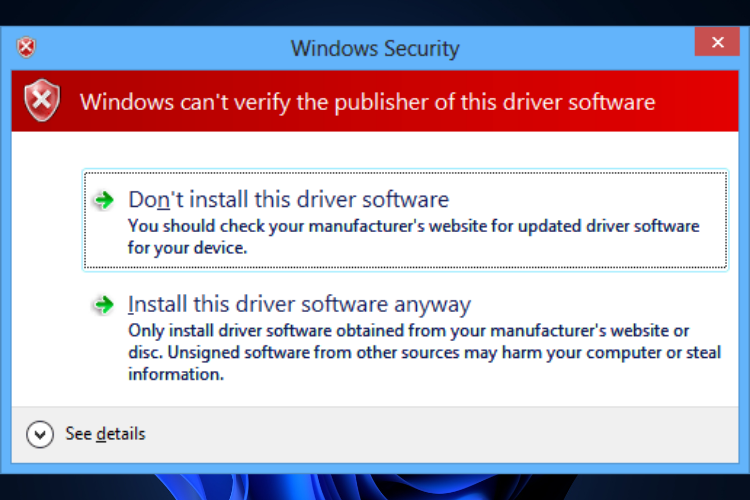
Our readers already know some of the best features in Windows 11 to upgrade for and they made the big step in this direction. However, some of them have asked us what they should do when they encounter the Windows cannot verify digital signature – Code 52 message in Device Manager or DXDiag. The full error is the following one:
Windows cannot verify the digital signature for the drivers required for this device. a recent hardware or software change might have installed a file that is signed incorrectly or damaged, or that might be malicious software from an unknown source. (code 52)
That being said, having a better understanding of why this error appears and how to better take care of your device and prevent this issue from happening in the future has become a necessity.
Is the digital signature mandatory?
According to Microsoft, the digital signature’s main purpose is to actively protect your system from threats and infections by making sure that the signer is trusted and that the files were not altered in any way after they were published.

Therefore, every single driver and program must be digitally signed before you install and run it on your device. But this isn’t always the case, as not all publishers and vendors are verified and neither are their products.
It is simply impossible for Microsoft to check all the drivers or programs that are published daily and have them digitally signed for your device’s safety.
That is why you can come across driver errors since the OS won’t allow an unsigned legitimate software or driver to work or load as it should.
Error Code 52 main causes
You are about to discover how to troubleshoot this issue, but first, understand that the most common cause is related to incorrectly signed driver files installed on your PC and it mostly occurs after updating or upgrading Windows.

Things are no different for those who discovered that their PC is eligible for a free upgrade after using WhyNotWin11. They’ve learned to download Windows 11 and it seems that this error is part of the package too.
Corruption in the Windows Registry from a recent software change can also lead to this issue, as well as problematic filters for USB or incompatible drivers installed in the system.
Some other reasons include damaged hardware, improper installation, or uninstallation of a program, and virus or malware infection that has corrupted Windows system files.
That’s why we strongly recommend using one of the best antivirus options for Windows 11 by taking into consideration elements such as scanning capabilities, ransomware protection, malware/virus removal, or resource consumption.
Even if it’s not a situation you want to be in, rest assured that we have the solution to this error. Some step-by-step guides are waiting for you below, so check them out.
How to fix the digital signature – Code 52 error on Windows 11?
1. Uninstall the driver manually
- Right-click on Start and select Device Manager.
- Go to the Universal Serial Bus controllers section and expand the menu.

- Right-click on your faulty driver, the one with the yellow exclamation mark next to it.
- Choose Uninstall from the menu.

- Click Yes to continue with the uninstallation.
- If you have more than one faulty driver, you should repeat the steps for each one.
- Reboot your PC to save the changes.
2. Download and install the driver
- Once again, open the Device Manager as in the previous solution.
- Right-click on your faulty driver but this time, click ok Update driver.

- Select the first option Search automatically for updated driver software.

- Windows will now try to find and install the latest driver for your PC.
- Follow the on-screen instructions to finish the installation process.
- After the update is complete, reboot your device.
You can also try Outbyte Driver Updater, a driver updater tool that will automatically perform the procedure if you do not want to go through the above steps to update your faulty drivers.
Even more, by choosing this software, you won’t put your computer at any risk by installing the wrong drivers and having to deal with errors all over again.
3. Run SFC scannow to fix the corrupt system files
- In the Search box, type command prompt and click on Run as administrator.

- After Command Prompt starts, enter the following:
sfc/scannow
- Press the Enter button and the System File Checker process will now start.
- Because the repair process can take a while, wait patiently while it completes and don’t close the window.
- Once the scanning gets completed, restart your computer and check whether the error Code 52 is still appearing.
If the scannow command has stopped before the process finished, there’s no reason to worry about. As always, we’ve got an easy fix for you.
4. Remove USB Upper Filter and Lower Filter entries
- Open the registry by pressing the Windows + R keys and typing regedit in the run box.

- Hit Enter and navigate to:
HKEY_LOCAL_MACHINESYSTEMCurrentControlSetControlClass{36FC9E60-C465-11CF-8056-444553540000}
- On the right pane, locate and right-click on the UpperFilters and select Delete option.

- Repeat the process for the LowerFilters as well, if you have the option.
- Restart your computer to save changes.
5. Perform a System Restore
- Press Windows + R on your keyboard to open the Run box.
- Type sysdm.cpl in the search box and click OK.

- Go to the System Protection tab.

- Click on the System Restore option.

- Click on Next and choose the desired System Restore point and follow the on-screen instructions to complete the system restore.

- Check if the error still persists.
System Restore is a recovery feature in the Windows operating system that allows you to restore your PC to an earlier state.
You can do a restore point manually, but you should know that your PC will usually create them on its own when installing new software, driver, or if you update your system.
6. Disable driver signature enforcement
- In the Search box, type command prompt and click on Run as administrator.
- When Command Prompt starts, enter the following lines:
set loadoptions DDISABLE_INTEGRITY_CHECKS
bcdedit -set TESTSIGNING ON
- Close Command Prompt and restart your device.
If you’re having trouble accessing Command Prompt as an admin, then you better take a closer look at our guide. This issue will become a thing of the past in no time.
 NOTE
NOTE
7. Disable Automatic Hardware drivers update
- Go to Start and click on Settings.

- Under the System option, scroll down until you find About and click on it.

- Next to Related links, select the Advanced System Settings option.

- In the new windows, go to the Hardware tab.

- Click on Device Installation Settings, select No, then Apply changes.

- This will prevent Windows from interfering with your hardware drivers in future updates, while keeping important security updates.
8. Boot your PC and disable driver signing enforcement
- Press the Start button and open Settings.
- Under the System option, scroll down until you find Recovery and click on it.

- Press on Restart now next to the Advanced startup.

- A pop-up will appear where you’ll need to click on Restart Now again.

- In the Choose an option screen, select the Troubleshoot option.

- Now click on Advanced options.

- Select Startup Settings.

- Press on the Restart button.
- Your PC will restart and show you different boot options. Press the 7 or F7 key to Disable driver signature enforcement.

- The computer will now automatically restart with the driver signature enforcement disabled.
The default boot location is none other than your hard drive where the operation system is installed. However, if the above method isn’t for you, have a look at our guide and discover how simple it is to boot from USB too.
9. Reset your BIOS
- Follow the above steps until you reach to the blue screen with Advanced options, or step 7. Now, select UEFI Firmware Settings.

- Click Restart to continue.

- Your computer should shut off and then load a setup menu. Look for the Reset the system button.
- Because the interface may vary, pay attention to phrases such as Load Setup Defaults or Load Default Options. Selecting one of these options will open a dialog box. Select Yes and your default settings should be restored.
- Now simply exit and startup your PC as usual.
If you are having trouble resetting your BIOS, you should definitely check out this article and find out how to easily update your BIOS. This brings you access to new features and increased stability.
What happens if I disable driver signature enforcement?
As previously said, this Windows feature pretty much guarantees you that your drivers are authentic and unbroken by malicious apps.
A digital signature is an integral part of any operating system, meant to protect your system and prevent you from installing unverified drivers.
When it comes to Windows, the OS actually requires that a driver belongs to a verified developer and that the driver understands that it simply cannot be fraudulent.
If you disable signature enforcement, there will be nothing to prevent you from installing broken, poorly-written, or malicious drivers, which can easily crash your system.
You can also temporarily shut it down, as the ongoing lack of verification can lead to negative computer performance.
So if you don’t wish to disable driver signing permanently, or want to know how to enable it back on, you should check out our full comprehensive guide on driver signature verification.
We hope that this guide has successfully helped you in resolving the issue and your PC is now error-free. Even more, learn all about the latest Windows 11 preview build 22000.65 and be on the lookout for its bugs but also its newest features.
Use the comments section below and tell us which method has helped you fix the problem. If you have any suggestions or know of another solution, then feel free to share them with us as well.
Read our disclosure page to find out how can you help Windows Report sustain the editorial team. Read more


Improve this guide


User forum
0 messages