How to Enable Running Scripts on Windows 10
You can use the Settings app to enable it
Key notes
- Enabling running scripts on Windows 10 allows you to execute and run various types of scripts, such as PowerShell scripts or batch files.
- You can enable it using the Settings app, PowerShell, Group Policy Editor, or Registry Editor.
The ability to run scripts on Windows 10 can empower users with automation, customization, and troubleshooting capabilities.
This guide will guide you through the process of enabling running script on Windows 10, highlighting the benefits and considerations involved.
What are the benefits of enabling running scripts on Windows?
Enabling the execution of scripts can be beneficial in many ways. Some of them are mentioned here:
- Automation – Allows you to automate repetitive tasks and processes, thereby streamlining operations such as software installations and file management, saving you time & effort.
- Customization – Enables you to create scripts to modify system settings, personalize the user interface, configure network settings, or tailor applications to your preferences.
- Troubleshooting and maintenance – It allows you to develop diagnostic scripts that gather system information, check for errors, and perform automated troubleshooting steps.
- Script-based applications – Ensures you can fully utilize the capabilities of these script-based applications, thereby allowing you to leverage additional features and functionalities.
- Task streamlining – This allows you to combine multiple tasks or commands into a single script, simplifying complex processes.
Overall, it empowers users with greater control, efficiency, and customization, ultimately improving productivity and system management capabilities.
However, it’s important to note that running scripts can pose security risks if executed from untrusted sources or without proper validation.
How can I enable running scripts on Windows 10?
Before engaging in advanced troubleshooting steps, you should consider performing the following checks:
- You must have administrative rights to the machine.
- Check if you have Windows PowerShell installed. If not, download and install it from the Microsoft website.
Once you are through these checks, move to different steps to run scripts on Windows.
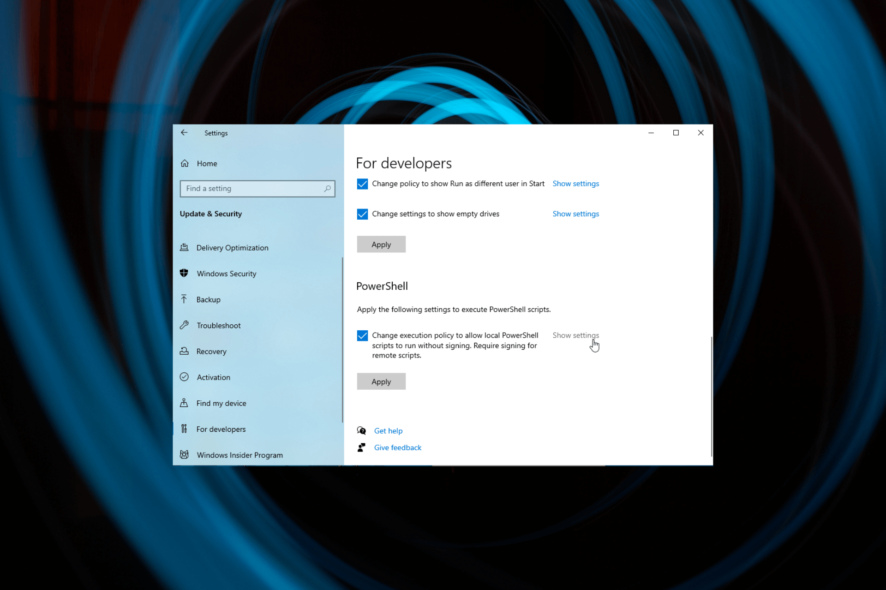
1. Use the Settings app
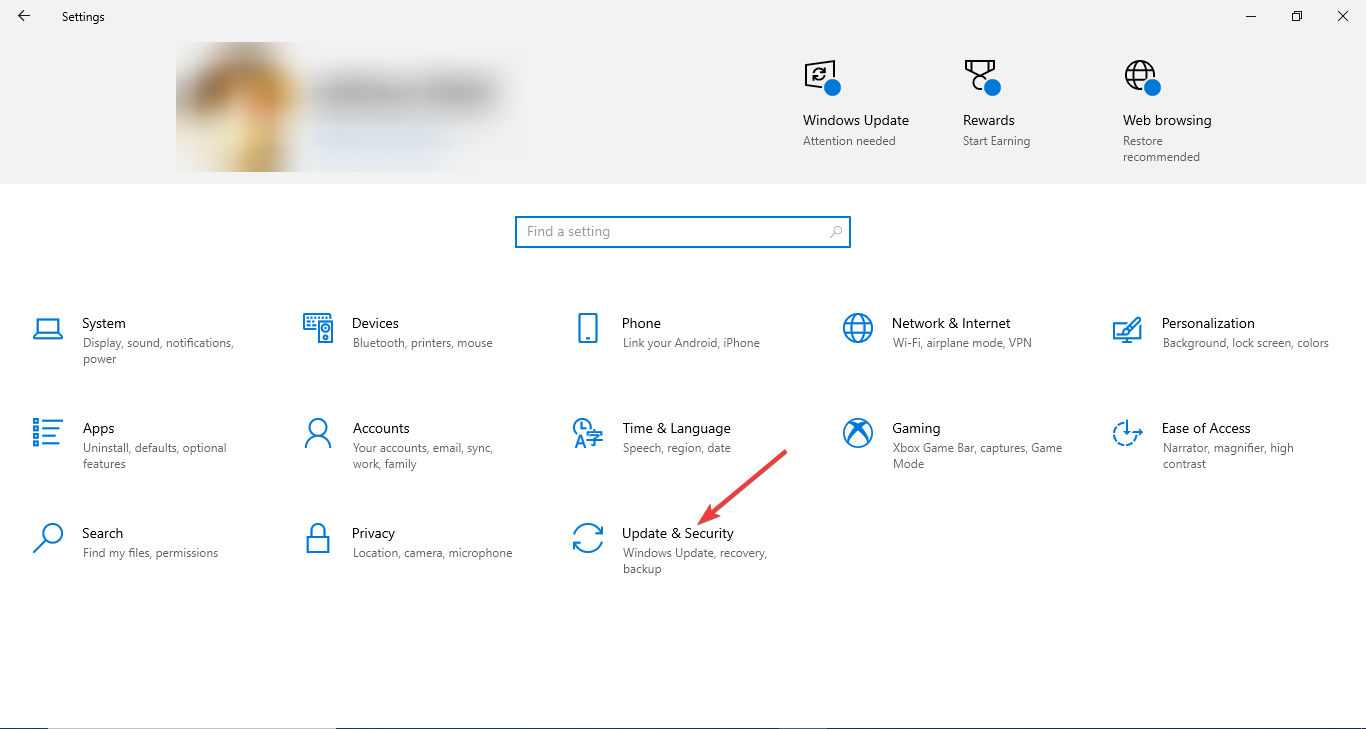
- Press Windows + I to open the Settings app.
- Go to Update& security.
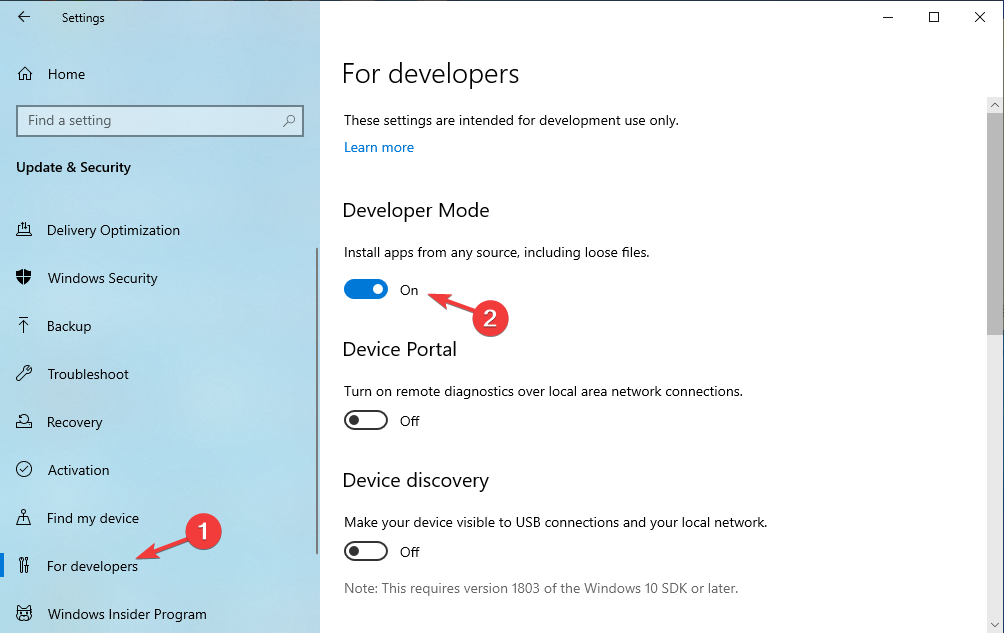
- From the left pane, select For developers.
- Toggle on the switch under Developer Mode.
- Locate and expand PowerShell and place a checkmark next to Change execution policy to allow local PowerShell scripts to run without signing. Require signing for remote scripts.
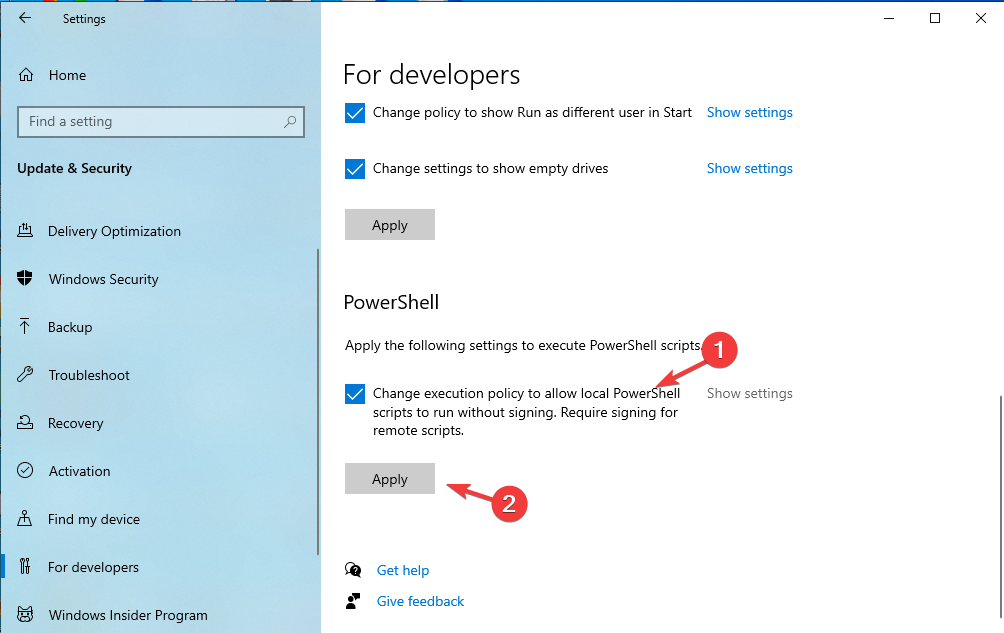
- Click Apply.
- Close the Settings window and try running the scripts you want.
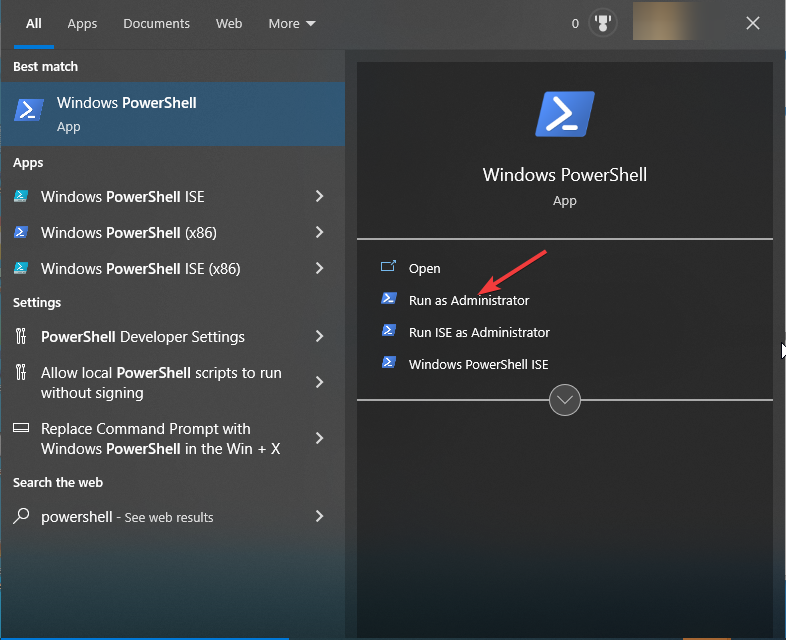
2. Use Windows PowerShell
- Press the Windows key, type powershell and click Open.
- Copy & paste the following command to enable running scripts on Windows 10 for the current user, and hit Enter:
Set-ExecutionPolicy Bypass -Scope CurrentUser -Force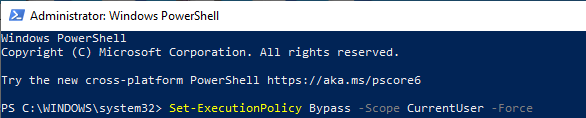
- Type the following command to enable running scripts for the local machine and press Enter:
Set-ExecutionPolicy Unrestricted -Scope LocalMachine -Force - However, if you are concerned about security, you can enable it on a per-script basis or per-instance basis. For that, copy & paste the following command and hit Enter:
Set-ExecutionPolicy Bypass -Scope Process -Force
Now you can run the script on your Windows 10.
3. Use the Group Policy Editor
- Press Windows + R to open the Run console.
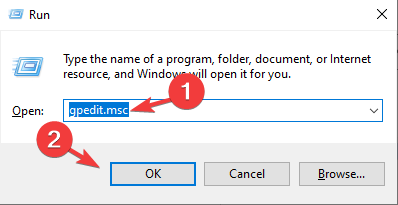
- Type gpedit.msc and click OK to open the Group Policy Editor.
- Navigate to this path:
User Configuration\Administrative Templates\Windows Components\Windows PowerShell - From the right pane, double-click Turn on Script Execution to open its Properties.
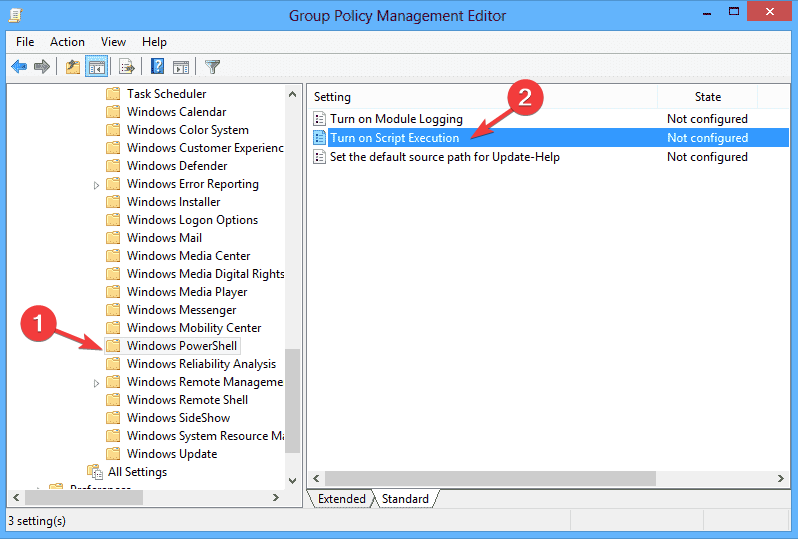
- Select the Enabled option, and under Options, select Allow all scripts from the drop-down for Execution Policy.
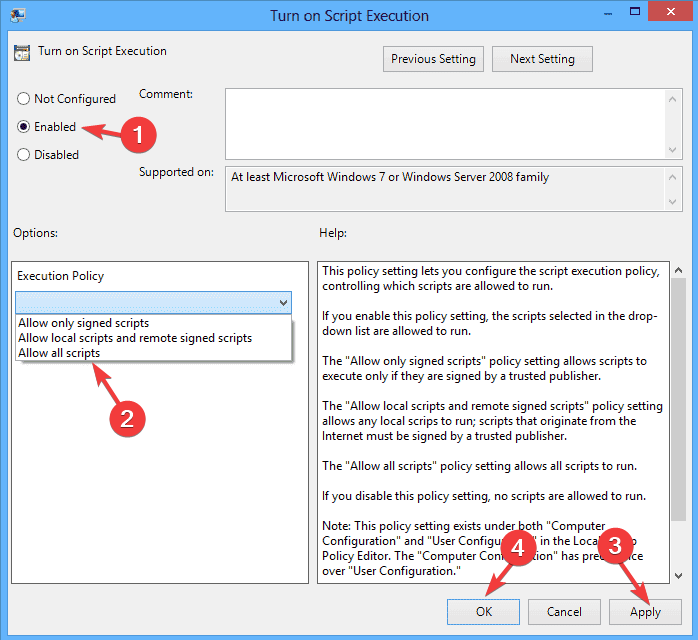
- Click Apply, then OK.
4. Modify the registry entries
- Press Windows + R to open to Run dialog box.
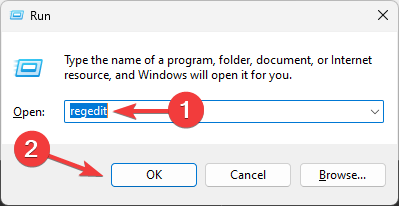
- Type regedit and click OK to open the Registry Editor.
- Navigate to this path:
Computer\HKEY_LOCAL_MACHINE\SOFTWARE\Microsoft\PowerShell\1\ShellIds\Microsoft.PowerShell - Locate and double-click the ExecutionPolicy entry to edit the string.
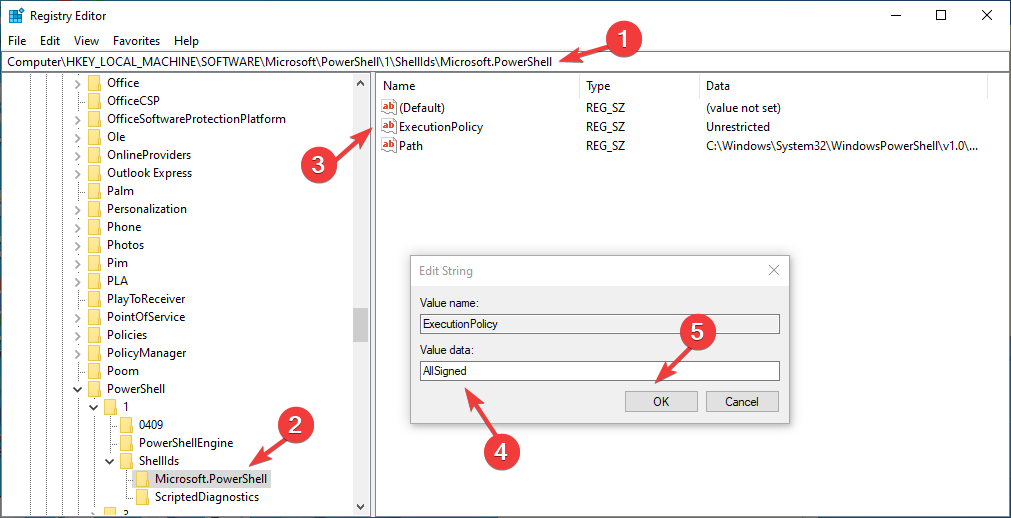
- Change the Value data to either AllSigned or RemoteSigned to enable it.
- Click OK to confirm the changes.
So, these are methods to enable running scripts on Windows 10. It’s important to exercise caution when enabling script execution, as it can pose security risks.
You must only enable scripts from trusted sources and consider the potential consequences before changing the script execution policy.
If you are still not able to run scripts on PowerShell, then check out this informative guide to find the solutions
Please feel free to give us any information, tips, and your experience with the subject in the comments section below.
Read our disclosure page to find out how can you help Windows Report sustain the editorial team. Read more


Improve this guide


User forum
0 messages