Epson Scan 2 Professional Mode Not Working [Fix]
Update the software and scanner drivers to get rid of the issue
Key notes
- If Epson Scan 2 has no Professional mode, it might be because your software or scanner drivers are outdated.
- Update your software and drivers to fix this.
- For some users, resetting or reinstalling the app completely did the trick.
Epson Scan is a popular software with a large user base of Epson devices, given its excellent set of features. Yet, users encounter several serious Epson Scan issues. A common problem is when the Epson Scan 2 Professional mode is not working.
The problem can be caused by misconfigured settings or even a trivial bug, rendering the software ineffective to a large extent. So, let’s find out all about the issue.
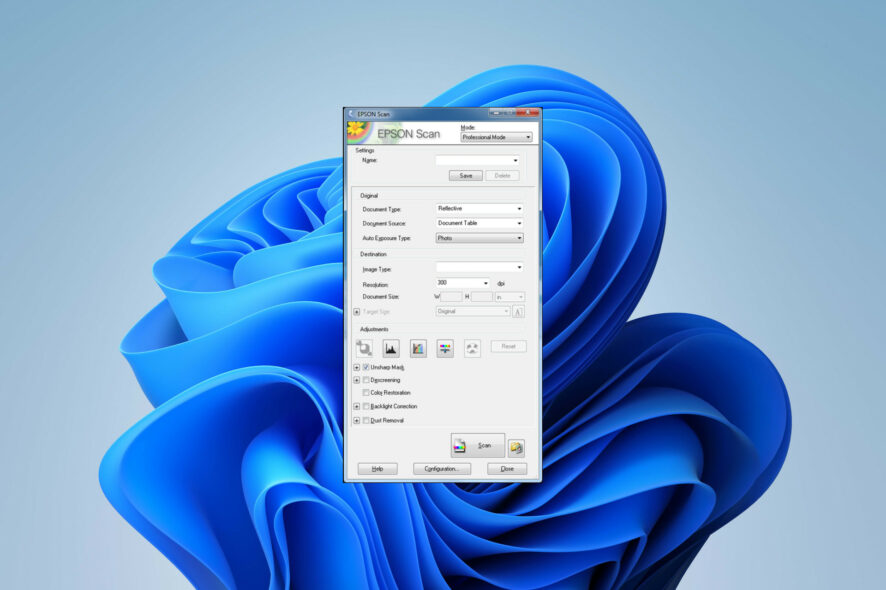
Why is my Epson Scan 2 Professional mode not showing?
Professional mode allows total control of scanning settings. Scanning in Professional mode in Epson Scan 2 allows you to check the changes you make live in the preview image and to save your file into a .jpeg format automatically.
These are just some additional features you miss if your Professional mode isn’t working. The functionality might be malfunctioning due to any of the following reasons:
- Recent update or outdated OS: Ironically, a recent OS update and an outdated Windows can result in the issue at hand. Some encountered the problem after a recent Windows 11 update, while others faced it when running an old version of Windows.
- Outdated Epson software: If you’re not running the latest version of the Epson software, you might be missing some important features, including the Professional mode.
- Missing or damaged scanner drivers: If the drivers aren’t up-to-date, missing, or damaged, this will most likely lead to the issue. Always make sure your drivers are updated to their latest version.
How do I get my Epson Scan 2 into Professional mode?
Before you dive into advanced troubleshooting, you can try these workarounds:
- Ensure you have the latest version of the Epson software: Epson regularly releases updates to address bugs and compatibility issues. So, before anything else, ensuring you have the latest software version is important.
- Restart the scanner and the computer: A simple restart might sometimes solve a temporary software glitch. If the issue isn’t persisting and has accidentally appeared, an easy solution like this might actually save you.
- Check for software conflicts: Certain apps can occasionally interfere with Epson software, preventing the Professional mode from working correctly. Try to disable your trusted antivirus software or any third-party scanning programs installed on your PC to see if that resolves the issue.
If the software still isn’t functioning properly, here’s what you can try to enable Professional mode:
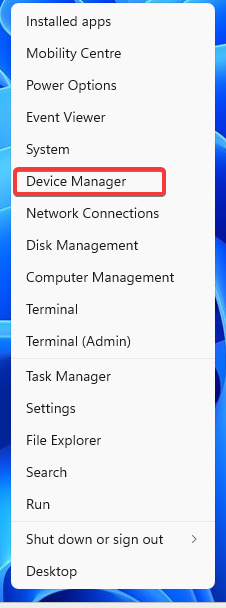
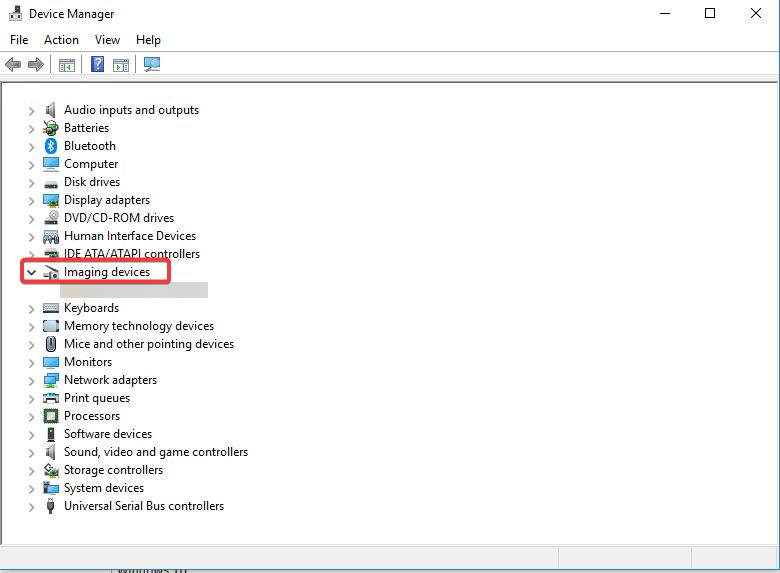
1. Update scanner drivers
- Press Windows + X key to open the pop-up menu. Choose Device Manager.
- Double-click the Imaging Devices section.
- Right-click the device under it and select the Update Driver option.
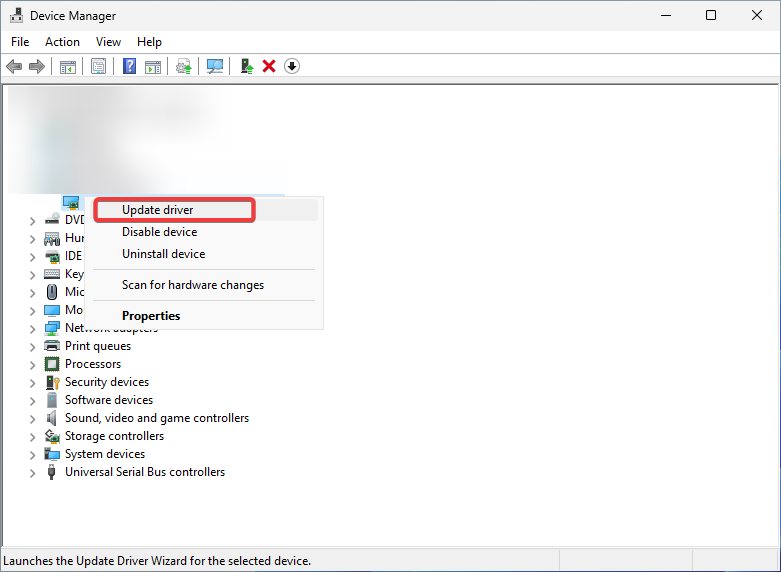
- Choose Search automatically for drivers to install any available driver updates.
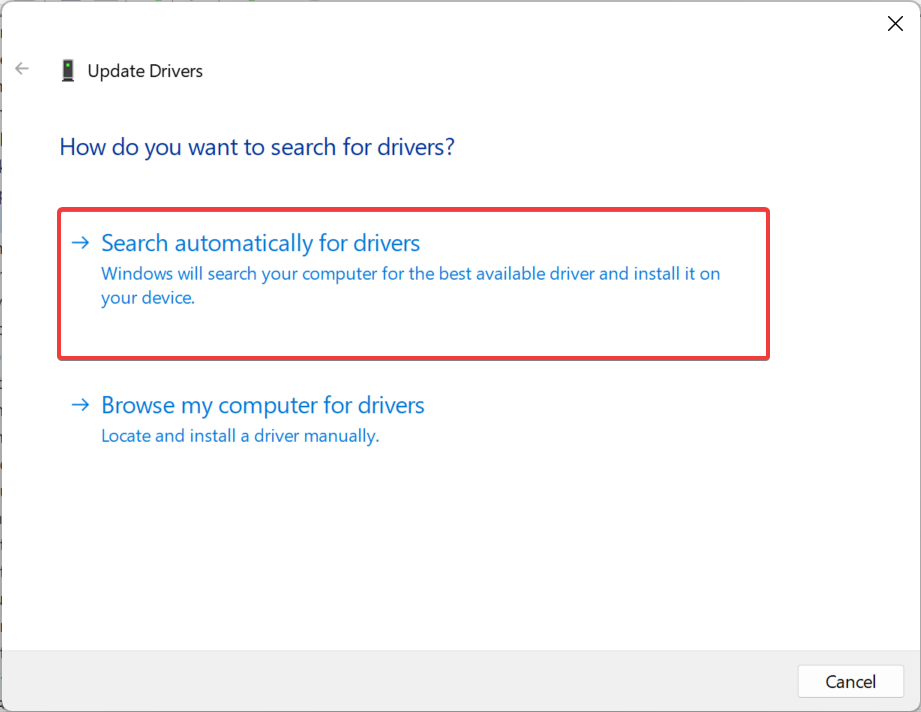
- Restart your PC.
Usually, such issues are caused by either the software or problems with the scanner connected to it. The latter include faulty or missing drivers as a common culprit. Make sure your drivers are up-to-date to get rid of such issues.
Alternatively, you can manually download and install the latest versions of your drivers. However, this is a bit advanced, while the above option allows Windows to handle the entire process for you.
You can prevent these problems by using an automatic tool that will search and install the correct drivers on your computer with just a few clicks. That's why we recommend you use Outbyte Driver Updater. Here's how to do it:
- Download and install the Outbyte Driver Updater app.
- Launch the software.
- Wait for the app to detect all incompatible drivers.

- Afterward, it will show you a list of the drivers found to select the ones to Update or Ignore.
- Click on Update & Apply Selected to download and install the newest versions.
- Restart your PC to ensure the applied changes.

Outbyte Driver Updater
Use this software and solve all driver-related issues from your PC.2. Reset Epson Scan 2 settings
- Press Windows and type Epson into the search box. Open your Epson Scan software.
- Choose the Other tab and click the Reset button.
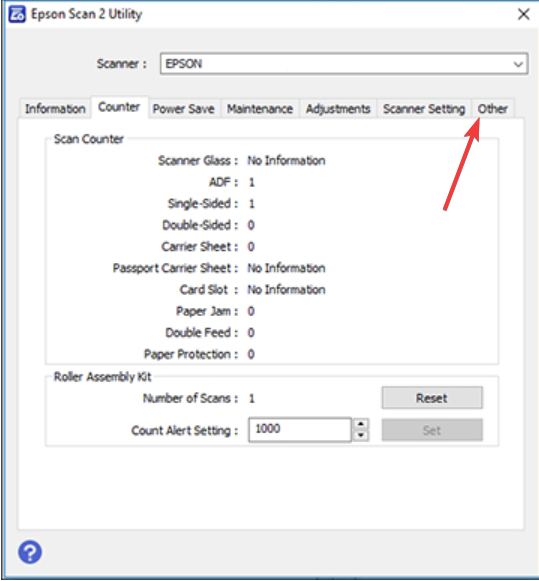
- Wait for the process to complete and restart your PC.
If updating your drivers didn’t work, you’ll need to troubleshoot the software itself. Resetting it will clear bugs or potential glitches that might lead to the Epson Scan 2 Professional mode not working error.
3. Reinstall Epson Scan 2
- Hold Windows + I key to open Settings. Go to Apps and then Installed apps.
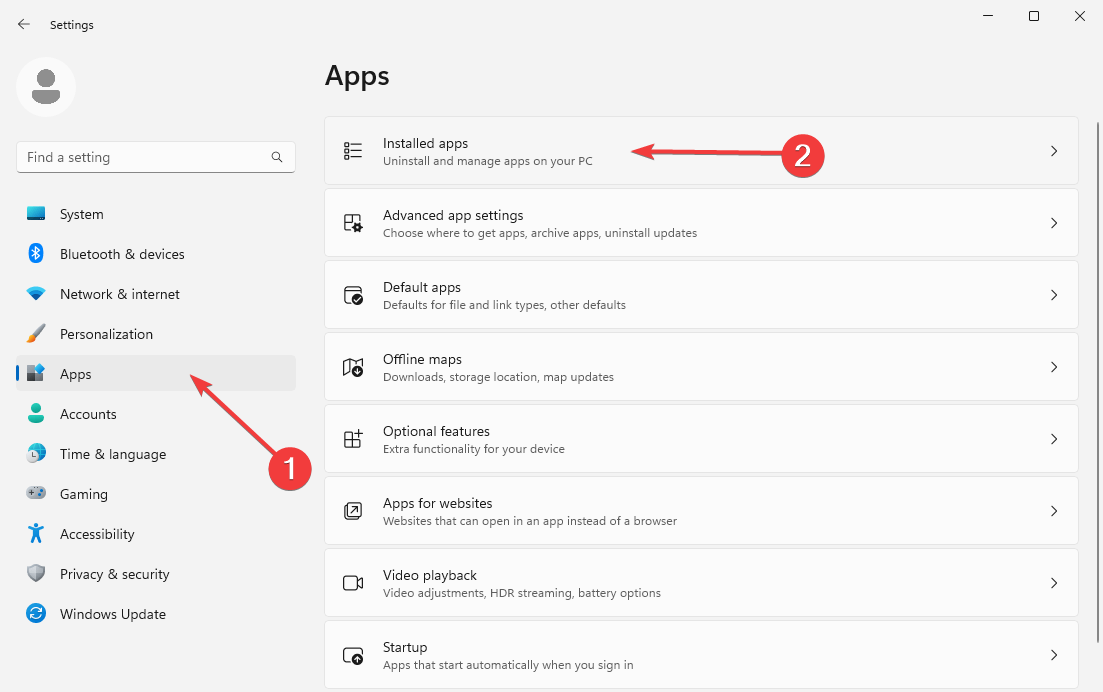
- Locate the Epson Scan software in the list of apps below. Click on the three horizontal dots on the right and choose Uninstall.

- Follow the on-screen prompts to complete the removal process. Then visit the official Epson scanners web page.
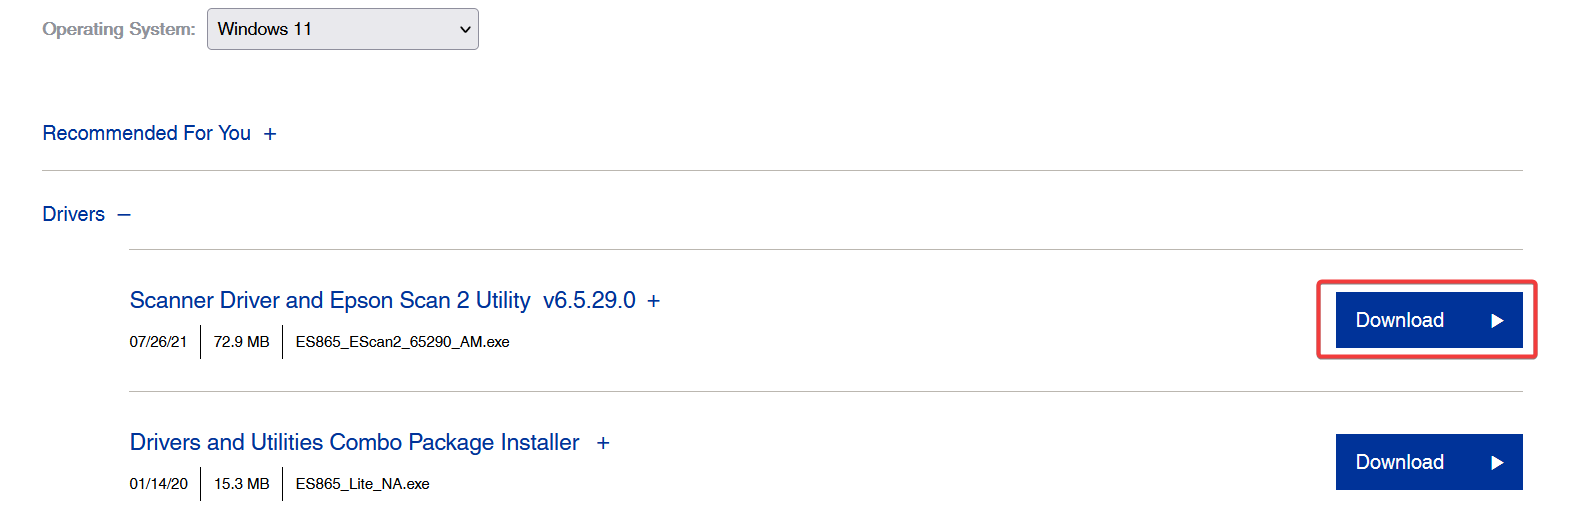
- Choose your scanner and then your specific model from the list.
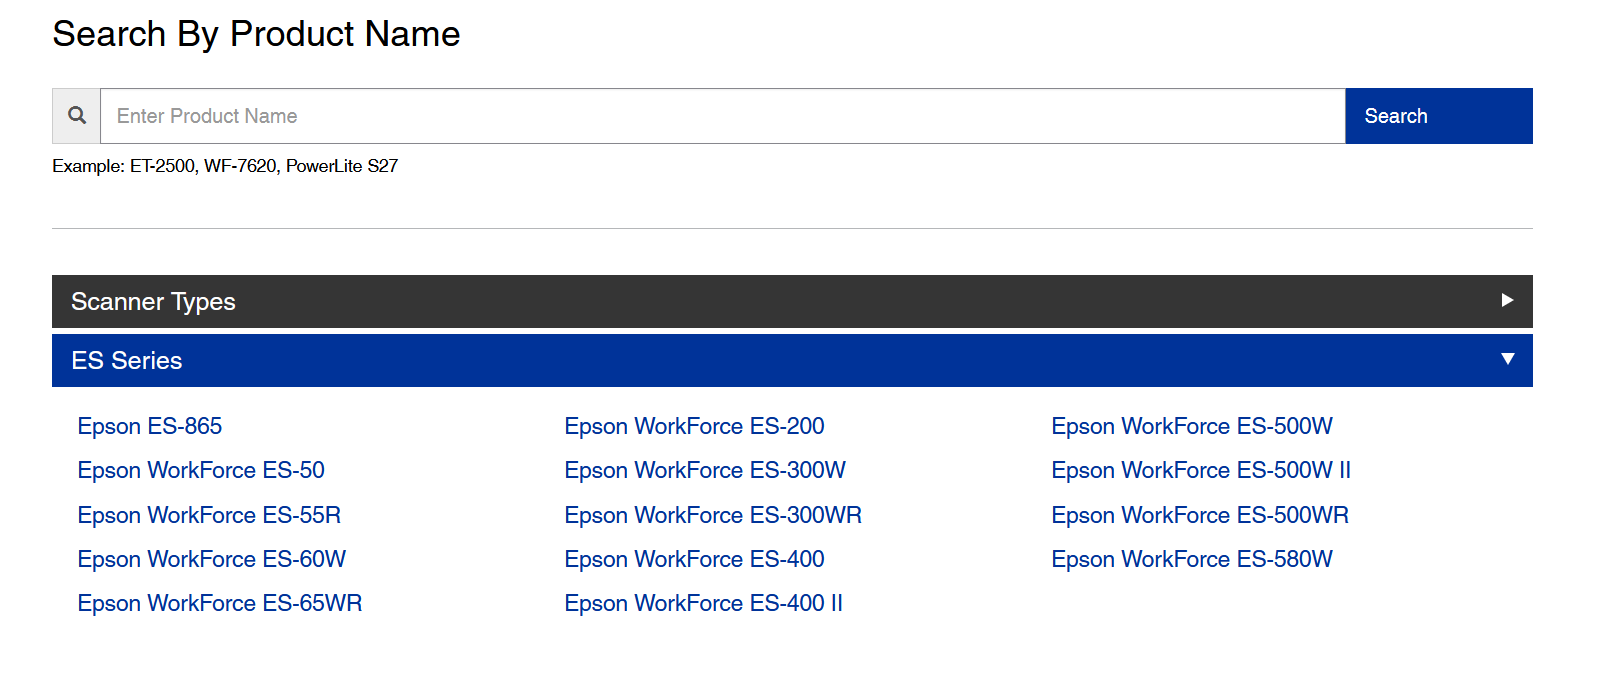
- It’ll detect your OS version automatically. Open the Driver drop-down menu, choose the Scanner Driver and Epson Scan 2 Utility option, and click the blue Download button on the right.
- Open the setup file and run the installation wizard. Follow the instructions to complete the process and then restart your PC.
If none of these worked, you might consider contacting Epson’s customer support for further assistance or just using an alternative scanner software for your Windows device as a workaround.
However, we are positive these will help you solve things when Epson Scan 2 Professional Mode is not working.
Did these solutions work for you? Let us know in the comment section below.
Read our disclosure page to find out how can you help Windows Report sustain the editorial team. Read more


Improve this guide


User forum
0 messages