Windows Update Error 0x80240017 [SOLVED]
Third-party antivirus or corrupted files are likely to blame for this issue
Key notes
- It seems that more and more users are having difficulties updating built-in apps and programs.
- The Windows 10 update error 0x80240017 is one of the most common ones.
- To fix it right away, you may run the built-in troubleshooter or fire up a System File Checker scan.
One of the most common issues that might occur while updating Windows’s built-in apps and programs is the 0x80240017 error code.
Read this article to find out how to fix it and get your updates up and running.
What causes the error 0x80240017?
The error code 0x80240017 usually appears due to the fact that your system has changed after you installed a third-party application.
It can also occur because something has changed in the registry after a reboot and you do not have the required system permissions.
This troubleshooting guide will show you what solutions you can use to fix this error once and for all.
How can I fix the Windows Update error 0x80240017?
1. Clear and reset the Microsoft Store cache
- Reboot your operating system.
- To start Windows 10, log in with your administrator account if you haven’t already.
- Go to your Desktop tile and hold the Windows and R buttons at the same time.
- Now you have the Run window in front of you.
- In the Run dialog box, enter the WSReset.exe command.
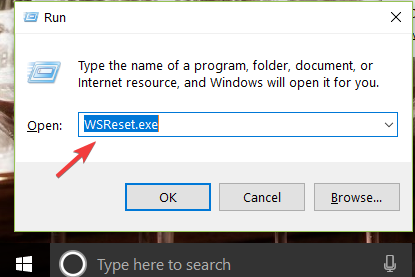
- Press the Enter key on the keyboard.
- Reboot your operating system once more and log in again with your administrator account.
- Check if the error persists.
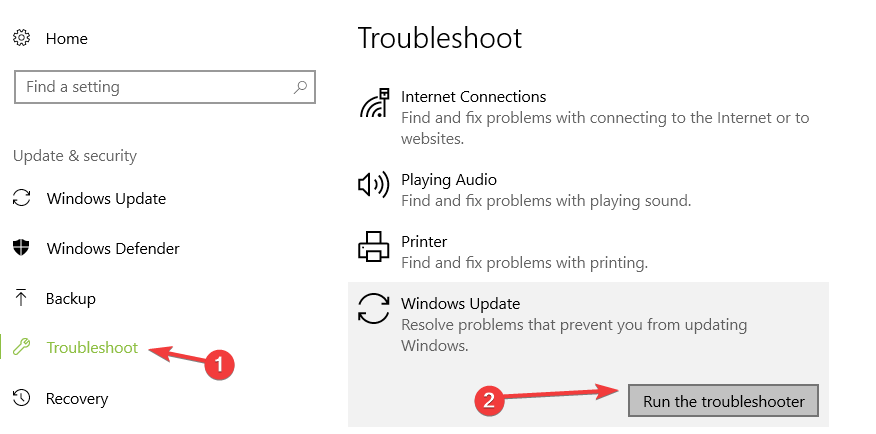
2. Run the built-in Windows Update Troubleshooter
- Go to Search > type settings > double click on the first result.
- Go to Update & Security > select Troubleshoot.
- Now in the Troubleshooting window, locate the Windows Update Troubleshooter.
- Select the Windows Update troubleshooter and run it.
- Now a scanning process will begin and it will tell you if any issues have been found and fixed.
- Follow the on-screen instructions to finish the troubleshooting steps.
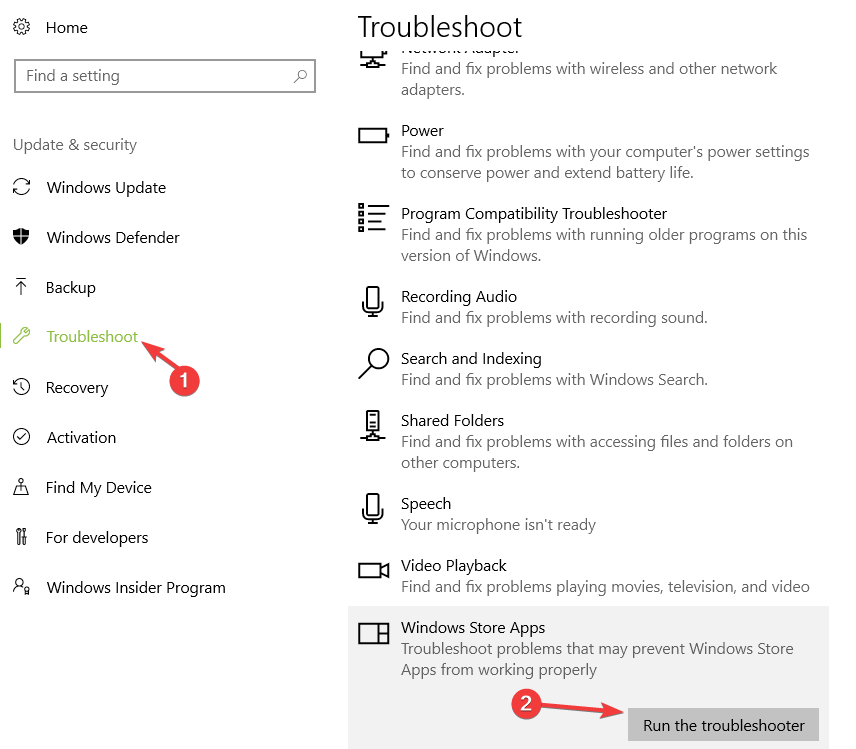
- Scroll down and run the Microsoft Store Apps troubleshooter as well (follow the same steps listed above).
- Reboot your Windows 10 device.
- When the device starts, check if you still get error code 0x80240017 while trying to update your apps and programs.
3. Take full control over File Explorer and the WindowsApps folder
- Reboot your Windows 10 device and log in with your administrator account.
- Open the C:/ partition or wherever partition you have installed your Windows 10 OS on.
- Double click to open the Program Files folder.
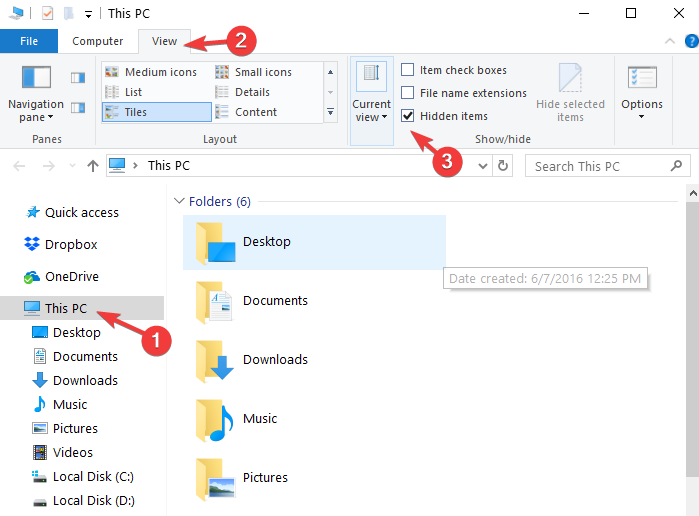
- Select the View tab situated on the upper side of the File Explorer.
- From the list that appears, check the box next to Hidden items under the Show/hide topic.
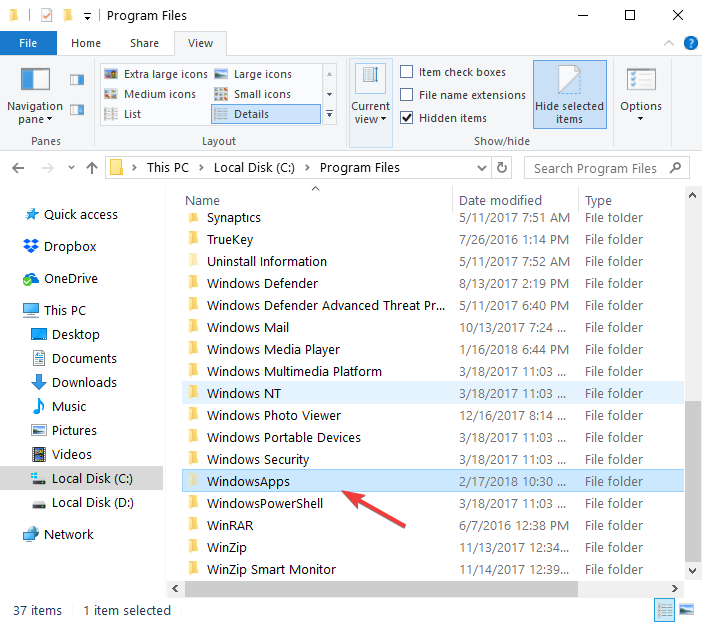
- Now in the Program Files folder, locate the WindowsApps folder.
- Select the WindowsApps folder.
- Select the Properties feature you have on the menu that appears.
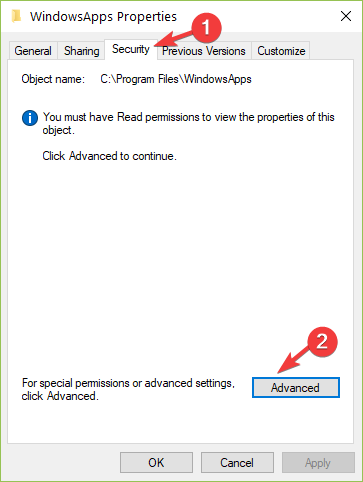
- Go to the Security tab situated in the upper side of the Properties window.
- Select the Advanced button.
- Double click on the username you use.
- Make sure that the Type field is set to Allow and This Folder, subfolders and files.
- Check the box next to Full Control.
- Left-click or tap on the OK button.
- Open the C: partition once more.
- Double click on the Users folder to open it.
- Double click on your username to open the folder.
- Double click to open the AppData folder.
- Double click to open the Local folder.
- Now, within the Local folder, search for the WindowsApps folder.
- Right-click on the WindowsApps folder.
- Left-click or tap on the Properties feature.
- Left-click or tap again on the Security tab.
- Left-click or tap on the Advanced button.
- Now you will need to set the permissions for this folder as you did for the one above.
- Left-click or tap on the Apply button again.
- Left-click or tap on the OK button > close all the windows you opened so far.
- Reboot your Windows 10 PC.
- After the device starts, check again to see if you still get the error 0x80240017.4.
4. Run SFC scan
If certain system files got corrupted or deleted, this may trigger update issues and errors. Fortunately, you can quickly fix this problem by running a System File Checker scan.
This tool will quickly scan your system and identify missing or corrupted files which will then replace. Here are the steps to follow:
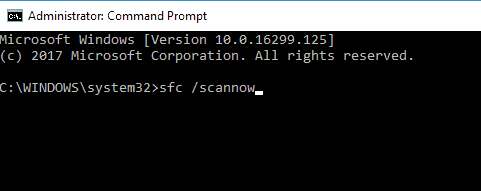
- Go to Start > type cmd > right click on the first result > Run Command Prompt as administrator.
- Type the sfc /scannow command and hit Enter.
- Wait until the process completes and then restart your computer > check if this workaround solved your problem
5. Reinstall the Microsoft Store app
Sometimes, the Microsoft Store itself is the culprit for all the issues and errors that you’re experiencing. In this case, the quickest solution is to simply uninstall the Microsoft Store app.
- First of all, log out of the app.
- Then, navigate to Start > go to Apps & features > type store in the search box.
- Select the Windows Store app > click on Uninstall.
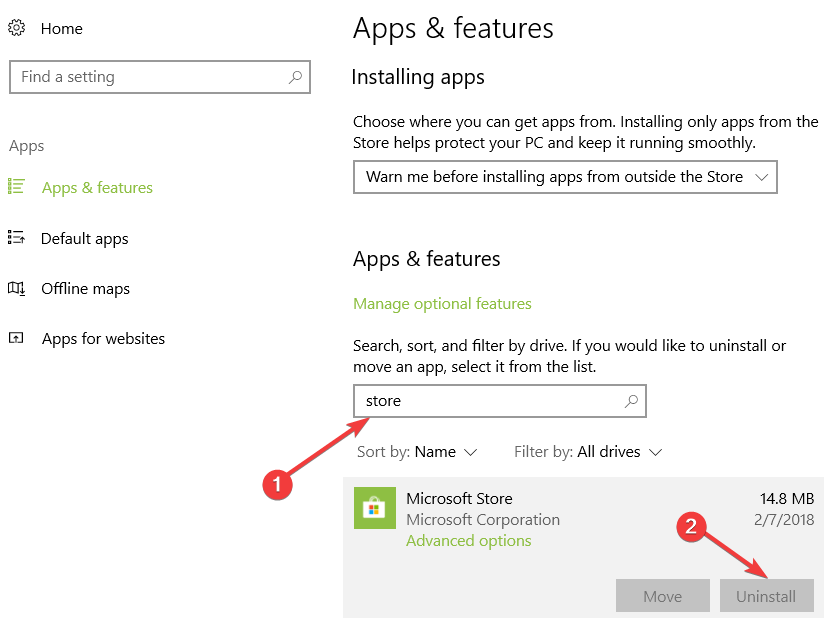
- Restart your PC.
- Reinstall the Microsoft Store app> log in and try to install the latest app updates to see if the issue persists.
6. Scan your computer
If the error persists, try running a full system scan. Viruses, malware and other types of cyber threats could also trigger error 0x80240017 when you try to update your apps.
If you haven’t installed a reliable antivirus solution on your computer yet, check out this list of the best antivirus tools that you can use on your Windows 10 machine.
Install the one that suits your needs best, and run a full system scan.
7. Reset your PC
Note: It is recommended that you back up your files and folders before attempting the steps below
- Go to Settings > Update & Security.
- Select the Recovery feature.
- You will have there an option named Refresh your PC without affecting your files and under it, you will need to select the Get Started button.
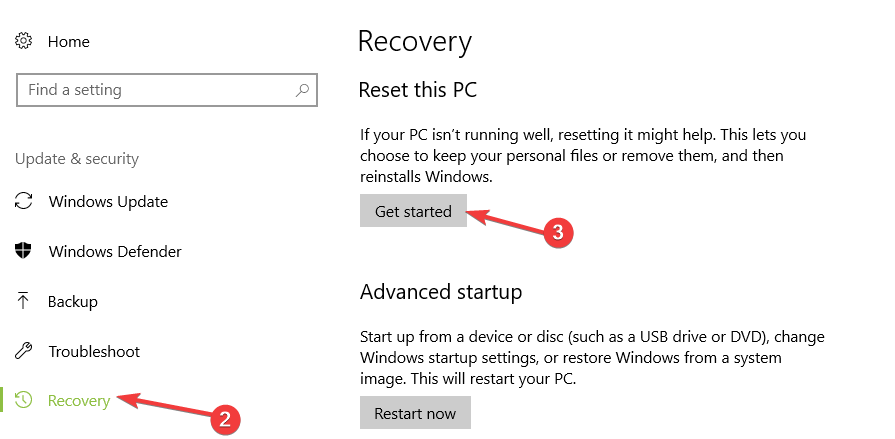
- Now follow the on-screen instructions finish the Reset process.
- Reboot your Windows 10 device.
- Check again to see if error 0x80240017 has been fixed.
8. Reinstall the OS
If the methods above did not work, then I would suggest you backup your important files and folders that you have in your Windows 10 directory and perform a complete reinstall of the operating system.
If necessary, check out this guide on how to fix Windows can’t automatically find new drivers.
That’s it, we hope these methods fixed error 0x80240017 on Windows 10 when you try to use the update feature.
If you do have additional questions related to this subject, you can list them in the comments section below. We will get back to you as soon as possible.
Read our disclosure page to find out how can you help Windows Report sustain the editorial team. Read more


Improve this guide


User forum
2 messages