The file size exceeds the limit allowed and cannot be saved
5 min. read
Updated on
Read our disclosure page to find out how can you help Windows Report sustain the editorial team Read more
Key notes
- If you're getting an ERROR_FILE_TOO_LARGE message, you might need to compress the file.
- In case some settings need changing, we're showing you exactly how to do it.
- Our Troubleshooting Hub is a resourceful option whenever you need to fix blocker errors like this one.
- If you ever need expert advice on using SharePoint, visit our Teamwork section.

System errors can be a big problem, and many users reported ERROR_FILE_TOO_LARGE errors on their PC.
This error usually displays the following message: The file size exceeds the limit allowed and cannot be saved.
Today we’re going to show you how to fix this error on Windows 10.
How do I fix the file size exceeds the limit allowed error?
1. Use WinZip as a file compression tool
Perhaps the easiest, and the first-on-the-list solution, is to try and compress the respective file or files with a dedicated tool.
WinZip is the most popular app in this segment, with more than one billion users.
With WinZip, you can compress most major formats, such as Zip, Zipx, RAR, 7z, TAR, GZIP, VHD, XZ, and more, so you won’t have any trouble quickly shrinking the size of any file to get rid of or avoid the above-mentioned error.
In case you need further features, WinZip helps with finding, opening, editing, moving, and sharing the files stored on PCs, networks, or cloud services.
It conveniently comes with Dropbox, G-Suite, or OneDrive integrations.
”WinZip”
”Try
2. Modify your registry
- Press Windows Key + R and enter regedit. Press Enter or click OK.
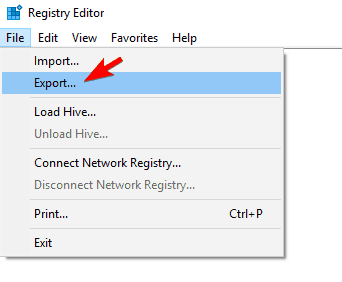
- Optional: Modifying the registry comes with certain risks, and if you don’t modify it properly you can cause system stability issues to occur. To prevent any potential problems, it’s important to backup your registry. To do that, click on File > Export.
Select a safe location for your backup. Enter the desired file name, select All as Export range and click on Save.
After exporting the registry, you can use the exported file to restore everything to the original state if anything goes wrong.
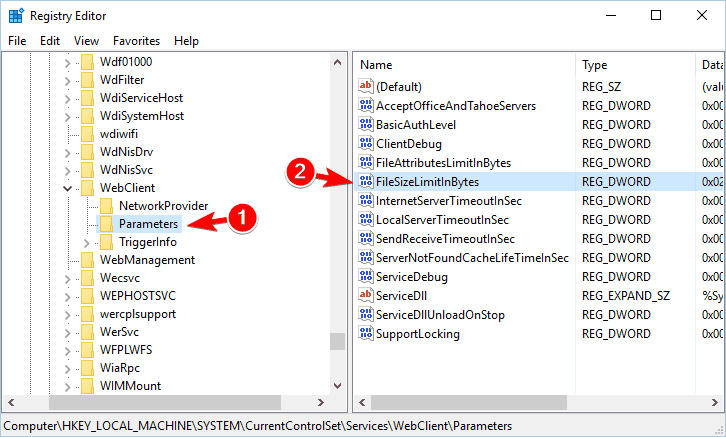
- In the left pane navigate to the following location
HKEY_LOCAL_MACHINESYSTEMCurrentControlSetServicesWebClientParameters - Locate FileSizeLimitInBytes DWORD in the right pane and double click it.
- In the Value data field enter 4294967295 and click OK to save changes.
- Close Registry Editor.
After doing that, you just need to restart your PC and the issue should be resolved.
By modifying the registry you’ll change the maximum file size to 4GB. Instead of restarting your PC, some users are recommending restarting the WebClient service. To do that, follow these steps:
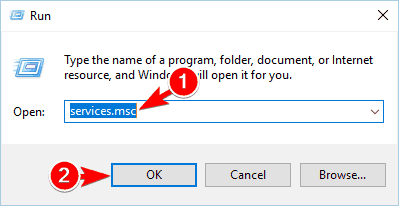
- Press Windows Key + R and enter services.msc.
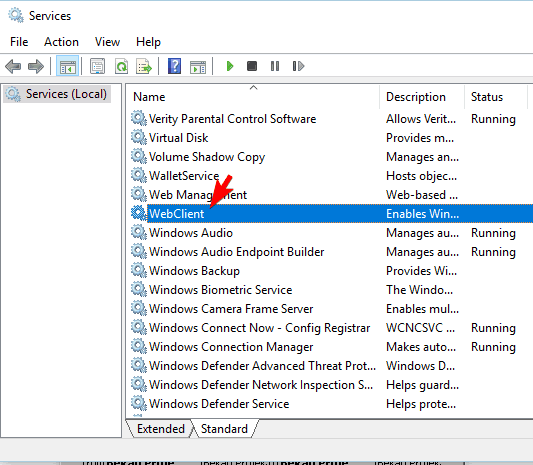
- Locate the WebClient service and restart it.
- Close the Services window.
After you restart the service, changes will be applied and the file size limit will be removed.
3. Scan your PC for viruses
Several users reported that this error can occur due to malware infection.
That’s why we strongly advise you to perform a detailed scan using a dedicated anti-malware program.
To perform this efficiently and get a detailed report of your system’s health status, you should use powerful anti-malware tools. Hence, you can select the best antiviruses for Windows 10.
4. Configure your SharePoint storage
Few users reported that The file size exceeds the limit allowed and cannot be saved message appears with files located in the SharePoint folder.
To fix this issue, users are suggesting configuring your SharePoint storage so it can save larger files.
Apparently, SharePoint has a storage limit, but you can easily change it. After doing that, you should be able to save files without any issues.
5. Set a file size upload limit
- Login to SharePoint’s Central Admin and navigate to Central Administration > Application Management > Manage Web Applications.
- Select the applications you want to change and click on General Settings.
- Once the General Settings opens, you’ll see Maximum upload size value. Change that value to 2047 MB and save changes.
After performing these steps, the error message should be gone.
6. Change the SharePoint web.config file
- Open Internet Information Server console on server desktop.
- Open the Websites tree and select the desired website. Select Open in Explorer View option.
- Locate web.config file in the folder.
- Create a copy of that file and use it as a backup in case anything goes wrong. Open the original web.config file with Notepad (or any other text editor).
- In the Notepad text, locate the <httpRuntime maxRequestLength=”51200″ /> line and change it to <httpRuntime maxRequestLength=”204800″ />.
- Repeat these steps for each server in SharePoint.
7. Increase the machine-level request setting
- Open the SharePoint Administrative Command Prompt.
- Enter the following command:
%windir%system32inetsrv appcmd set config -section:requestFiltering -requestLimits.maxAllowedContentLength:209715200 - You should receive a confirmation message after applying this command.
As seen, The file size exceeds the limit allowed and cannot be saved error usually affects SharePoint users. We truly hope that using one of our solutions has been helpful.
We’d appreciate it if you’d tell us which solutions you tried or if you have further suggestions on this topic.


