3 Easy Ways to Fix Corrupted Desktop Icons in Windows 10
Rebuilding your icon cache with Command Prompt can fix this issue
4 min. read
Updated on
Read our disclosure page to find out how can you help Windows Report sustain the editorial team Read more
Key notes
- Unfortunately, system corruption can cause your icons and shortcuts to be corrupted as well.
- To fix this issue, you can run some commands to rebuild the icons on Command Prompt.
- Another effective fix is to run the Disk Cleanup feature and restart your PC.
Windows users often complain about corrupted desktop icons. Windows’s icons for your documents and programs are saved in an icon cache.
So they can be displayed quickly instead of having to load them every time slowly. If, for any reason, one or more Windows icons are corrupted, you can repair them by rebuilding the icon cache.
Windows 10 Start menu corrupted icons are an issue among some users; others in previous OS editions have also encountered this issue.
Here are the easy fixes to repair corrupted desktop icons on Windows 10/11. All you need to do is follow the instructions in the letter, and you will be fine.
Why are my icons and shortcuts corrupted?
The main reason icons and shortcuts are corrupted is faulty icon cache. If they’re corrupt, you may have trouble deleting shortcuts. You can fix this by rebuilding the icon cache.
Alternatively, you can manually delete the icon cache on your PC. We have explained these solutions in detail in the subsequent section of this guide.
How do I fix corrupted desktop icons in Windows 10?
1. Use Command Prompt
- Press the Windows key + S and type cmd.
- Select the Run as administrator option under Command Prompt.
- Type the commands below and press Enter after each:
ie4uinit.exe -showtaskkill /IM explorer.exe /FDEL /A /Q "%localappdata%\IconCache.db"DEL /A /F /Q "%localappdata%\Microsoft\Windows\Explorer\iconcache*"shutdown /r /f /t 00 - Note that the last command will instantly restart your PC. So, save your work before your run it.
One of the easiest ways to fix the corrupted or blank white icons and shortcut on the desktop on Windows 10 and 11 is to run the above commands. This will clear the icon cache and return normalcy.
2. Manually delete the icon cache file
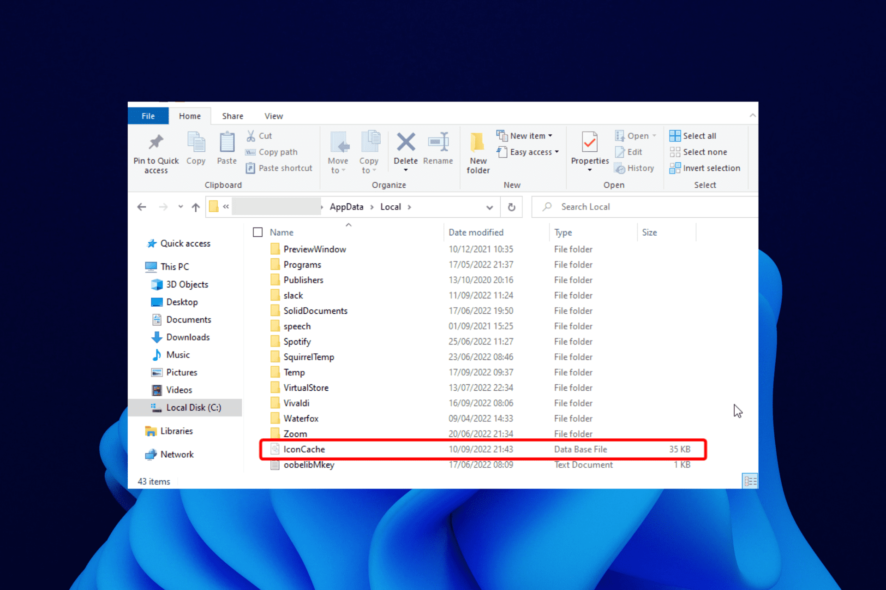
- Open File Explorer and click the View tab.
- Check the box next to Hidden items.
- Now, navigate to the path below:
C:Users/username/AppData/Local - Scroll down in the Local folder until you locate the IconCache file.
- Right-click on the file and click Delete.
- Now, right-click on the Recycle Bin icon on the desktop and click Empty Recycle Bin.
- Finally, restart your computer.
Another effective method to fix the corrupted icons and shortcuts on Windows 10 is manually deleting the icon cache. Note that username is your account user name on the PC, and C is the drive letter of the drive where Windows 10 is installed.
After restarting your PC, check if your icons are changed unexpectedly on Windows 10.
3. Use Disk Cleanup
- Open File Explorer and right-click on the C: drive.
- Choose the Properties option.
- Click the Disk Cleanup button.
- Check the box for Thumbnails.
- Finally, click the Clean up system files button and wait for the process to complete.
Following the steps described above, you will manually delete the icon cache file and restart your computer to let Windows 10 automatically create the new icon cache file.
How do I fix the problem with desktop shortcuts on Windows 11?
- Right-click on any space on your desktop and select View.
- Click the Show desktop icons option.
- Finally, right-click on the desktop again and select Refresh.
In most cases, the problem with desktop shortcuts on Windows 11 is due to wrong settings. The solution above should fix the issue more often than not.
Also, you can use any of the solutions for how to fix corrupted icons and shortcuts in Windows 10 to solve this issue on Windows 11.
How do I reset my icons on Windows 10?
- Right-click on any space on the desktop and click View.
- Choose Show desktop icons.
- Lastly, right-click again and select the Refresh option.
After refreshing the desktop apps, all icons and shortcuts should reset.
With the fixes above, we believe you have everything needed to fix the corrupted icons and shortcuts issue on Windows 10 and 11.
If you want to know how to fix Windows 10/11 icons that are too big, check our detailed guide to do it quickly and effectively.
Let us know if you could rebuild your icons and shortcuts with the solutions in this guide in the comments below.

