5 Methods to Fix Intel Display Audio if it's not Working
Repairing damaged files is an important step
Key notes
- The Intel display audio driver allows you to hear the background music, and its sudden freeze can take that away and make some apps unresponsive.
- You will need to check your audio drivers and update or replace them as per the case.

Some Windows users reported getting Intel display audio not working prompts while playing games or accessing online multiplayer games.
This audio could be very annoying and reduce user experience on many computer activities.
Here is all you need to know if you belong to this category.
What is Intel display audio?
To transfer sound to a monitor connected through a DisplayPort that can play audio or HDMI, you must choose Intel Display Audio or a similar option when choosing your audio device.
Intel display audio, in a nutshell, sends audio through a video adapter to be used with any video interface.
Why is Intel display audio not working?
This error prevents users from hearing background music and sometimes makes apps unresponsive. There are a few reasons for your Intel display interface to stop working. Among these include:
- Incompatible drivers – On Windows 10, drivers are essential for connecting software to hardware; if faulty, you may expect errors like this Intel display problem.
- Broken or bad Registry – The registry may sometimes include some damaged Registry Items. These things are often corrupted or destroyed registry entries that might remain after a file has been removed or uninstalled.
- Bad system files – System files are essential to properly running a computer. If they are bad, they may trigger the audio problem.
Sound problems have always been recorded in several Windows versions, and Windows 10 is no exception.
Here are some practical solutions if you’re experiencing issues with the Intel display audio driver in Windows 10.
How can I fix the Intel High Definition Audio not working problem?
- Run the SFC and DISM scan
- Reinstall your sound drivers
- Manually update Intel audio drivers
- Run a Windows Audio service check
- Run Windows update
1. Run the SFC and DISM scans
1. 1 Running the SFC scan
- Right-click on Start and select Command Prompt (Admin).

- Type the script below and hit Enter.
sfc /scannow
- Wait for the scanning process to complete, then restart your computer. All corrupted files will be replaced on reboot.
The aftermath of malware or virus infection can lead to missing system files leading to Intel display audio not working.
Even though antivirus software may be used to remove the corruption, the system files could be overwritten, corrupted, or even damaged.
So, to repair the critical system files that will prevent the Intel display audio driver from working, you need to run a System File Checker (SFC) scan.
System File Checker utility program checks for the authenticity of all system files and fixes problematic files afterward.
In addition, you can also run DISM to repair Intel display audio driver issues in Windows 10. Finally, deployment Image Servicing and Management can also fix corrupt system files.
To make sure that the SFC didn’t miss anything, we recommend using a specialized repair tool that can scan, find, and repair any corrupted or damaged files.
1.2 Running the DISM scan
- Right-click on Start and select Command Prompt (Admin).
- Copy and paste the following command on the command line and hit Enter:
DISM /Online /Cleanup-image /Restorehealth
- If the DISM can’t obtain files online, try using your USB or DVD installation. Insert media and type the following command, and hit Enter:
DISM.exe /Online /Cleanup-Image /RestoreHealth /Source:C:RepairSourceWindows /LimitAccess - Be sure to replace the C:
/RepairSourceWindows the path of your DVD or USB.
2. Reinstall your sound drivers
- Press Windows Key + X to open the Win + X menu.
- Select Device Manager from the list.

- Locate your audio device, right-click it, and choose Uninstall device from the menu.

- Once the driver is uninstalled, click the Scan for hardware changes icon.

- After doing that, Windows will install the default audio driver
- Restart your computer to confirm the changes
If you have a corrupt Intel audio driver on your Windows 10 PC, it is more likely that you’ll experience the Intel display audio not working problem.
Therefore, you need to reinstall the drivers to their default state from Device Manager.
After reinstalling the drivers, the Intel display audio not working issue should be resolved after following the steps above.
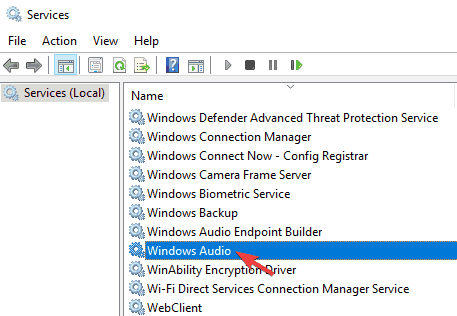
3. Run a Windows Audio service check
- Press Windows Key + R.
- In the Run menu, type services.msc, press Enter, or click OK.

- When the Services window opens, locate Windows Audio and double-click on it to open its Properties.
- Set the Startup type to Automatic, and click the Start button to start the service.
- Click Apply and OK to save changes.
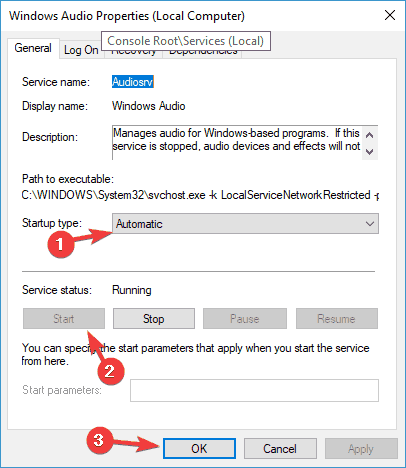
- Restart the PC afterward.
Sometimes, the Windows Audio service may be disabled, leading to the Intel display audio not working prompt.
Therefore, you need to check whether the service is disabled or not; but if it is disabled, you have to enable it.
4. Manually update Intel audio drivers
- Download the Intel audio drivers from Intel official website.
- Extract the downloaded driver to a specified folder on your PC.
- Press Windows Key + X and select Device Manager from the list.
- Locate the device you want to update, right-click, and choose Update driver.

- Select the Browse my computer for driver software option. This option will enable you to install the driver software manually.

- Choose the Let me pick from a list of device drivers on my computer option.

- Click the Have Disk button.

- The Install From Disk window will now appear. Click the Browse button and locate the driver on your hard drive. After you select the driver, click the OK button.

- After doing that, the driver will be automatically installed on your PC.
Since outdated system drivers can cause the Intel display audio not working problem, you should update your Intel audio drivers.
Note: You need to download the driver from the Intel official website and then extract it to any folder on your PC before you proceed.
Alternatively, you can use automated tools to update Intel drivers to fix the Intel display audio not working problem.
We strongly recommend Outbyte Driver Updater automatically download all the outdated drivers on your PC.
5. Run the Windows update
- Press Windows Key + I to open the Settings app.
- Now navigate to the Update & Security section.

- Click the Check for updates button.

Microsoft frequently releases Windows updates to improve the OS and fix various driver issues, such as Intel audio drivers.
Therefore, you can run a Windows update to solve Intel display audio not working problem.
Remember that you can use the workarounds presented in this article to solve driver issues, not just the ones we addressed today.
If you have any questions or suggestions, let us know in the comments below.
Read our disclosure page to find out how can you help Windows Report sustain the editorial team. Read more


Improve this guide


User forum
1 messages