How to Fix Nvspcap64.dll not Found Error on Windows 10/11
The quickest fix is to disable NVIDIA GeForce Experience
![]() 3 min. read
3 min. read
![]() Updated on
Updated on
Share this article
Improve this guide
Read our disclosure page to find out how can you help Windows Report sustain the editorial team. Read more
This problem is associated with the NVIDIA GeForce Experience, in turn, related to NVIDIA Capture Server Proxy which is a proxy server used whenever streaming or recording takes place in ShadowPlay.
However, NVIDIA ShadowPlay is used to record and share gameplay videos, screenshots, and live streams with people. Disabling NVIDIA GeForce Experience worked like a charm so here’s what you do:
How can I fix nvspcap64.dll not found on Windows 10?
1. Disable NVIDIA GeForce Experience from startup
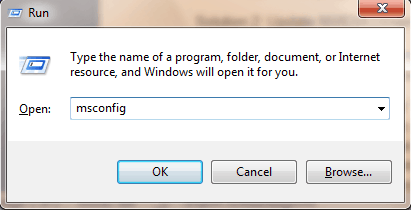
- Press the Windows and R key at the same time to launch the Run program.
- Type msconfig without quotes and click on OK.

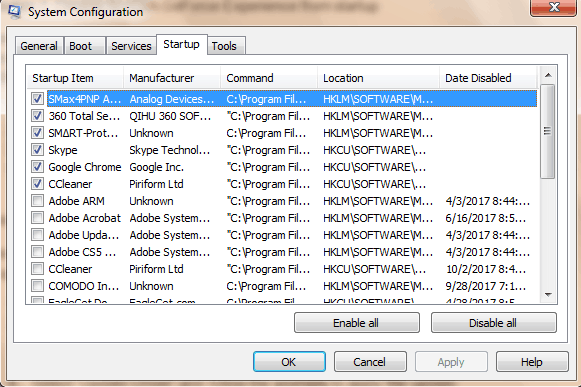
- Now, click on the Services tab.

- Here, uncheck the NVIDIA GeForce Experience Service box (or any other NVIDIA application programs) and click on OK.
The startup error nvspcap64.dll can be fixed by disabling NVIDIA GeForce Experience service from the startup. This will remove the application from startup programs.
Alternatively, you could try fixing or repairing the affected DLLs using third-party repair software, since doing so manually poses too many risks to be worth it.
In fact, Microsoft themselves recommend that users never attempt to modify or replace DLLs manually unless they have backups made, precisely because the task itself is very delicate.
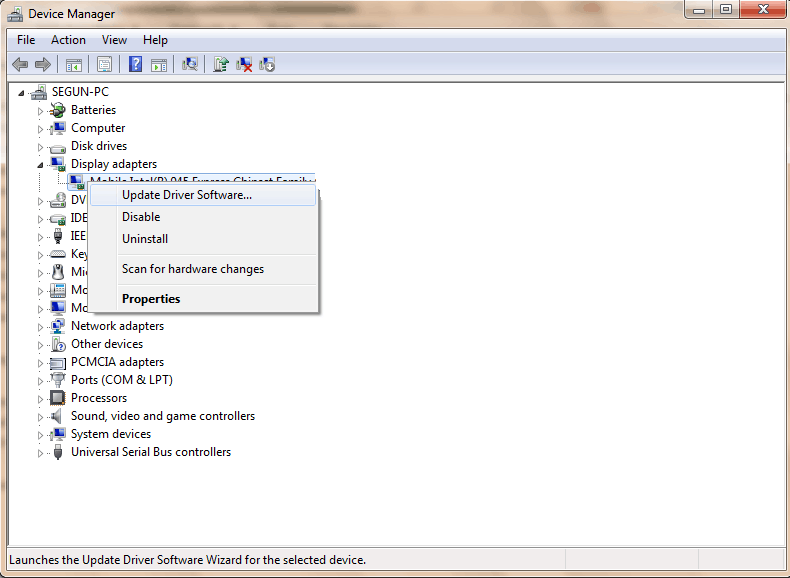
2. Update NVIDIA Drivers
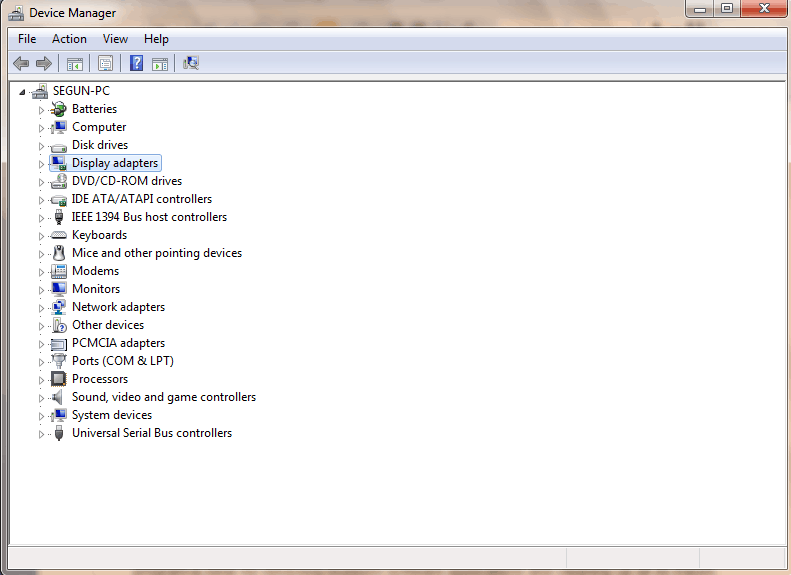
- Press the Windows and R key to launch the Run program.
- In the Run windows, type devmgmt.msc and click OK to open Device Manager.

- From the Device Manager left the panel, expand the Display adapters’ category and right-click on NVIDIA driver.

- Select Update Driver and follow the prompts to apply the update.

- Finally, after NVIDIA driver on your PC has been updated, restart your PC.

3. Uninstall using a removal tool
Another method of fixing nvspcap64.dll is by using the CCleaner uninstaller program. This utility program is ideal for removing stubborn software applications and cleaning up all their traces.
Alternatively, you can use any of the ten best alternative uninstaller programs to completely uninstall NVIDIA GeForce Experience.
Download, install and use CCleaner Professional on your Windows 10 PC to solve the nvspcap64.dll error on startup problem. Here’s how to do this:
- Download the CCleaner Professional program, and install it.
- Launch the CCleaner Uninstaller application.

- Select the NVIDIA GeForce Experience program and other NVIDIA applications, and then select automatically remove residual files.
- Click on the Uninstall option to proceed with the uninstall process.

4. Update your Windows OS
- Go to Start and type update in the search box and then click on Windows Update to proceed.
- In the Windows Update window, check for updates and install the available updates.

- After the update is complete, restart your Windows PC.
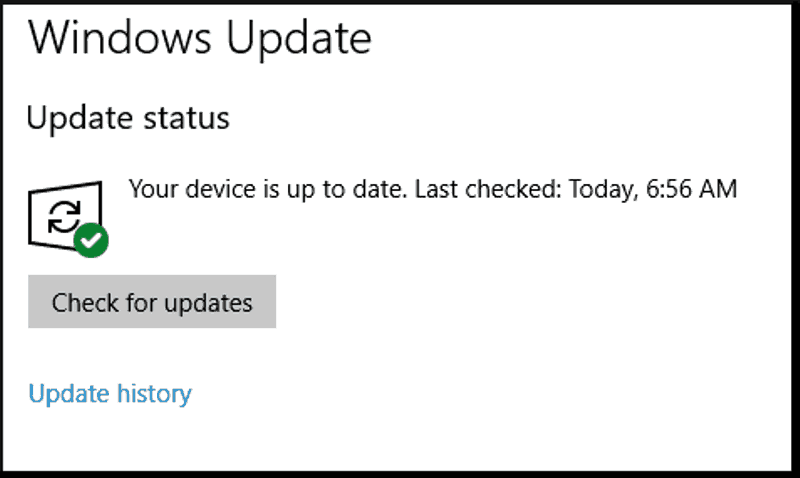
In addition, you can fix nvspcap64.dll by updating your Windows OS to the latest version.
Microsoft constantly releases Windows updates so as to improve the system’s stability and fix various issues and errors associated with startup errors.
This isn’t the only problem you can experience with Nvidia, and a few users reported that cudart64_90.dll is missing, but we have a guide that tackles this issue.
Before you leave, check our latest guide on the gfsdk_txaa_alpharesolve.win64.dll error to learn more about DLL files.
In conclusion, the solutions listed above can help you to fix nvspcap64.dll startup problem on your Windows 10 PC. Comment below if you have any questions.
User forum
0 messages