Fix: Former volume not mounted error [Utorrent, Bittorrent]
5 min. read
Updated on
Read our disclosure page to find out how can you help Windows Report sustain the editorial team Read more
Key notes
- When trying to access a downloaded or in progress torrent, you encounter the Former volume not mounted error.
- A quick way to fix this error is to disconnect and reconnect the external drive used as the storage device for the torrents.
- Alternatively, try configuring the download location to fix the error.
- On uTorrent, you can fix the former volume not mounted error by matching the drive letter to the computer allocated drive.

You may encounter the error former volume not mounted or error files missing from job message on popular torrent clients when trying to move or rename the downloaded files.
As a result, the users are unable to access their downloaded files. The error can occur on all the major torrent clients, including BitTorrent, Utorrent, and Vuse.
Reading through different user experiences with similar error suggests that the error can occur due to several reasons.
Bad external driver letter, incorrect download location, wrong letter in disk management, and corrupted content are some of the reasons.
In this article, we have listed a few easy ways to fix the Former volume not mounted error in Windows 10.
How do I fix former volume not mounted error?
1. Remove and reconnect the external storage device
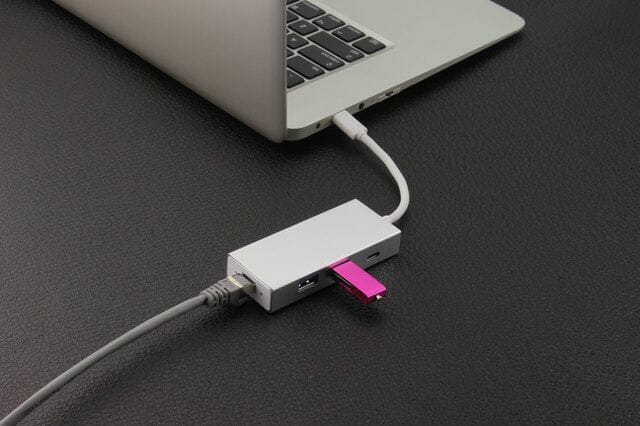
- Turn off your computer and disconnect the external hard drive.
- Restart your PC and reconnect the drive.
- Launch the torrent client and check if the drive is detected by the app.
Reconnecting the storage device will force Windows OS to reassign a letter to the external drive.
This may resolve the issue if triggered due to an incorrect drive letter. If the error persists, proceed with the other steps below.
2. Reconfigure the download location
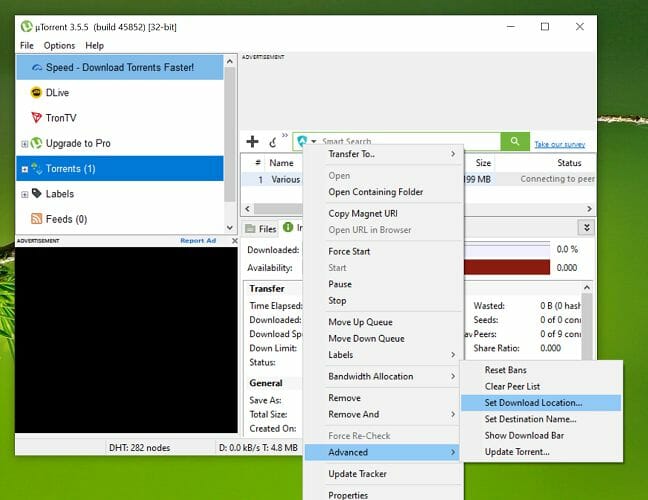
- Launch the Torrent client that is causing the error and right-click on the torrent file.
- Go to Advanced and select Set Download Location.
- Next, navigate to the directory where the torrent files are stored.
- Click on Select Folder once you are in the correct directory.
- Restart your torrent client and check for any improvements.
Installing a Windows update can trigger the error if the torrents is referencing a download path that does not exist.
It can also occur if you have abruptly removed an external drive that was saving the in-progress downloads.
To fix the problem, simply relocate the original download location of the existing torrent files and set it as the torrent’s download location.
Repeat the steps if the error is triggered on multiple torrent files.
3. Match the download drive letter
- Launch the uTorrent client on your PC.
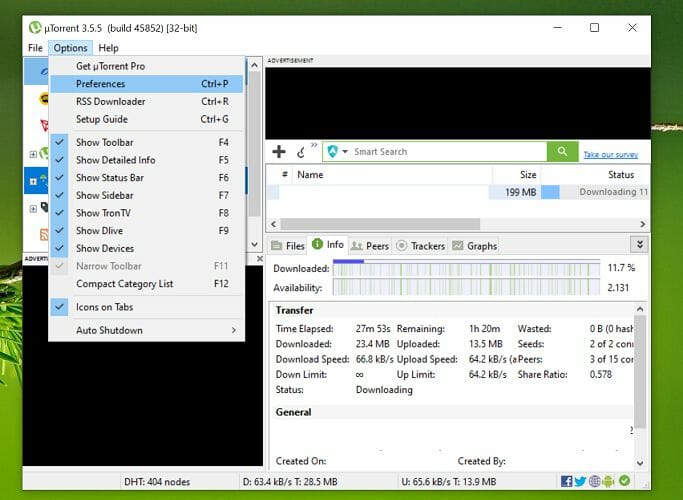
- Click Options from the menu and select Preferences.
- In the Preferences window, click on the Directory tab from the left pane.
- On the right pane, check if the drive letter matches your current configuration. If you are using an external drive, make sure the drive letter matches.
- If necessary, change the drive letter and click Apply to save the changes. Click OK to close the Preferences window.
- Restart uTorrent and check if the error torrent error former volume not mounted is resolved.
Your PC may alter the drive letter allocated to an external hard drive that is used to save the downloads and regularly disconnected from your PC.
Make sure the drive letter is matching by going into the uTorrent Preference settings.
4. Change driver letter using Disk Management
- Open the torrent client, hover over the error message and check the drive letter mentioned.
- Close the torrent client and open the Disk Management tool.
- Press the Windows key + R to open Run.
- Type diskmgmt.msc and click OK.
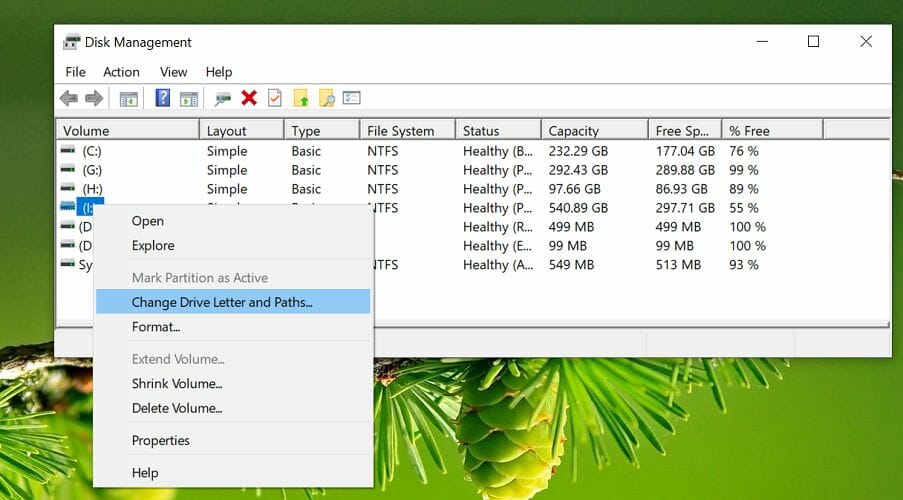
- In the Disk Management window, right-click on the drive letter that doesn’t match the one mentioned in the error message.
- Select Change Drive Letter and Paths.
- Click the Change button in the Change Drive Letter and Paths window.
- Click the drop-down menu and select the drive letter that was mentioned in the error message.
- Next, click OK to save the changes and restart your computer to apply the changes.
- After the restart, open your torrent client and check if the uTorrent former volume not mounted.
5. Edit the Resume.dat file
Note: Skip these steps if you are not using uTorrent. To edit the resume.dat file, you need a file editor. Download and install Notepad++ if you don’t have it installed already.
- Once installed, press the Windows key + R to open Run.
- Type the following and click OK:
%AppData%\uTorrent\ - Locate the Resume.dat file, create a copy and save it in a different folder as a backup.
- Go back to the AppData\uTorrent folder and right-click on the Resume.dat file.
- Select the Edit with Notepad++ option from the context menu, and press Ctrl + F.
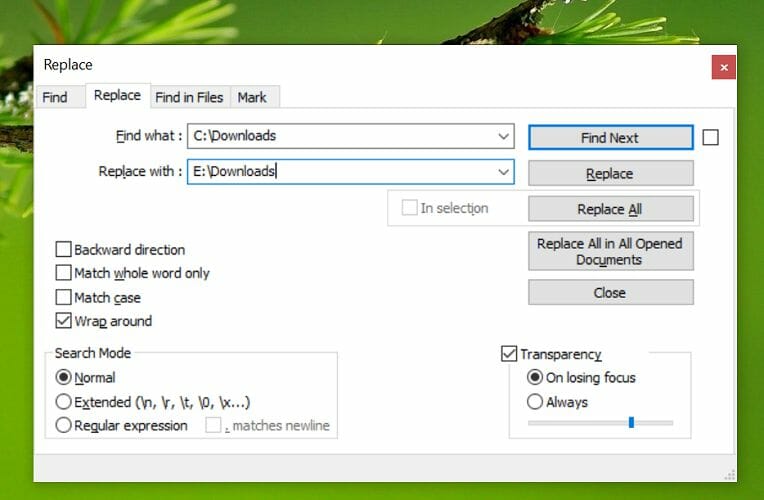
- Click the Replace tab, and in the Find What field, enter the incorrect path, for example C:\Downloads.
- In the Replace With field, enter the correct path for your drive.
- Click the Replace All button to replace all the instances of the incorrect path with the correct one.
- Click Close, and press the Ctrl + S button to save the changes.
- Restart your computer and launch the app to see if the error is resolved.
By modifying the Resume.dat file, many users have reportedly fixed the error. Just make sure to fill the incorrect and correct path and then proceed with the replacement process.
If anything goes wrong, replace the edited Resume.dat file with the backup file saved in step 4 above.
The Former volume not mounted error in torrent clients can occur due to incorrect storage drive letter or if the computer is unable to detect the drive.
Follow the steps in the article to fix the problem and complete the torrent downloads.

