Host Process for Windows Services Using Microphone [Solved]
The easiest fix is to disable the Listen to this device setting
![]() 4 min. read
4 min. read
![]() Published on
Published on
Share this article
Improve this guide
Read our disclosure page to find out how can you help Windows Report sustain the editorial team. Read more

Often, when you turn on the computer, a pop-up appears on the desktop that reads, Host Process for Windows Services is using your microphone. When you head to the Privacy & Security settings, it lists Currently in use under the Host Process for Windows Services entry!
Besides, for some, the Windows host process (Rundll32) may be the one automatically accessing the microphone. In both these cases, you may notice echo or active apps may lose access to the microphone.
Before you move to the software-based solutions, try another microphone, connect the mic to another port on the device, or install the latest Windows updates.
What can I do if the Host Process for Windows Services is using microphone?
1. Turn off Listen to this device
- Press Windows + S to open Search, type Control Panel in the text field, and click on the relevant result.
- Click on Hardware and Sound.

- Click on Sound.
- Navigate to the Recording tab, right-click on the default built-in microphone, and choose Properties.

- Now, go to the Listen tab, untick the checkbox for Listen to this device, and click on Apply and OK to save the changes.
- Reboot the PC and verify you still get the Host Process for Windows Services is using your microphone error message.


2. Disable the conflicting service using the microphone
- Perform a clean boot, re-enable all the services one at a time, and identify the one using the microphone.
- Press Windows + R to open Run, type services.msc in the text field, and hit Enter.

- Locate the service identified earlier, right-click on it, and choose Properties.
- Select Disabled from the Startup type dropdown menu, and click on Stop under Service status.

- Finally, click Apply and OK to save the changes, and then check for improvements.
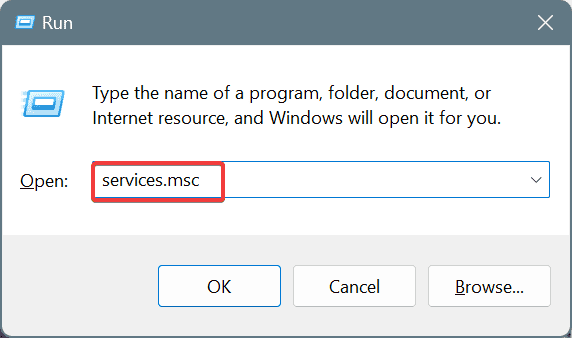

Remember, while accessing the services.msc console, you shouldn’t disable any of the core Windows services, like Windows Audio and Windows Audio Endpoint Builder. Doing so may cause the other sound-related tasks to stop working!
3. Re-enable the Let apps use your microphone setting
- Press Windows + I to open Settings, go to Privacy & security from the navigation pane, and click on Microphone on the right.
- Now, disable and re-enable the toggle for Let apps access your microphone.


4. Disable Cortana (for Windows 10)
- Press Windows + I to open Settings, and click on Privacy & security.
- Choose Voice activation, and then disable the toggle for Let Cortana respond to “Cortana” keyword.

- Finally, reboot the PC and check for improvements.

If you don’t use the voice-based virtual assistant, perhaps consider disabling Cortana for good to get rid of all such issues. Microsoft is, anyway, depreciating Cortana in newer versions of Windows!
5. Reinstall the microphone driver
- Press Windows + X to open the Power User menu, and select Device Manager.
- Expand the Audio inputs and outputs entry, right-click on the affected microphone, and select Uninstall device.

- Again, click on Uninstall in the confirmation prompt.
- Finally, reboot the PC for the changes to come into effect and verify whether the Host Process for Windows Services using microphone pop-up disappears.

6. Run the SFC and DISM scans
- Press Windows + R to open Run, type cmd, and hit Ctrl + Shift + Enter.
- Click Yes in the UAC prompt.
- Paste the following DISM commands individually and hit Enter after each:
DISM /Online /Cleanup-Image /CheckHealthDISM /Online /Cleanup-Image /ScanHealthDISM /Online /Cleanup-Image /RestoreHealth - Now, execute this command to run the SFC scan:
sfc /scannow
- Finally, reboot the PC.


7. Perform a system restore
- Press Windows + S to open Search, type Create a restore point, and click on the relevant result.
- Click the System Restore button.

- Select the Choose a different restore point option, and click on Next.

- Pick the oldest restore point from the list, one created before the issue first appeared, and click on Next.
- Verify the details, click on Finish, and then wait for the restore to complete. It typically takes 15-45 minutes.


If the previous solutions didn’t work, a system restore would revert the PC’s configuration to an older date when the Host Process for Windows Services using microphone problem didn’t exist!
The Host Process for Windows Services is using your microphone pop-up indicates microphone use by one of the active services, and can be verified through Settings. Remember, it’s a generic name, and any of the service(s) could be to blame for the pop-up. But the above-listed solutions will work in every case.
Before you leave, discover how to easily remove static noise from the microphone and experience clearer audio!
Which fix worked for you? Share with our readers in the comments section.


User forum
0 messages