How to Disable Intel SpeedStep Technology
Adjust the Power options in Control Panel before disabling it
Key notes
- If you disable the Intel SpeedStep feature, it may cause high power consumption and system overheat.
- Further, the feature does not directly affect the PC because it is not a basic PC component.
- You should be able to disable Intel SpeedStep by accessing your system's BIOS.

SpeedStep is a technology built by Intel to help optimize system performance in some supported CPUs. However, you may encounter problems like SpeedStep activities not being stable, causing the system to be slow or perform poorly. Hence, we’ll take you through some basic steps to disable the features.
Also, we recommend you go through our guide on how to undervolt your CPU on Windows 11.
Is it OK to disable Intel SpeedStep Technology?
Disabling the intel SpeedStep technology does not affect any core processor or components running on the PC. Since it is not an essential system component, stopping its implementation will not pose issues with other programs and tools.
However, disabling it may affect the battery life and power consumption if used to save energy. But if the intel SpeedStep feature is not performing these functions for you, it is safe to disable it.
How can I disable Intel SpeedStep Technology?
1. Disable SpeedStep in BIOS
- Press the Windows + I key to open the Windows Settings app.
- Select System and click on Recovery.

- Then, click the Restart Now option under Advanced startup.

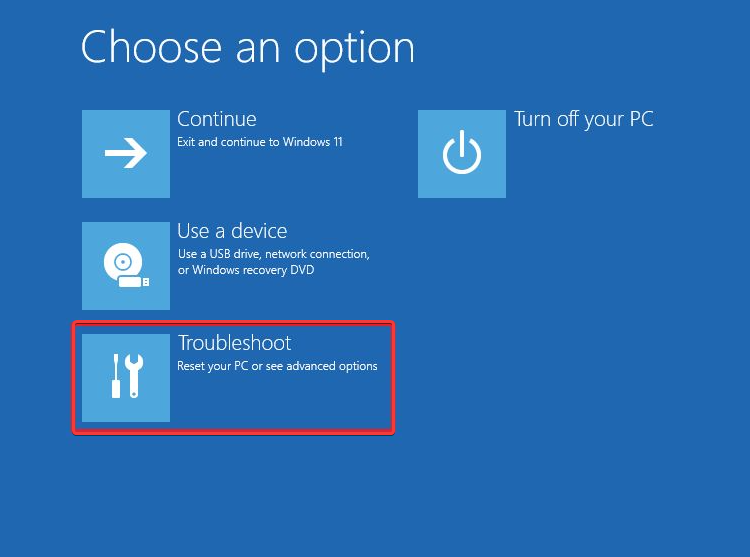
- Click Troubleshoot and select Advanced options.
- Tap on UEFI Firmware Settings, and click Restart. The system will restart and enter the BIOS menu.

- Choose the Advanced tab on your BIOS.
- Select CPU Power Management Configuration to disable SpeedStep.
- Select Intel SpeedStep or EIST, then select the Disable option to turn the SpeedStep Off.

- Exit the BIOS and restart your PC.
Do not hesitate to check our guide on resolving corrupt BIOS components that may cause the BIOS not to work.
2. Disable SpeedStep via the Windows Power Option
- Press Windows + R key to open the Run dialog box, type control, then press Enter to open the Control Panel.
- Click on the System and Security option and select Power Options from the right pane.

- Select either the Balanced or Power save option.

- Click on the Save option to save the settings.
Though you cannot disable SpeedStep without using the BIOS, the steps above are the closest way to doing something similar to it.
In addition, we have a comprehensive guide on how to safely overclock your CPU without BIOS on Windows 11.
Likewise, you can read about some of the best Intel overclocking tools to maximize performance on your PC.
Should you have further questions or suggestions, kindly drop them in the comments section below.
Read our disclosure page to find out how can you help Windows Report sustain the editorial team. Read more


Improve this guide


User forum
0 messages