How to get and stream Windows 10 on a Chromebook or other devices via Chrome Remote Desktop and Microsoft Edge
7 min. read
Published on
Read our disclosure page to find out how can you help Windows Report sustain the editorial team. Read more
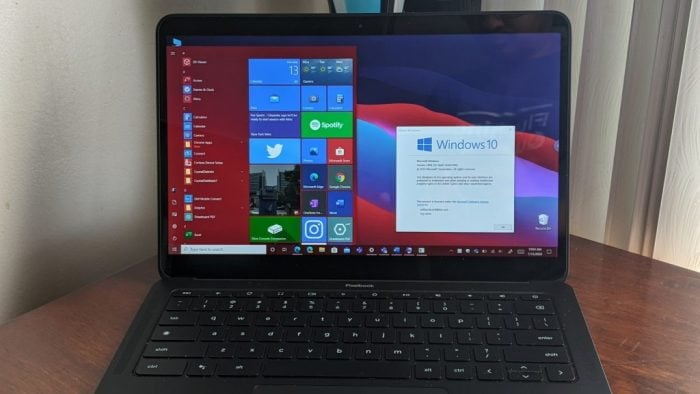
There are times when buying a Chromebook might end up being cheaper for use in business or education. However, the age-old problem of Chromebooks is the lack of support for the fully-featured Microsoft 365 desktop programs and even other Windows 10 desktop applications.
Google last said in June that it is working on bringing native support for Office to Windows 10 with Parallels, but did you know there’s a neat little workaround that you can use right now to accomplish almost the same thing?
With Chrome Remote Desktop, you can stream your Windows PC over the internet to your Chromebook, MacBook, Linux device, or other phone or tablet. This will then give you remote access to access Office or your other apps from your Windows 10 PC. Here’s how to use it.
Step 1: Install the extension:
To get started, you’ll want to turn on your Windows 10 PC and download and install the Chrome Remote Desktop extension for Chrome or Microsoft Edge. Although Google says this extension is best designed for Chrome, it also will work in the new Microsoft Edge, too. It is your choice of which browser to use but we found the extension will work without any issues in Edge.
To install the extension, open Edge or Chrome and visit the listing on the Chrome Web Store. Once there, click the blue Add to Chrome button. You’ll then want to click the Add Extension pop-up that appears to confirm adding it. You’re now done with the first step.
Before going to step 2, we just want to mention that (as the name suggests) Chrome Remote Desktop isn’t a native on-device solution to getting Office and Windows applications on your Chromebook. You’re just using the internet to stream Windows programs to a Chromebook. The performance will vary based on the speed of your internet and your Wi-Fi performance. It’s also best when you’re connected to the same network, too, though you can use a different network if you want to.
Step 2: Visit the Chrome Remote Desktop website
For step 2, you’ll want to click the newly added extension in Chrome or Edge. In Edge and Chrome, it will appear on the top bar near your profile icon. The Chrome Remote Desktop icon is of two squares, one of which has a Chrome logo. As an alternative, you also can go to the Chrome Remote Desktop website, too to launch.
Once there, if you’re using Microsoft Edge, you’ll get a message telling you that, “Chrome Remote Desktop needs the latest web features for the best experience.” You can ignore this message. If you’re using Chrome, you won’t see this. In Edge, you can dismiss it by clicking Continue Anyway.
After that, you’ll be launched into Chrome Remote Desktop. From there, you’ll see a message telling you that you’ll need to set up remote access. To get started with it, click the Download button. This will download a MSI file to your host PC which you’ll then need to double click to launch. When launched, you’ll want to click Allow on the UAC window that comes up. After that, a special host will be installed on your Windows PC in the background. We’re done with this for now.
Step 3: Set up your PC for remote access
In step 3, it’s time to finally set up your PC for remote access. To get started, go back to the Chrome Remote Desktop website and click the link that says Accept and Install under Ready to Install. When asked if you want Chrome or Edge to open the download, click Yes. This will run through the set-up prompt. Follow the instructions on the screen.
When that’s done, you’ll then want to give your PC a name. In our case, we’re naming our remote desktop as Surface. Next, you’ll then want to put in a PIN, for your security. Please be sure to remember this PIN, as if you forget it, you’ll have to delete and add your PC again. Once the PIN is entered, you can click Start. You also might need to click Yes on the UAC prompt in Windows 10.
If all goes well, you’ll see your device name appear in the list under the Online section. You can now set your PC to the side and go to the device you want to stream it to.
(This is optional) Before proceeding, you also might want to change your screen resolution settings to match the device you’re streaming to. This will ensure it will fill up the entire screen (and not be scaled wrong.) As we’re using a high-resolution Surface Laptop 3, we changed the resolution from (2496 x 1664) to (1920 x 1080) to match the screen of our Google Pixelbook Go.
Step 4: Head to the Chromebook or device you want to stream your PC to
Finally, you’ll want to open the device where you want to stream your Windows 10 PC on. We’re using a Pixelbook Go. From this device, open Chrome (or any other web browser, if you’re not on a Chromebook.) You’ll then want to go to the Chrome Remote Desktop website.
Once in the web browser, you should see your device appear under Remote Devices. If all went well, you should see it appear Green, to show it as online. Click that green icon to connect, and then enter in your PIN. You can click remember my PIN on this device to remember the PIN instead of having to reenter it. Your Windows 10 screen will then be shared over to the remote PC.
To make this remote session full screen, click the blue arrow which is showing to the right of the screen. Then choose Full Screen. Like magic, this will make your remote session full screen, and make it seem like your device is running Windows natively! You can now open every single app that you have on your Windows PC, from your Chromebook. When you’re ready to stop sharing, click the arrow once again, and choose Disconnect.
For customization, you also can choose some other options from the menu, too. Such as scale to fit, resize to fit, and smooth the scaling to help improve the quality. They’ll be additional controls like to press CTRL+ALT+DEL, Print Screen, as well. And, for sharing files, you can click Upload File to upload files from one PC to the other. It’s quite a cool experience.
Try it on your phone or tablet!
We primarily talked about using the desktop version of Chrome Remote desktop but there is also a mobile, app, too. If you’re on a tablet or phone, you can download the Chrome Remote Desktop app (iOS here, Android here.) Once downloaded, sign in with your Google account, then tap the device you want to connect too. Enter the PIN, and then click the blue arrow to connect. You’ll then be taken into the remote desktop session. To end, tap the hamburger menu, choose Disconnect.
At the end of the day, Chrome Remote Desktop is quite useful, especially if you’re hoping to stream your PC to a Chromebook or other device. It also can serve as a method to help others diagnose their PCs, or share their screen with you. Just click the Remote Support option and follow the instructions on the screen.
Do you find Chrome Remote Desktop useful? Let us know in the comments below.




User forum
0 messages