How to Turn On Network Discovery In Windows 11 [Explained]
Network Discovery is a useful tool to master for security purposes

Let’s see how to turn on Network Discovery in Windows 11. As a bonus, you will also see how to turn on File Sharing.
We’ll also talk about this feature’s safety and other useful information. But first, let’s see how to enable it:
Table of contents
How can I turn on Network Discovery in Windows 11?
1. Use Settings to enable Network Discovery
- Open the Settings app by pressing Windows + I simultaneously.
- Then, navigate to Network & Internet followed by Ethernet. Note that if you are connected to WiFi, you will have to click on it instead of Ethernet.

- Now under the WiFi or Ethernet properties, you will have the Network profile type section under which you can choose Private.
- This option will automatically enable Network Discovery.

If Network Discovery keeps turning off after you enable it, see our guide on Network Discovery won’t stay on in Windows 11 for step-by-step fixes.
1. Press the Windows key to open the Windows Search function and enter Control Panel.
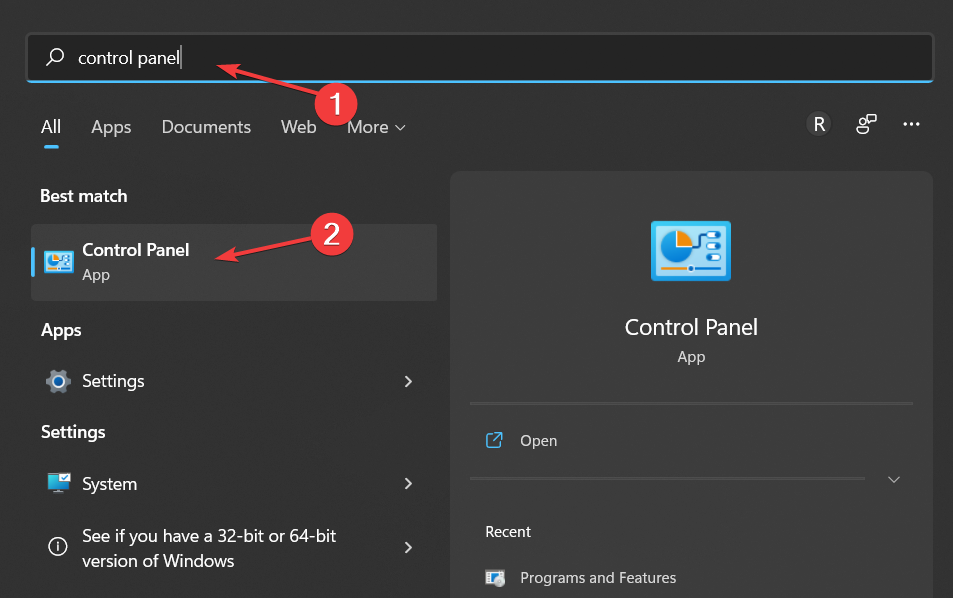
2. Click on the topmost result to open Control Panel.
3. Now click on Network and Internet.

4. Next, select the Network and Sharing Centre option.

5. From the left panel choose the Change advanced sharing settings option.

6. Here all you have to do is check the radio button next to the Turn on network discovery option. If you want to turn off the feature, you can simply follow the same steps as above but check the radio button next to the Turn off network discovery option.
2. Turn on Network Discovery in Windows 11 using Control Panel
If your Network Discovery is not turned on, you can easily enable it through the built-in Control Panel settings.
The advanced sharing settings for your network allow you to turn Network Discovery on and off in just a click.
Is Network Discovery safe?
Network Discovery is essential and safe for all MSPs and IT teams, regardless of organization size. It ensures network visibility, allowing IT teams to understand connected devices and their interactions.

In cybersecurity, Network Discovery helps identify malicious or rogue devices by detecting incorrect IP addresses. By mapping assigned IP addresses, IT teams can distinguish genuine devices from threats.
Tools in Network Discovery allow MSPs to perform frequent scans, ensuring no hidden threats on the network. It also helps improve security by identifying unnecessary open ports that could pose risks.
FAQs
Open the Control Panel → Network and Sharing Center → Advanced sharing settings. If “Turn on network discovery” is selected, the feature is active.
Make sure the network is set to Private, not Public, and that File and Printer Sharing is also turned on. Some firewalls or antivirus tools can block discovery.
No. It’s recommended to enable it only on private or work networks. Public networks expose your device to potential security risks.
Not necessarily. While setting the network to Private can turn on discovery, you still need to manually enable File Sharing under Advanced sharing settings if you want to share files or printers.
Summary
To wrap this up, remember that Network Discovery is essential for enhancing IT operations, ensuring network security, and simplifying device management across different environments.
You can check related troubleshooting details by visiting the Network and Sharing Center not opening guide, which helps you resolve access issues before adjusting Network Discovery settings.
Whether for troubleshooting, security scans, or device management, its role in modern networking remains crucial.
Read our disclosure page to find out how can you help Windows Report sustain the editorial team. Read more


Improve this guide


User forum
1 messages