How to change mouse sensitivity [Windows 10 & Mac]
![]() 4 min. read
4 min. read
![]() Updated on
Updated on
Share this article
Improve this guide
Read our disclosure page to find out how can you help Windows Report sustain the editorial team. Read more
Key notes
- Precision for gaming, drafting apps, and more can be achieved by changing mouse sensitivity.
- Use the tips detailed below to adjust how much your mouse pointer responds when you move the mouse.
- For more handy solutions, don’t hesitate to check out our Mouse Troubleshooting Hub.
- Bookmark our Tech Tutorials Hub too, in case of encountering similar issues in the future.
A computer mouse is a key peripheral, and almost all users use it for input. Your mouse allows you to quickly perform any action on your PC.
However, there are users who want to increase their mouse sensitivity even further. This is relatively simple, and today we’re going to show you how to do that on Windows 10.
How to change mouse sensitivity in Windows 10?
Change your mouse DPI settings

The best way to change mouse sensitivity is to use the DPI button on your mouse. Usually, gaming mice have a DPI button on them that allows you to switch to a different sensitivity setting.
This is the best way to change your sensitivity because it allows you to change it with a single button.
We have to mention that your DPI settings are temporary, and in most cases, they will revert to the default value once you turn off your PC.
On the other hand, mice with adjustable DPI settings are relatively affordable, so if you want a mouse that offers different sensitivity levels, you might want to invest in a new mouse.
Select a proper mouse pad

If you want to increase your mouse sensitivity and precision, you might want to consider using a different mouse pad.
There are many great mouse pads with different textures that allow you to enhance your sensitivity.
Many of these pads are relatively affordable, so you might want to consider purchasing one of them for your PC.
1. Press Windows Key + S and type Control panel.

2. Choose Control Panel from the list of results and click on it.
3. Once Control Panel opens, select Mouse from the list of options.

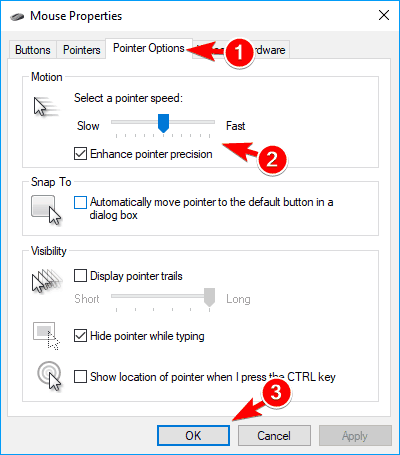
4. The Mouse Properties window will now appear.
5. Go to the Pointer Options tab and adjust mouse pointer speed by moving the slider. You might want to try turning on the Enhance pointer precision option as well.

6. After adjusting your mouse speed, click on OK and Apply to save changes.
Change mouse sensitivity on Windows 10 using Control Panel
If you’re satisfied with your current mouse and you don’t want to change it for one that allows you to change its DPI, you can change mouse sensitivity from Windows. The built-in Mouse Properties settings in Control Panel allow you to make changes to your mouse in just a few clicks.


This is the simplest way to change your mouse sensitivity, so be sure to try it out.
Use your mouse software to adjust the sensitivity

Gaming mice tend to come with dedicated software that allows you to configure your mouse. Thanks to this software you can adjust the mouse lighting, macros, and other settings.
In addition, you can also adjust the sensitivity of your mouse so be sure to try that.
Keep in mind that not all mice come with dedicated software, so this solution won’t work for every computer mouse.
Modify your registry
- Press Windows Key + R and enter regedit. Press Enter or click OK.

- Optional: Modifying the registry can cause certain problems with your PC, therefore it’s highly advised to create a backup. To do that, simply click on File > Export.

Select All in Export range section and enter the desired file name. Choose a safe location and click on Save button.
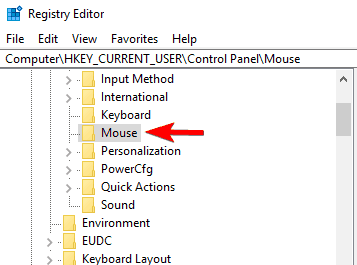
In case anything goes wrong after modifying the registry, you should be able to restore it by running this file. - Navigate to
HKEY_CURRENT_USERControl PanelMousekey in the left pane.
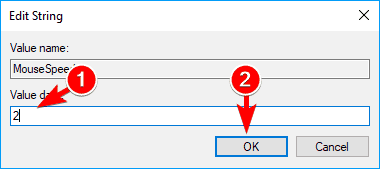
- In the right pane, double click MouseSpeed and set its Value data to 2.

- Now change the value data for MouseThreshold1 and MouseThreshold2 to 0.


If needed, you can further increase the sensitivity of your mouse by modifying your registry. We have to mention that modifying the registry can be potentially dangerous so be extra cautious.
To change mouse sensitivity from your registry, perform the above steps.
After doing that, your mouse sensitivity will be set to maximum. If your mouse is too sensitive, you might want to adjust MouseThreshold1 and MouseThreshold2 values.
Keep in mind that you need to keepMouseThreshold2 greater or equal to MouseThreshold1 at all times.
This solution is for advanced users, so if you’re not familiar with Registry Editor, or if you don’t feel comfortable editing your registry, you might want to use a different solution.
Changing mouse sensitivity in Windows is rather simple, but the best way to do that is to use a mouse that allows you to adjust the DPI settings manually.
If you don’t want to purchase a new mouse, feel free to try any other solution from this article.


User forum
0 messages