Windows Live Mail spam filter not working? Here’s what to do
3 min. read
Updated on
Read our disclosure page to find out how can you help Windows Report sustain the editorial team. Read more

For a very long time, Windows Live Mail has been the go-to email client for Microsoft Windows users. However, no application is entirely stable, as you’ve seen in the past few years. At times, Windows Live Mail’s spam filter might be the one not working.
You’ve probably faced certain problems while using the Windows Live Mail application and there’s nothing out of the ordinary in this error. However, you do know your filtering options and they used to work great.
When receiving unsolicited junk emails in your Inbox that’s clearly not the case any longer. So, to help you out, we are going to discuss some reliable ways to deal with this Windows Live Mail error.
What can I do when Live Mail’s Spam filter is not working?
1. Remember the basics
As a quick recap, carefully read the lines below:
- Don’t hesitate to remove your email address from mailing lists that aren’t on your safe senders list.
- Clicking Unsubscribe is time-consuming but beneficial per long term.
- When an email appears to come from a company, it never hurts to contact customer service via phone or web browser to confirm it’s indeed legitimate.
- Scammers often use a technique called spoofing to disguise their real email address.
- When dealing with this case, right-click on the email, and select the Junk email submenu, then click Mark as junk.
- Give a try to one of those latest email scanning software programs to further filter your emails.
Looking for the best antivirus with antispam functions? Here’s a list with our top picks.
2. Look for a secondary spam folder
If you added your email account as IMAP or Microsoft Exchange ActiveSync, you may have another spam folder in addition to Windows Live Mail’s own junk email folder.
Try finding it in the folder tree (left pane) and see if it’s active or not.
3. Try to repair the installation
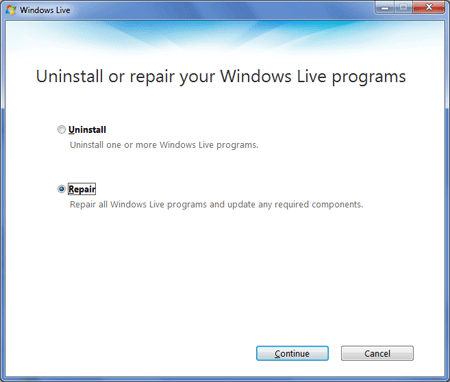
The quickest remedy now is the Repair option that waits to be used. With all programs closed, just type wlarp into the start search box and press Enter.
Select Repair on the next page. When it’s finished, reboot the computer for the changes to take place and launch Windows Live Mail.
4. Customize your spam filters
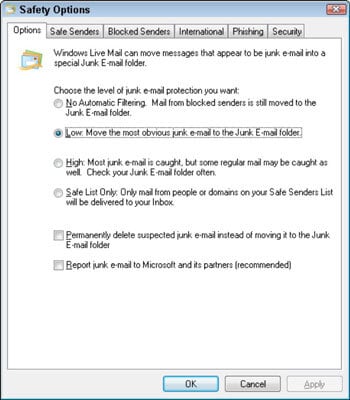
Click on the dropdown arrow of the Junk / Not junk button, then choose Safety options from the menu. The general Options tab keeps tabs on your junk filter.
By default, Windows Live Mail has it set to:
- Low
- This lets you move the most obvious junk email to the Junk Email folder
For a much higher level of protection, you could go for:
- Safe List Only
- Only mail from people or domains on your Safe Senders List will be delivered to your inbox.
Receiving countless junk emails every day is no joy, but you know how to stop that now. Windows Live Mail has these adaptive spam filters built right in.
This means that your junk filter gets better with time at recognizing what you see as junk emails.
If you have any other suggestions that can help with Windows Live Mail’s spam filter issue, share them with the other users in the comment section below.
READ NEXT:


User forum
0 messages