Microsoft Date and Time Picker Control - How To Enable and Use It
![]() 6 min. read
6 min. read
![]() Published on
Published on
Share this article
Improve this guide
Read our disclosure page to find out how can you help Windows Report sustain the editorial team. Read more
Microsoft Date and Time Picker Control helps you enter multiple date and time entries in Microsoft 365 desktop apps, like Excel, Word, and more.
For example, you might need to regularly update dates and times for employee attendance, meeting schedules, project timings, etc. Date and Time Picker Control steps in to make tasks like this more convenient.
However, enabling this feature is a challenging task because these Microsoft apps don’t activate the service by default. Luckily, I’ll show you how to use it and enable it.
Also, if your Microsoft app isn’t compatible with it, you’ll learn which alternatives you should try. Let’s get started!
What Is the Microsoft Date and Time Picker Control?
Microsoft Date and Time Picker Control is an ActiveX Control service for compatible Microsoft 365 apps, like Excel, Word, PowerPoint, etc. It allows you to type in the date and time in a convenient way. You don’t have to worry about the date and time format of your entries.
You can just visually select your data for the MM-DD-YYYY format or the DD-MM-YYYY format.

The MSCOMCTL.OCX file and Visual Basic 6.0 ensure that this feature works smoothly.
System Requirements for Microsoft Date and Time Picker Control
At the time of writing, this ActiveX Control element is only available in Microsoft 365 and Microsoft Office desktop apps for 32-bit architecture.
Also, you might need to register the MSCOMCT2.OCX file in your Excel or Word software. You’ll have to do this if the feature isn’t readily available in the More Controls menu of the ActiveX Control command.
You might be able to register the above-mentioned OCX file if you own the Microsoft 365 64-bit app. However, the service won’t work when you call it. Instead, you’ll get an error message.
So, if you’re a 64-bit Microsoft Excel or Word user, you’ll need to try the alternatives mentioned later in this article.
Registering the MSCOMCT2.OCX Service
To activate the binary file, follow these steps on your Windows PC. You should be logged in using an administrator account to execute a few commands.
- Go to the Windows OS installation drive and enter the following search query into the Search this PC field:
MSCOMCT2.OCX- Wait for the Windows File System Search tool to find the file in the device.
- There should be one instance of the MSCOMCT2.OCX file.
- When you see the result, right-click on it and choose Open file location from the context menu.

- Go into the directory and press the Windows + R keys together to launch the Run command tool.
- Into the Open field, enter the following command and hit Enter.
cmd admin
- The Command Prompt console will open with administrator privileges.
- Enter the following command into the CLI and hit Enter:
C:\Windows\System32\regsvr32.exe mscomct2.ocx
Or
C:\Windows\SysWoW64\regsvr32.exe mscomct2.ocx- To verify that the binary file has been registered successfully, run the following command inside the same Command Prompt window:
regsvr32 -u MSCOMCT2.OCX
- A message box will tell you that the file has been loaded. This confirms that you’ve activated the required file successfully.
How To Get Microsoft Date and Time Picker Control
Now that you’ve activated the MSCOMCT2.OCX file, you’re all set to enable the Date and Time Picker Control. Follow along with the steps in Excel as outlined below:
- Click on the File tab to open the Excel sidebar.
- Find and select the Options menu at the bottom.
- The Excel Options dialog box will open.
- Click on the Customize Ribbon category on the right.
- You’ll see two columns of options on the right.
- Below the Customize the Ribbon column, checkmark the box for the Developer tab.
- Click OK to save the changes you’ve made.

- You should now see the Developer tab in the Excel ribbon menu. Click on that.
- Now, click on the Insert drop-down menu in the Controls commands block of the Developer tab.
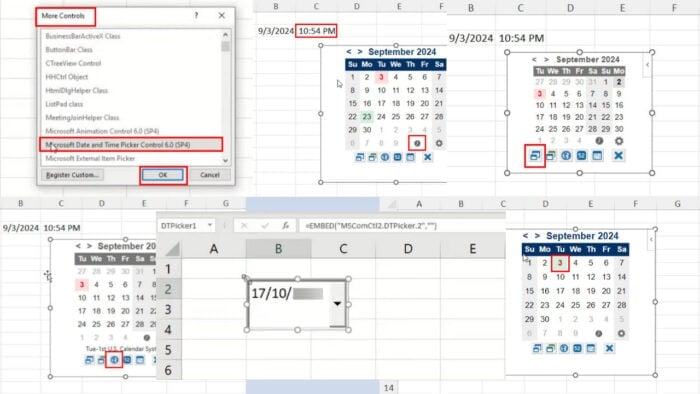
- Select the More Controls tool in the ActiveX Controls section of the context menu.

- You should see the More Controls dialog box.
- Scroll through the list of available ActiveX Controls to find and select the Microsoft Date and Time Picker Control 6.0 (SP6) item.
- Click OK to enable the tool.

- Now, click on any cell and a date and time picker will pop up.
Alternatives for Microsoft Date and Time Picker Control
If you can’t enable the built-in feature yet want to use similar automation in Microsoft 365 apps, you can try these alternatives:
Use a Third-Party Add-In
You can install the Mini Calendar and Date Picker from the Office Add-ins Store. It’s free and works exactly as the Date and Time Picker ActiveX Control tool does. Here’s how:
- Go to the destination Excel worksheet and click on the Developer tab.
- Click on the Add-ins command inside the Add-ins commands block.
- The Office Add-ins dialog will open.
- Click on the Store tab.
- In the Search field, type Mini and hit Enter.
- The Mini Calendar and Date Picker add-in will show.
- Click Add and follow the on-screen instructions to install the service.

- Once installed, the date and time picker will open on the active worksheet.
- Click the destination cell and pick a date and time from the dialog box.
- Mini Calendar and Date Picker will insert the date and time instantly.

- To add a time, click on the adjacent cell.
- Select the Time clock on the calendar tool.
- It’ll insert the time.

Here are the customizations available in this date and time add-in:
- Toggle Calendar Size: If you need to reduce the dialog box size, click on this button.

- Change Calendar Theme: To cycle through different dialog box themes, you can use this option.
- Change Calendar System: It helps you to switch the calendar system between the U.S. Calendar System and the ISO Calendar System.

- Toggle Week Numbers: If you need the week number, add that using this button.
- Highlight Range of Dates: Click this button to visualize the cell range containing date and time entries.
The Microsoft Date and Time Picker Control 6.0 (SP6) feature is totally absent in the Excel online or web app. So, you can click on the Add-ins command on the Home tab and search for Mini Calendar.

Summary
You can now easily activate Microsoft Date and Time Picker Control in Excel or Word. Ensure that the Microsoft Office app is a 32-bit program before trying these steps.
If it’s a 64-bit app or you don’t want to downgrade to a 32-bit program, try the alternative method to automate the data entry for date and time values.
Did the article help you? Comment below to let us know. If you want to share a better method, feel free to add that in your comment.


User forum
0 messages