New Computer Checklist: 15 Things to Change for a Smooth Experience
Key notes
- If you just got a new computer or laptop, there’s a lot to do before you start using it.
- You should make sure the computer has all the right hardware, and then make some changes in the configuration to make it more familiar with your preferences.
- In this article, we explore a checklist for hardware and software to ensure your PC is set up the right way.

Getting a new computer is exciting. You finally have that device you’ve been eyeing or needed to replace your old PC. But after the initial excitement passes, you soon realize that setting up and configuring a new computer is less thrilling.
You may want to go on with your work immediately after taking the computer out of the box. However, it’s better for you in the long run if you spend some time, in the beginning, making sure everything is configured just right.
Checking your PC specifications is one of the most important things to do before installing or upgrading software. This is necessary to ensure that your computer is capable of running new programs because if it isn’t, you can experience problems such as slowness and system errors.
If you’re lucky, your new computer will come preconfigured with some of these things already taken care of and all you need to do is transfer your old settings to your new computer.
But if you’re like most people, you’ll need to install Windows 11 from scratch on your new PC and do a bit of work before everything is just how you like it.
How do I check my PC specs?
New computers are a huge investment, so it’s important to take the time to make sure they come set up just right.
Many people confuse hardware specifications with software specifications. While both are important, hardware specifications refer to the physical characteristics of a computer.
Software specifications refer to the operating system, programs, and other data that are installed on a computer.
Hardware check
Before you even switch on your new computer, you need to take a good look at it. The hardware of the PC is the part that you can touch and see. You may know the parts inside the PC, such as the CPU, RAM, motherboard, hard drive, and graphics card.
These physical components determine the capabilities of your computer and its performance. Feel free to refer to our guide on different ways to check for your computer specs to see what you are working with.
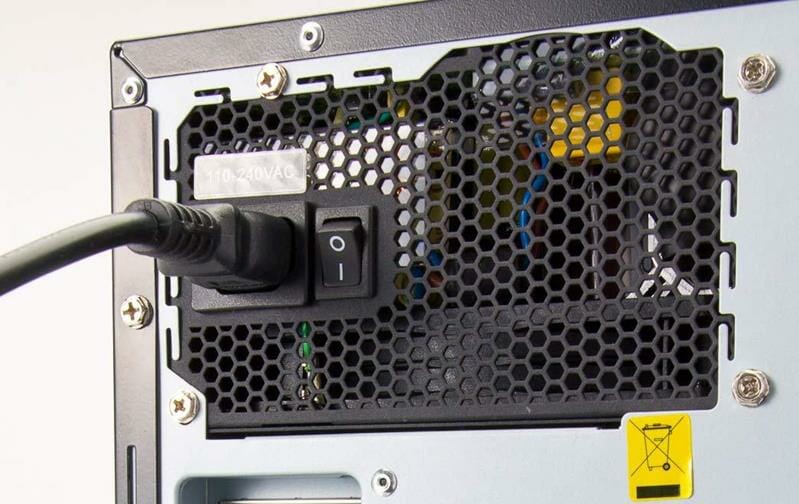
Before you proceed with checking any hardware, make sure that AC power is properly connected to the PC. It’s easy to forget about this step.
The hardware checks you need to carry out include:
- Processor – The processor (also called a CPU) is what makes your PC tick, and it’s often referred to by its brand name and model number. The processor is the most important part of the computer. It’s what takes the instructions you give your PC and does something with them. Some processors have multiple cores, which means they can simultaneously process more than one task at the same time.
- Memory information – Memory is the another equally important component of a computer. If you don’t have enough, you’ll be waiting for things to load for a long time. But, how do you know how much you need? And how could it be wrong? The most important thing to remember is that the amount of memory that a computer needs depends on what it’s used for.
- RAM – RAM, or random access memory, is your computer’s short-term memory. It provides a space for your computer to process information before it is sent to the hard drive. The more RAM a computer has, the more programs and files it can work with at once without slowing down. Common amounts are 2GB, 4GB, and 8GB.
- GPU – If you’re going to be doing a lot of graphic-intensive work, then the Graphics Processing Unit (GPU) is the most important component for you. The better your GPU, the better your frame rates will be and the smoother everything will feel.
Software check
- Application programs – Most people think of applications when they think of computer software. We use applications to create documents, listen to music, surf the web, play games, send an email, design graphics, edit videos and do thousands of other tasks.
- Device drivers – Device drivers are specialized software that allows Windows to interact with your computer’s hardware. For example, your printer driver controls your printer, telling it how and when to print. Without a driver, the printer would not know what to do with the data being sent to it from the computer. When you buy a new device (such as a digital camera or monitor), you’ll need to install its driver before you can use that device with your computer.
- Operating system (OS) – Your operating system is responsible for controlling nearly every aspect of your computer’s operation — from managing files on your hard drive to running application programs and device drivers. Check the OS version and whether it is up to date.
How do I transfer everything from my old computer to my new one?
You can transfer data from your old computer to your new one in a couple of different ways.
- Removable device – You can transfer files by copying them onto a removable device such as an external hard drive or flash drive. Ensure you have enough space for all your data.
- Cloud services – You may have your files stored in the cloud on One Drive, Dropbox or Google Drive so depending on where your files are stored, you can sign in to your new computer and restore your files.
- Transfer software – If you have both computers connected to the same network, you can use your operating system’s built-in file transfer software, which will let you move files from one computer to another.
Is there a general PC checklist template that I can use?
There are a lot of different types of PCs out there, and they all have their own unique features. But the good news is that a lot of the parts are standardized, so you can use the same kind of checklist for nearly all types of PCs.
The most important thing to remember is that you’re looking for a list that will cover every piece on your PC and what type of device it has.
Regular maintenance includes more than just running an antivirus program. It also includes regularly scanning your hard drive for errors and updating system drivers to improve performance.
These tasks may seem tedious, but they’re vital if you want your computer to keep running smoothly.
The general checklist includes:
- Processor – This is what makes your computer run. The speed of your processor will determine how quickly your computer will be able to open and run programs, which makes this an important part of your system.
- Storage (Hard Drive) – This is where all the files on your computer are stored, so it’s important that you have enough space for everything you need. Most PCs come with at least 500GB.
What to do as soon as you get a new computer?
Hardware changes
1. Check power connections
Before you start using your new computer, there are some basic checks you should make to ensure it is functioning properly. Connect the power cables to a socket and ensure the other end is firmly secured to your CPU and monitor.
If you are using a laptop, ensure that the charging port is working correctly when you switch it on.
2. Check ports
After confirming your new computer is connected to power, also, connect your ethernet cable and ensure it is secure before you power on your PC. Next, ensure your mouse and keyboard are connected to the USB ports available.

It is also a good idea to check for other ports such as the audio port, HDMI, CD/DVD drive, and the SD ports whether they are all in perfect condition.
Software changes
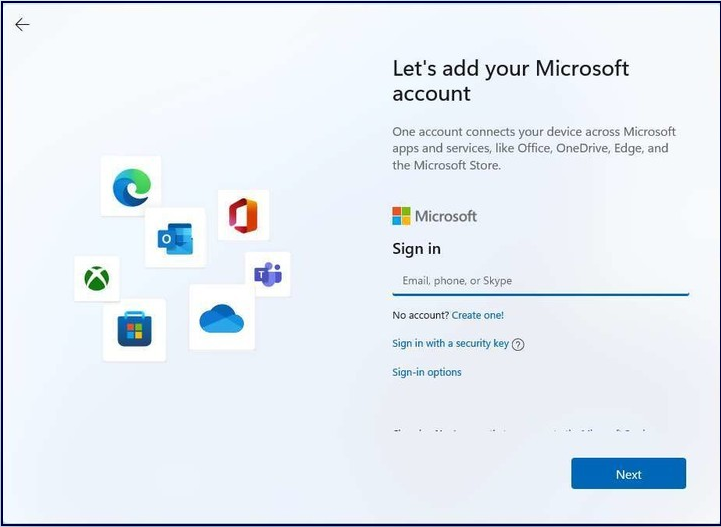
1. Add your accounts
If you’re using Windows, you need to set up your main account with your Microsoft login. This will ensure that all of your files, settings, and data sync across all of your devices that use the same account.
Windows PCs allow for multiple user accounts, so if you set up your computer with only one account, anyone who wants to use it has to log in to your account.
Think about how many people will share this device, and make sure each one has their own account. Having separate accounts helps keep your files organized and secure. You can also choose to set up user accounts with limited permissions.
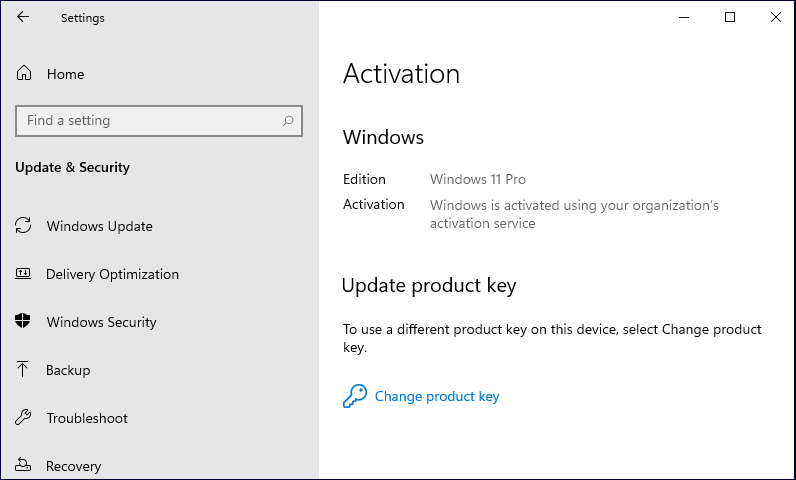
2. Check your product key and update the OS
If you’re installing Windows yourself, make sure you have your product key number ready before starting.
While Windows Update typically runs automatically in the background when Windows is running, it never hurts to make sure that there aren’t any pending updates that need to be installed.
Your computer has probably been in storage for some time so you want to ensure it is up to date.
To check for updates:
- Hit the Windows + I keys simultaneously to open Settings.

- Select Windows Update on the left pane and click on Check for updates on the right pane.

- If there are any updates, download and install
3. Check your antivirus software
Many new computers come with trial versions of antivirus software that will only work for 30 days or 60 days. Your PC also has a default security system: Microsoft Defender but you may have to add an extra layer of protection with more reliable security software.
If your computer didn’t come with one or if the trial period has expired, install antivirus software immediately. Also, run the antivirus to ensure your PC does not have any issues. If possible, use the same software that you used on your old computer so that everything is in sync.
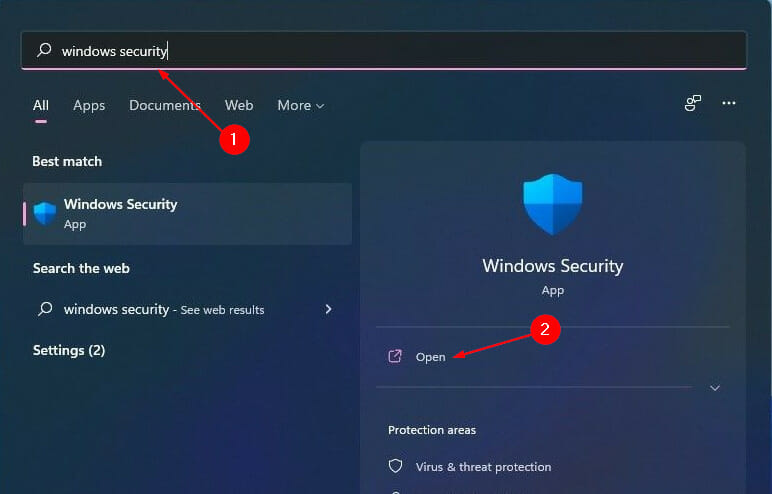
To run a scan, follow the steps below:
- Press the Windows key, search Windows Security and click Open.
- Select Virus & threat protection.

- Next, press Quick scan under Current threats.
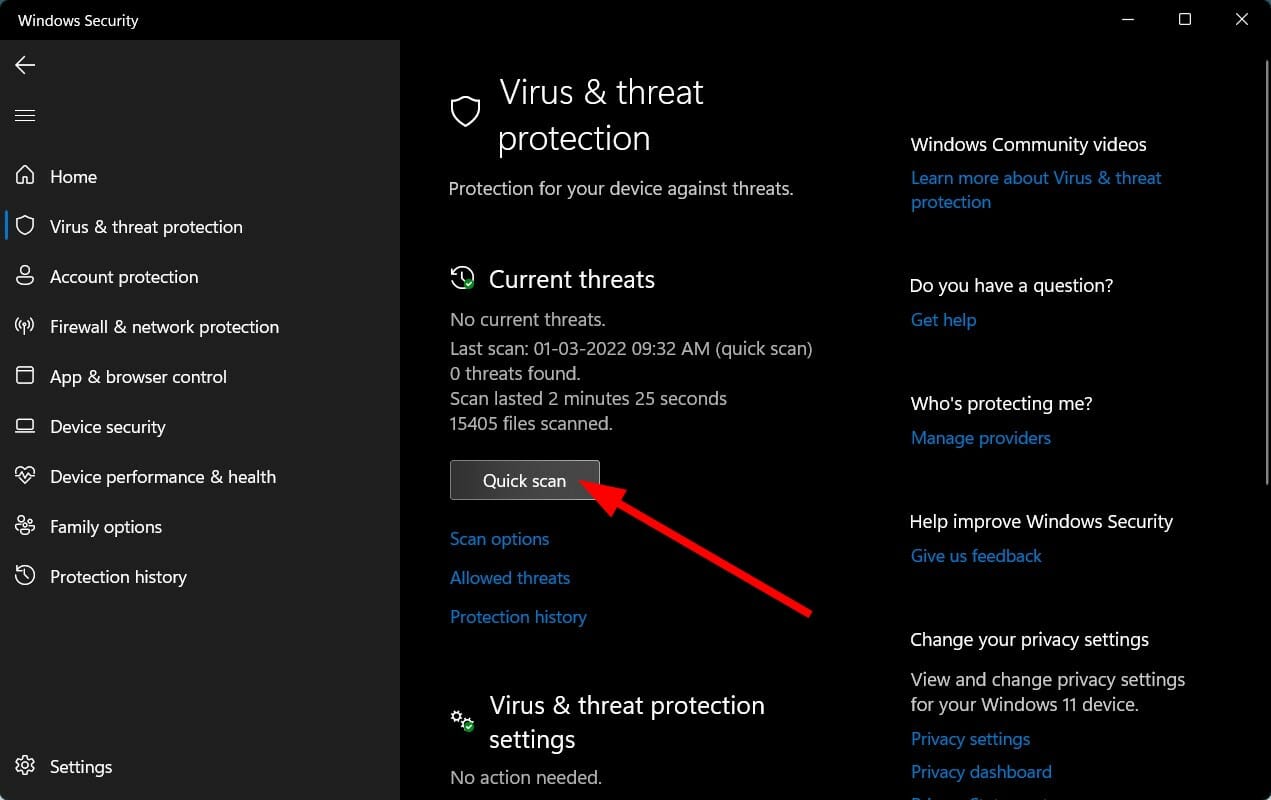
- Wait for the process to finish and restart your system.
4. Get rid of bloatware
When you buy a new computer, it can be loaded up with all sorts of programs that you don’t really need such as trial versions, games, and all sorts of other bloatware.
These programs are installed on computers at the factory to make it easier for customers to access their most used programs. Unfortunately, they don’t always serve the same purpose as what you want or need.
It’s amazing how much faster a computer can run after you’ve cleaned out all the unnecessary bloatware that slows it down.
To uninstall any unnecessary program, follow the steps below:
- Hit the Windows + I keys simultaneously to open Settings.
- Select Apps on the left pane then Apps & features on the right pane.

- Scroll down and select an app you’d like to uninstall (in this case WSA).
- Click on the three horizontal dots and select Uninstall.

- Confirm that you want to uninstall.

5. Remove unnecessary startup programs
Any program that runs automatically when you turn on your computer will slow down its performance and hog your memory. You need to go through your list of startup items and disable anything you don’t use every single time you turn on the computer.
Sure you will need some programs at startup to make your work easier but ensure your list consists of only the necessary programs.
To disable startup programs, follow the steps below:
- Hit the Windows + I keys simultaneously to open Settings.
- Select Apps on the left pane and Startup on the right pane.

- Select the apps you want to disable at startup and toggle the on/off button.

6. Set up anti-theft feature
Theft is all too common and no one wants to get their laptop stolen. Fortunately, many laptops come with a tracking program that will help you find your laptop if it ever goes missing.
As technology becomes an ever-more-integral part of our lives, the need for security against theft is more important than ever.
Each computer is different but the majority require the user to verify their identity with a password or other method before allowing access to the computer.
If your device ever got stolen, having the Find my device feature on can help you locate it. To set up the feature, follow the steps below:
- Hit the Windows + I keys simultaneously to open Settings.
- Click on Privacy & security on the left pane then Find my device on the right pane.

- Toggle the Find my device button on.

7. Install any missing drivers
Before you can enjoy the full potential of your new system, make sure everything is working correctly by installing any drivers that may be missing or updating any outdated software.
Drivers are programs that tell the operating system how to deal with certain hardware. For example, if you go to your printer settings and find no printer listed, there’s a good chance you need a driver.
For a new computer, you will most likely need:
- Windows update drivers.
- GPU drivers.
- Audio drivers.
- LAN drivers.
To update drivers, follow the instructions below:
- Press the Windows key, type Device Manager in the search box, and click Open.

- Click on each device one by one, right-click on it and select Update Driver Software.

- Select Search automatically for updated driver software.

- Restart your PC.
Missing drivers are neither pleasant nor healthy for your computer; everything we try to do without appropriate drivers might result in major problems later on.
If you believe handling driver updates and installs is not your cup of tea, upgrading drivers through a professional program like Outbyte Driver Updater can help prevent potential unwanted issues and improve overall PC performance. Try it out and let us know if it found your missing Network Adapter drivers.
8. Set up file baackups
When you’re setting up your new computer, be sure to set up file backups. You never know when your computer might crash, or when you might accidentally delete important files.
This is a good habit to get into early on in your relationship with your new machine so that you’ll have the peace of mind of knowing that all those documents, pictures, and videos are safe no matter what happens.
To set up automatic backup, follow the steps below.
- Hit the Windows + I keys simultaneously to open Settings.
- Select Accounts then Windows backup.

- Click on Manage sync settings to back up your files.

9. Optimize your power settings
The default power settings that come with most computers are not the best. Majority of these settings may not be cut out for the activities you do so it’s best to change them.
It’s important to make sure your computer’s power settings are optimized so you’re running at maximum efficiency.
To optimize your power settings, follow the steps below:
- Hit the Windows + I keys simultaneously to open Settings.
- Select System on the left pane then Power & battery on the right pane.
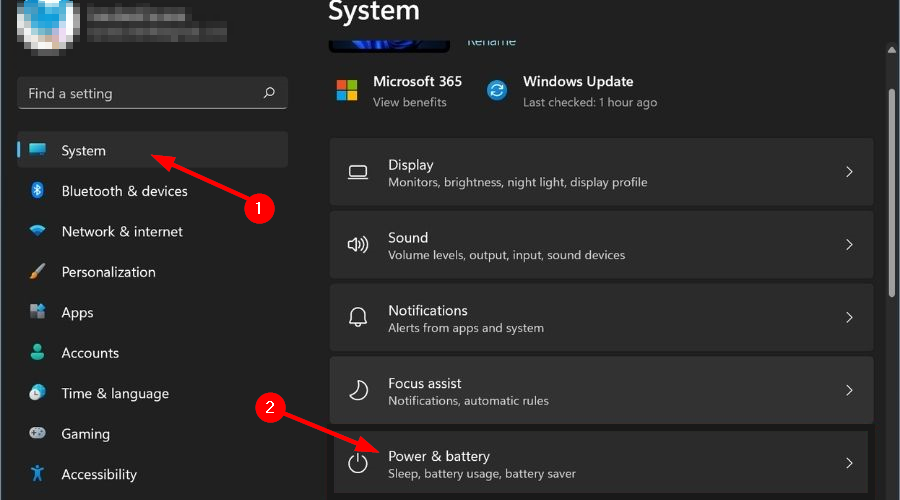
- Under Battery saver, toggle on Turn battery saver on automatically at and select an appropriate percentage.

10. Install a reliable VPN
VPN protects your online privacy by encrypting your data and hiding your location. This is extremely important if you ever use public Wi-Fi networks that you find at coffee shops and airports.
You don’t want an attacker on the same network as you to read your private data or even hack into your device. Check out our comprehensive list of reliable VPNs to install on your new computer.
11. Enable automatic updates
One of the very first things you should do after setting up your new computer is to enable automatic updates for both your apps and operating system. This will ensure that you always have the latest software and security fixes, which helps keep your computer safe from hackers and viruses.
To turn on automatic updates, follow the steps below:
- Hit the Windows + I keys simultaneously to open Settings.
- Select Windows Update on the left pane and select Resume updates on the right pane.

12. Change default programs
Your operating system comes with a set of preinstalled programs, but these aren’t always the best options out there.
For instance your browser. It’s likely that the default program is the one that came with your computer but if you don’t like it, you can easily switch to one that works for you.
To change your default programs, follow the steps below:
- Hit the Windows + I keys simultaneously to open Settings.
- Select Apps on the left pane then click on Default apps on the right pane.

- Click or search for the app you want to change default settings and assign your preferred app to open it.

13. Tweak privacy settings
Privacy is a big deal, especially when it comes to your computer. You need to know which apps have access to your camera, microphone, and location, as well as what information they can collect about you when you’re using them.
You can check the settings for all of your apps to make sure they’re what you want. You’ll also want to check your browser’s privacy settings, as well as any other applications you use that might have their own built-in privacy features.
14. Customize the look of your PC
If you are going to be spending hours on end on your new computer, you want it to be visually pleasing, but also easy to use.
Some of the customization settings you can adjust include:
Change your wallpaper
Choose a soothing background image that you’ll enjoy seeing every day. You’ll have plenty of options to choose from, including ones that come with the Windows operating system or ones you can download from the Internet. We have a list of the best Windows 11 wallpapers apps you can use to enhance the look of your PC.
Organize your icons
You spend a lot of time looking at your desktop, so it’s important to keep everything organized. Create folders for documents, music, photos, and other files so they don’t clutter up your screen.
Change your theme
Windows comes with a few pre-installed themes, but you can easily download more—both free and paid. Once you find a theme that suits your personality, you can make it your own. Windows 11 now allows you to have dark themes so be sure to check out our comprehensive list of the best dark themes for your OS.
This is not an exhaustive list as there are still a handful of things you can do to ensure your new computer is set to your preferences and its performance is at its peak.
New computer setup checklist
| Component | Checklist |
| Physical set up | Power cables, Ethernet, USB, Keyboard, and audio and ports |
| Updated OS | Update to the latest version |
| Power settings | Optimize your power settings for perfect balance |
New computer install checklist
| Component | Checklist |
| Antivirus | Install a reliable antivirus to protect you from viruses and malware |
| VPN | Install a VPN to protect your identity |
| Backup | Install backup software |
New computer driver checklist
| Component | Checklist |
| Windows update drivers | Drivers to ensure all Windows drivers are up to date |
| GPU drivers | Drivers to ensure smooth graphics in gaming |
| Audio drivers | Drivers to ensure your audio devices are working |
| LAN drivers | Drivers to ensure your internet is working |
Once your computer has fulfilled the above checklists, you can also opt to use customization software if you are more tech-savvy and enjoy things working for you automatically.
As always, we love hearing from you so engage us in the comment section below with some of the things you did when you first got your new computer.
Read our disclosure page to find out how can you help Windows Report sustain the editorial team. Read more


Improve this guide


User forum
0 messages