Solved: No Coredump Target Has Been Configured. Host Core Dumps Cannot be Saved
First, ensure the ESXi SSH is enabled
Key notes
- To fix the no coredump target has been configured issue, you need to change the UserVars.SuppressCoredumpWarning string value to 1.
- Continue reading to learn the detailed steps.
Many users have encountered the No coredump target has been configured. Host core dumps cannot be saved error after making changes to disk or installing ESXi and adding into Center.
In this guide, we will delve into WR experts’ recommended solutions to fix the issue right after discussing some of the common reasons behind the error.
What causes the No coredump target has been configured issue?
This error usually occurs if no core pattern is defined, you have insufficient permissions, or have storage space issues.
How can I fix the No coredump target has been configured issue?
1. Adjust the allowCoreDumpOnUsb boot variable
- Press Shift + 0 during the ESXi boot to get to the boot options.
- Now locate allowCoreDumpOnUsb, change its value to allowCoreDumpOnUsb=TRUE, and hit Enter to continue booting.
- Once the boot options are updated, open an SSH session to the ESXi host.
- Type the following command to verify if the core dump file was created on the VMFS-L filesystem within OSDATA:
esxcli system coredump file list
2. Configure the remote core dumps on an ESXi host
- First, connect to the ESXi host via the vSphere Client or direct console.
- Type the following command to list VMkernel interfaces and identify the one used for communication with the Center Server appliance:
esxcfg-vmknic -l - To set remote core dumps, which specifies the VMkernel interface, the port for remote core dumps collector and vCSA’s IP address:
esxcli system coredump network set --interface-name vmk0 --server-ipv4 192.168.15.8 --server-port 6500 - Copy & paste the following command to enable remote core dumps:
esxcli system coredump network set --enable true - To get & check the network settings for core dumps, type the following commands one by one to confirm the configuration:
esxcli system coredump network get
esxcli system coredump network check
- Copy & paste the following commands one by one to disable and remove local core dumps:
esxcli system coredump file set --enable false
esxcli system coredump file remove --force
- Type the following command to ensure there are no more local core dumps:
esxcli system coredump file list - Now to save the configuration changes for future reboots, copy & paste the following command:
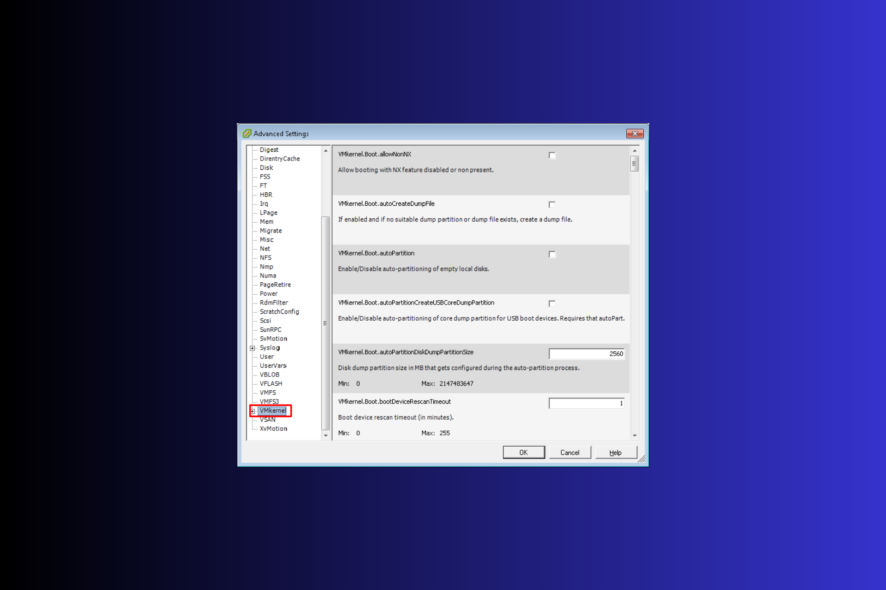
/sbin/auto-backup.sh - On the ESXi Host to Configuration, then select Software.
- Select Advanced Settings.
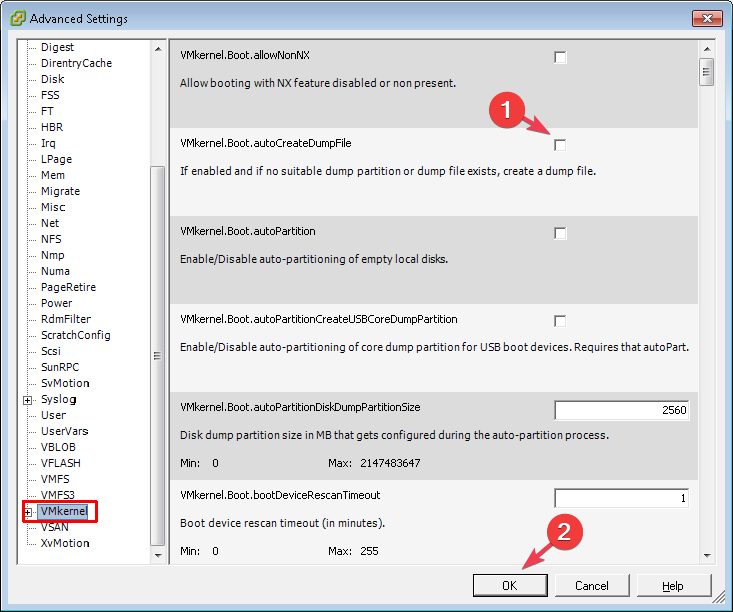
- Remove the checkmark next to VMkernel.Boot.autoCreateDumpFile, then click OK.
The core dump file needs a volume larger than 4 GB, so make sure it has the required space to avoid the error in the future as well.
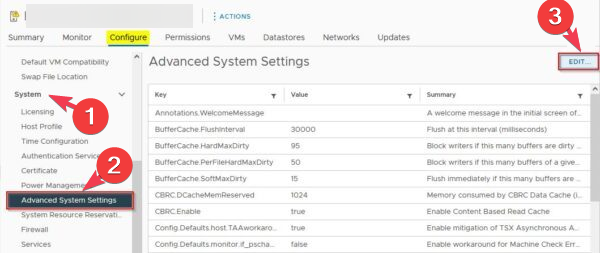
3. Edit the Advanced System Settings
- Launch the vSphere Client, and choose the affected ESXi host.
- Go to the Configure tab, then select System.
- Choose Advanced System Settings, and click Edit.
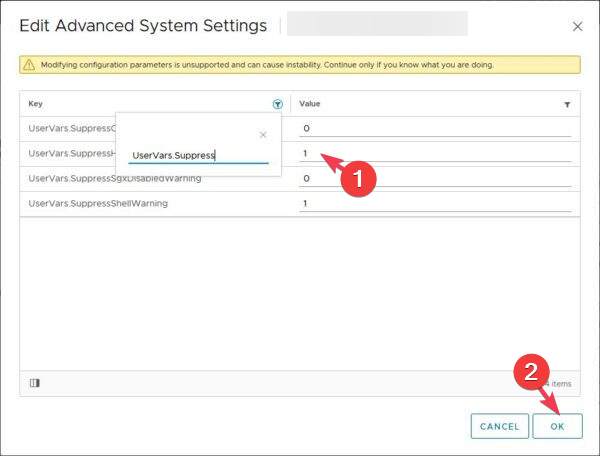
- Look for UserVars.SuppressCoredumpWarning, change the value of the string to 1, then click OK.
- Next, search for VMkernel.Boot.allow and locate VMkernel.Boot.allowCoreDumpOnUsb.
- Change its value from False to True.
Next, connect to the host via SSH, then look for available storage locations, and follow these steps:
- Copy & paste the following command and hit Enter:
esxcli storage filesystem list - To create the coredump file, type the following command after replacing DATASTORE and HostName:
esxcli system coredump file add -d DATASTORE -f HostName -s 2000 - Type the following command to verify if the coredump file was created:
esxcli system coredump file list - Copy & paste the following command to set the values to false:
esxcli system coredump file set -s -e=True
4. Create a dump file (If using iSCSI storage for ESXi hosts)
- First, connect to the ESXi host via the vSphere Client or direct console.
- Go to Configure, then Security Profile.
- Choose Services.
- Locate SSH from the list and click Options.
- Click Start.
- Now, use an SSH client like PuTTY to connect to the ESXi host via IP address or hostname.
- Once connected via SSH, type the following command to confirm the core dump file location & filename after replacing your_datastore_name and the_dumpfile_name with your ESXi hostname, then press Enter:
esxcli system coredump file add -d *your_datastore_name* -f *the_dumpfile_name - Copy & paste the following command to set the newly created sump file as your active dumpfile after replacing the your_datastore_name & the_dumpfile_name:
esxcli system coredump file set -p /vmfs/volumes/*your_datastore_name*/vmkdump/*the_dumpfile_name*.dumpfile - Next, confirm your dump file is in place, and press Enter:
esxcli system coredump file list
Another common issue that people face while using the ESXi host is The operation is not allowed in the current state while using VMware tools; read this guide to learn more.
So, to get rid of the No coredump target has been configured message, first try adjusting the allowCoreDumpOnUsb boot variable during the reboot process, then configure the remote core dumps on an ESXi host.
In case you need help with periodic backups for ESXi host configuration, read this guide to get the detailed steps.
If you have any questions or suggestions about the subject, feel free to mention them in the comments section below.
Read our disclosure page to find out how can you help Windows Report sustain the editorial team. Read more


Improve this guide


User forum
0 messages