Best OBS Settings for Low-End PC [Recording, Streaming]
Find out all about resolution, FPS, Bitrate, Presets & more
Key notes
- Finding the ideal OBS settings for low-end PC is essential for a lag-free experience.
- In that regard, use the below procedure to configure both your computer and OBS right away.
- So, what are the best OBS settings for your PC? Here's a valuable tip: don't forget to set the encoder!

OBS Studio is a software developer of free open-source software. Their product is for those with a passion for video recording and live streaming.
Some of them want to know what are the OBS settings for recording on a low-end PC. Here’s what one user says:
I have a PC with very low specs. I want to record and not to stream my game. I request anyone to tell me the settings that can give me a lag-free gaming and recording experience.
If you have in mind the same thing, don’t hesitate to follow our quick solutions to use the best OBS settings for recording on a low-end PC. Read carefully our next section to check them out.
Is OBS CPU heavy?
OBS can potentially hog up a lot of processing power and this is something to take into consideration especially when running on a low-end PC.
You can tweak the software’s settings to use less CPU, but the quality will be impacted both for streaming and recording tasks. For instance, FPS loss is a direct consequence of OBS’ CPU consumption rates.
And speaking about that, you must be also wondering what is the best FPS for OBS.
We know that 60 frames is the desirable preset for quality videos. However, we mustn’t forget that we are aiming to find the very best OBS settings for a low-end PC, hence system specs should prevail.
60 FPS will not only take up more storage but also demand a higher bitrate, which could potentially lead to buffering issues, lagging, and stuttering.
Instead, a 30 FPS preset will provide more stability, which will secure a more committed audience.
What are the best OBS settings for low-end PCs?
1. Configure computer and OBS settings
- Turn all video settings from your game to their lowest.
- Reduce Canvas resolution for OBS to 16:9 720p (1280×720) or 480p (854×480).
- Use the Bicubic downscale filter.
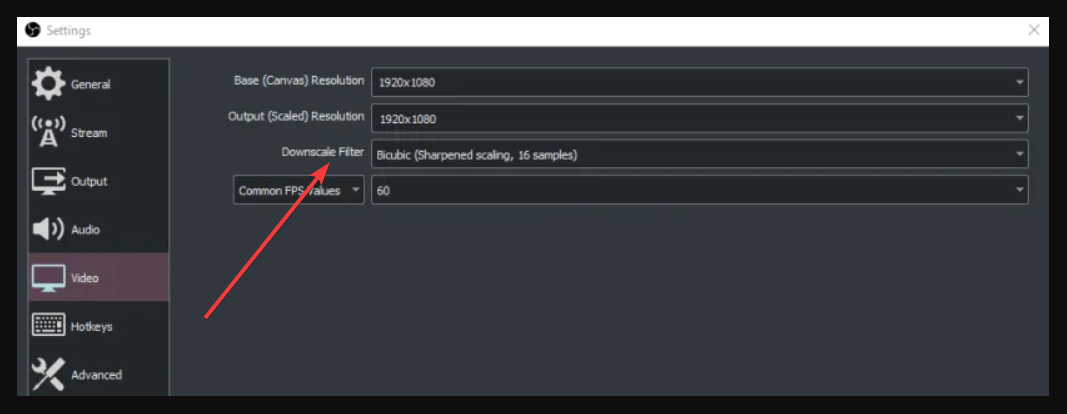
- Verify the OBS FPS and reduce them to 24 or 30. (Is 30 FSP good for OBS? In this case, yes, it will be more stable than 60 or higher).
- Verify OBS Audio and set the sampling rate to the lowest at 44.1kHz.
- If you’re wondering what is the best bitrate for OBS for low-end PC, know that you can set them as low as 64 KBpS.
When you have set the game video settings to the lowest, this will decrease the quality of game graphics. Even so, your computer will perform better because this step reduces the load from the CPU and GPU.
After setting the OBS Audio and ensuring its sampling rate is at the lowest, that will save you some bits. Also, resume strictly playing the game, and avoid running other applications or services.
2. Use Quick Sync Video for your encoder
2.1. Activate Quick Sync
- Open OBS, navigate to Settings, and visit the Encoder section.
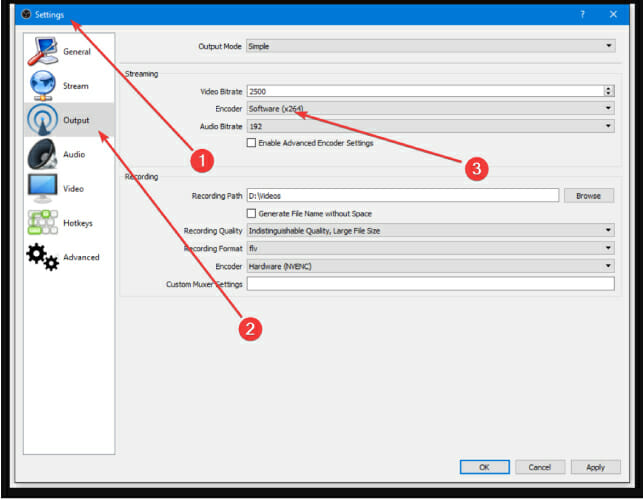
- Select Quick Sync Video.
When trying to find the best OBS settings for recording on a low-end PC, note that your encoder is very important as it uses certain hardware and encodes your video file.
Quick Sync Video is designed to use the Intel IGPU for encoding. This leaves the processor, graphics card, and hard disk drive free for gaming or software.
Thus, the Intel graphics chip will handle the entire encoding process while you can use the AMD or NVIDIA GPU at its full capacity.
2.2. What to do if you can’t select Quick Sync
- Navigate to BIOS and activate the integrated Graphics Chip.

- Open your web browser and visit Intel Download Center.
- Choose and download Intel Graphics Drivers for your processor.

- Run the driver installation process.
- Restart the computer after installation has finished.
- Open the OBS application and navigate to Settings.
- Visit Encoder and select Quick Sync.
The possibility to activate the Quick Sync encoder depends on the manufacturer of your computer’s motherboard. We recommend you verify the mainboard manual in this regard.
This applies even to those who are looking for the best OBS stream settings for a bad, old computer that’s far from its days of glory.
In BIOS, please search for one of the following options and enable it:
- IGPU Multi-Monitor
- Internal Graphics
- IGD Multi-Monitor
If you are unable to find such an option, then your computer’s mainboard might not support Quick Sync. We also advise you to contact the mainboard manufacturer and ask them for more information.
If you have managed to activate the option in BIOS, download the latest drivers available from Intel’s Download Center. Regardless if you use OBS Classic or Studio version, both of them are useful.
The encoding options remain the same for each of the variants. If you want to stream, use constant bitrate. For local recording, use the variable bitrate and increase the bandwidth.
When navigating through the advanced settings in OBS, you can change the encoding preset from x264 to Quick Sync. Lowering the preset is useful if you encounter problems during encoding.
Can I use OBS with 2GB RAM?
There is no official prohibition to doing so. According to OBS system specifications, it is recommended – not be mistaken for mandatory – to use a PC with 4GB of memory space and have DirectX enabled (version 10 onwards).
The previous section has detailed the best OBS settings for low-end PCs. Use our first solution to configure your computer, and then your OBS software.
The second solution we recommend is to use the Quick Sync feature. Read carefully that specific section and check out both possible cases. First, use the steps presented to activate Quick Fix.
If you don’t have it, make sure it is installed, and if not, then follow the steps written above the current section. Try out our tested solutions and implement OBS settings for recording on a low-end PC.
Now that you learned the steps to get the ideal settings for your computer check out this guide to learn steps to enable hotkeys in OBS Studio to increase productivity while using the software.
Do not hesitate to write a comment and give us details about your experience with OBS.
Read our disclosure page to find out how can you help Windows Report sustain the editorial team. Read more


Improve this guide


User forum
0 messages