How to Remove the External Tag in Outlook
Apply these simple steps to remove the External tag on Outlook
Key notes
- The External tag/label attached to Microsoft Outlook email is to warn users that the email did not originate from within the organization.
- By excluding the email via administrative rights, the External tag should be removed from the mail.

Lately, emails from outside your network can come into Outlook tagged or labeled with [EXTERNAL]. It indicates the email is coming from an External recipient.
However, some users dislike the labels, so they want to know how to remove External tags in Outlook. Likewise, users report the name cannot be resolved error they encounter on Outlook.
Why is Outlook showing an external tag?
There are some email security threats you should be worried about. Scammers send malicious or bad-willed emails to steal the recipient’s information or money.
So, external email tags are an essential security measure to help users identify threats like phishing, spam, and other malicious emails.
Why do my emails say external?
However, the External tag or label attached to Microsoft Outlook email is to warn users that the email did not originate from within the organization. So, it helps the admin track and identifies emails that are potentially dangerous or harmful.
Furthermore, not all Outlook emails with External tags or labels are suspicious or malicious.
The concept of the External tag is to prompt users to confirm the sender’s authenticity before downloading attachments from the mail. Also, you should verify the sender before opening any links in the mail.
How do I remove the External tag in Outlook?
1. Disable External email tags via Windows PowerShell
- Left-click the Start button, type powershell, and click Run as administrator.
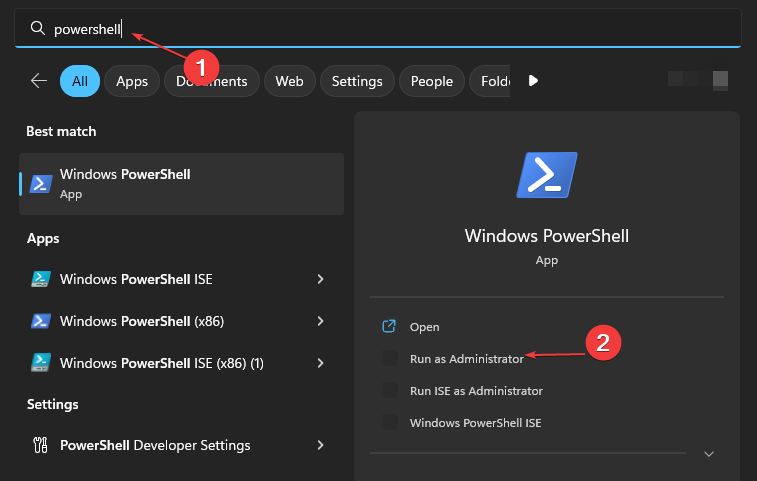
- Click Yes on the User Account Control prompt.
- Type the following lines and press Enter:
Set-ExternalInOutlook -Enabled $false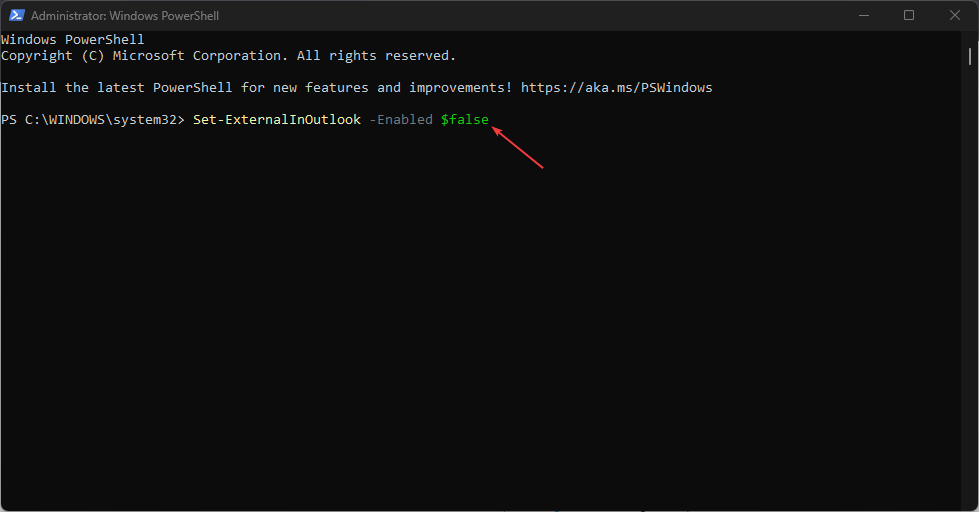
- Restart your PC and check if the External email tag or label still appears.
Note that it can take up to 24 hours for the tags to disappear, and the duration can differ depending on the volume of your emails.
Check what to do if Windows PowerShell stops working when executing the steps above.
2. Exclude specific Email addresses or domain from External tagging
- Left-click the Start button, type powershell, and click Run as administrator.
- Click Yes on the User Account Control prompt.
- Type the following lines and press Enter:
Set-ExternalInOutlook –AllowList "********.com"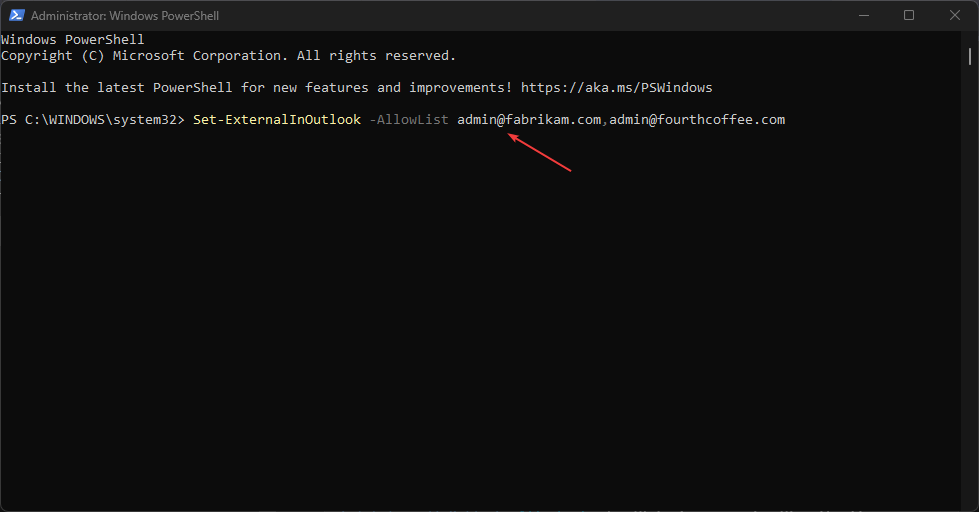
- Input the mailing address you want to exclude in the *** entries in the above command.
- Restart your PC and check if the exclusions work.
Users can exclude the maximum number of 30 emails with the above command (add a comma , at the end of each mail).
How do I add an External tag in Outlook?
1. Enable External email tags via Windows PowerShell
- Left-click the Start button, type powershell, and click Run as administrator.
- Click Yes on the User Account Control prompt.
- Type the following lines and press Enter:
Set-ExternalInOutlook -Enabled $true
- Restart your PC and check Outlook after 24-48 hours to see if the External warning tag or label appears.
Users without the Outlook External tags can add it to their Outlook app. Note that it can take up to 48 hours for the External email warning to appear in Outlook after enabling it.
Conclusively, you can refer to our article about how to fix Outlook 2016 crashes when opening if they encounter problems.
Hopefully, now you know how to turn off the external tag in Outlook and you know everything about the process.
Also, you may check our guide about fixing Outlook not connecting to the server & Gmail on Windows 11.
Should you have further questions or suggestions, kindly drop them in the comments section.
Read our disclosure page to find out how can you help Windows Report sustain the editorial team. Read more


Improve this guide


User forum
0 messages