Fix: ASP.NET MACHINE ACCOUNT password in Windows 10/11

Are you one of our users who is getting a prompt in Windows 10 or Windows 8.1, 8 every time you try to delete or modify a specific folder or file? Well, all you need to do is follow the steps listed below and you’ll be able to fix your ASP.NET MACHINE ACCOUNT issue in Windows 10 or Windows 8.1 in order to resume your everyday activities in no time at all.

There is a feature in Windows 10 or Windows 8.1 that you will need to disable first called control userpasswords2. You need to uncheck the check mark next to the “Users must enter a username and password to use this computer” option. If this does not solve your issue, we have a couple of more methods below depending whether you are using the asp.net development toolkit or not.
How do I fix ASP.NET MACHINE ACCOUNT password issues?
- Disable control userpasswords2
- Delete the Machine Account
- Change user account settings
- Use System Restore
- Refresh your PC
- Create a new user account
1. Disable control userpasswords2
- Press and hold the “Windows” button and the “R” button.
- You should now have in front of you the Run window.
- In the run dialog box write the following: “control userpasswords2” without the quotes.
- Press the Enter button on the keyboard.
- Now in the window that pops up, you will need to uncheck the box next to the “Users must enter a username and password to use this computer” option.
- Left click or tap on the “OK” button afterwards.
- Close all the windows you opened so far and reboot your Windows 10 or Windows 8.1 operating system.
- When the device starts you will need to check again for the pop up password message regarding the “ASP.NET MACHINE ACCOUNT”.
2. Delete the Machine Account
If you are not working with ASP.NET, you can delete the MACHINE ACCOUNT and see how it goes.
- Reboot your Windows 10, 8 operating system.
- When the device starts, log in with your administrator account and password.
- Left click or tap on the “Windows Logo” button.
- Write “User accounts” without the quotes.
- Left click or tap on the Settings feature presented in the menu.
- Left click or tap on the “User Accounts” icon.
- Left click or tap on the “Manage another account” feature.
- Select from the list the “ASP.NET Machine Account” from the list presented.
- Left click or tap on the “Delete the account” button.
- In the next window, you can choose to keep the files if you wish before continuing with the deletion process.
- After the deleted process has finished reboot your Windows 10 or Windows 8.1 device.
- When the operating system starts check again if you get the same pop up message.
3. Change user account settings
- Move the mouse cursor over to the upper right side of the screen.
- From the menu that appears left click or tap on the “Search” feature.
- In the search dialog box, write the following “Change user account settings” without the quotes.
- In the next window change the settings presented to “Never Notify” option.
- Reboot again your operating system.
RELATED: FIX: Windows 10 won’t let me add a new user account
4. Use System Restore
- Place the Windows 10 or Windows 8.1 installation media disk into the device.
- Reboot your Windows 10, 8 operating system.
- After the device reboots, you will get to a black screen where it will tell you to press any key to boot from the CD or DVD in which case you will need to press any button on the keyboard.
- In the first window that appears, you will need to set the correct time and keyboard type.
- Left click or tap on the Next button.
- Now in the next screen, you will need to left click or tap on the “Repair your computer” feature situated in the lower left side of the screen.
- In the window “Choose an option” left click or tap on the “Troubleshoot” feature.
- From the Troubleshoot window, left click or tap on the “Advanced Options” feature.
- Left click or tap on the “System Restore” feature presented in the menu.
- Follow the instructions on the screen to finish the System Restore process and then reboot your operating system.
- Check again if you still get the pop up message regarding the ASP.NET Machine Account.
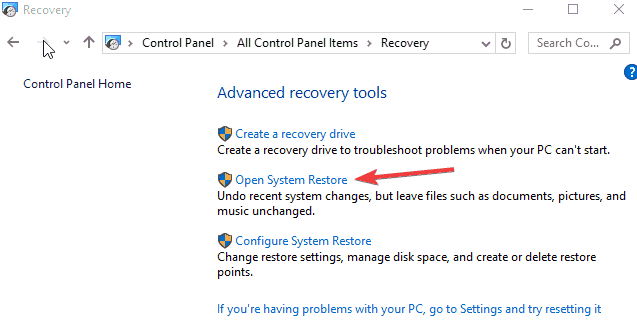
You can also open System Restore from Control Panel, as shown in the screenshot below:
5. Refresh your PC
Note: Before attempting the steps below please backup all your important documents and folders you use in Windows 8.1 or Windows 10.
- Reboot again your operating system with the Windows 10 or Windows 8.1 Installation Media disk inside.
- Press any button on the keyboard when the message “Press any key to boot from CD or DVD” appears.
- Choose again the time and keyboard type and press the Next button.
- Left click or tap on the “Repair your computer” feature situated in the lower left side of the screen.
- From the “Choose an Option” window left click or tap on the “Troubleshoot” feature.
- Now left click or tap on the “Refresh your PC” feature.
- Follow the instructions on the screen to proceed with the system refresh of the operating system.
6. Create a new user account
Some users confirmed that creating a new user account with administrative privileges fixed the problem. So, if none of the solutions above helped you solve the problem, go ahead and create a new user account.
And that is it, if you followed the methods above in the order they are listed, you should have managed to fix your ASP.NET Machine account pop up message in Windows 8.1 or Windows 10. If you’ve run into issues along the way in this tutorial, please use the comments section below to let us know and we will help you further as soon as possible.
RELATED STORIES TO CHECK OUT:
- Full Fix: Disabled Administrator Account on Windows 10, 8.1 and 7
- Full Fix: Unable to Sign in to Xbox Account in Windows 10
- ‘The referenced account is currently locked out’ Windows 10 fix
Read our disclosure page to find out how can you help Windows Report sustain the editorial team. Read more


Improve this guide


User forum
1 messages