PFN List Corrupt on Windows 11: How to Fix it in 8 Steps
Corrupt system files and memory partitions can cause this error
Key notes
- PFN LIST CORRUPT is one of the most common Windows 11 error messages on blue screens.
- A defective driver is one of the causes of this issue, which can be solved by updating drivers.
- You can also fix this problem by using the built-in repair tools or dedicated software.

One of the common blue screen error messages is the PFN LIST CORRUPT error in Windows 11. When this issue occurs, you might not be able to use your PC to perform any task at that moment.
Thankfully, just like the PFN list corrupt on Windows 10 issue, we have prepared the fixes to help you solve the problem on Windows 11 in this guide.
What does PFN list corrupt mean?
The PFN list corrupt issue on Windows 11 means that there are corrupt data in the Page Frame Number. Once the PFN is corrupt, there will be a limit to the number of tasks it can perform.
This leads to the dread BSoD error you see on your screen.
Why is PFN list corrupt?
Some of the possible causes of the PFN LIST CORRUPT error are as follows:
- Defective driver – Problematic drivers are one of the major reasons PFN list corrupt error while gaming. This can lead to a bigger problem and you will need to uninstall and reinstall these drivers to fix the problem.
- Corrupt system files – Since the PFN list deals with system files, it is only natural that you get this error when one or more of these files are corrupt. Repairing and restoring these broken system files is the only way out of this issue.
- Issues with memory – Your PC memory can also cause this problem. To eliminate the error code here, you have to fix the problems with the computer’s memory.
- Problematic third-party applications – If you started noticing a blue screen with the stop code PFN list corrupt after installing an app, the software might be triggering the issue. We advise removing this software either manually or with one of the best uninstaller software.
How do I fix a corrupt PFN list in Windows 11?
1. Update Windows
- Right-click the Start menu and select Settings.

- From the Settings menu, choose Windows Update then click Resume updates.

Since Windows 11 isn’t flawless and has a few flaws and faults, it’s critical to run Windows Update frequently to resolve any hardware or software issues.
Most hardware and software issues, which are both important causes of the blue screen PFN LIST CORRUPT error in Windows 11, can be resolved if you install the latest updates.
Updates include enhanced stability, security, and new features in addition to bug fixes, so make sure you download them frequently.
It’s also critical to keep your drivers updated. Since Windows 11 is a new operating system, it may encounter issues with older hardware.
2. Run the SFC scan
- Click the Start menu, type Command Prompt, then right-click it and choose Run as administrator.

- type the following line and hit Enter once the Command Prompt window appears:
sfc/scannow
- Wait till the procedure is completed (it may take a while).
This is a command-line troubleshooter for a variety of problems, including BSOD errors. Hopefully, this will also fix the PFN LIST CORRUPT error in your Windows 11 computer.
3. Run DISM
3.1. Standard way
- Click the Start menu, type Command Prompt, then right-click it and choose Run as administrator.
- Type the following command and press Enter:
DISM /Online /Cleanup-Image /RestoreHealth
- Wait until the scan is finished.
- Restart your computer and try updating again.
3.2. With the Windows installation media
- Insert Windows installation media in the drive.
- Click the Start menu, type Command Prompt, then right-click it and choose Run as administrator.
- Type the following commands in the command line, pressing Enter after each one:
dism /online /cleanup-image /scanhealthdism /online /cleanup-image /restorehealth - Now, type the following command and press Enter. With the Windows installation, make sure to replace an X value with the letter of the mounted disk:
DISM /Online /Cleanup-Image /RestoreHealth /source:WIM:X:SourcesInstall.wim:1 /LimitAccess
- Restart your computer once the procedure is completed.
DISM (Deployment Image Servicing and Management) re-deploys the system image while also fixing any potential faults. This method can also be used to resolve the PFN LIST CORRUPT error in Windows 11.
4. Update drivers
- Right-click on Start menu and select Device Manager.

2. Now, right-click the first device and select Update driver.

3. Then choose Search automatically for drivers from the menu that opens.

4. Wait for Windows to update the driver, then repeat the process with the remaining devices.
Outdated drivers might also be the cause of the BSOD PFN list corrupt on Windows 11. So, it is crucial that you keep your drivers updated always. You can learn how to do it using the guide below.
As you may be aware, updating drivers using this method takes a long time. As a result, we recommend that you use a specialized driver updater tool that will perform this task for you automatically.
Using an automatic driver updater will save you the time and effort of manually looking for drivers, and it will ensure that your system is always up to date with the latest drivers.
5. Check the hard drive
- Right-click the Start menu, then choose Settings from the list menu.
- Select System from the left pane, then scroll down to Recovery in the right pane and click it.

- After that, find Advanced startup and select the Restart now option next to it.

- Wait a few moments. Next, a window with a few options will appear. Choose Troubleshoot.

- Then, select Adanced Options.
- Choose Command Prompt in the next window.
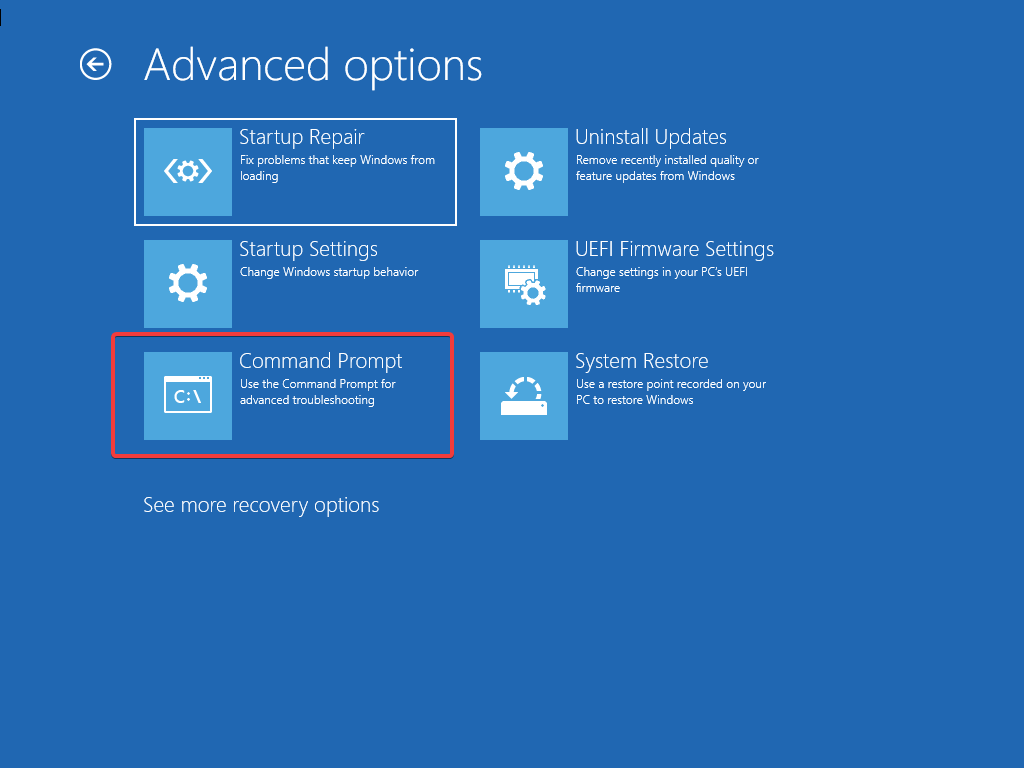
- In the Command Prompt window, type the following lines and hit Enter after each one to run it:
bootrec.exe /rebuildbcdbootrec.exe /fixmbrbootrec.exe /fixboot - Finally, run the following commands (replace C and D with your drive letter):
chkdsk /r c:chkdsk /r d:
Now, restart your computer and check if the issue is resolved. If not, proceed to the next solution.
6. Uninstall the problematic driver
- Right-click Start menu then choose Device Manager from the list.
- Click the arrow next to the section where the corrupt driver is to expand it and right-click the driver there.
- Choose Uninstall device.

- Finally, click the Uninstall button and restart your computer.

Keep in mind that practically any driver can cause this error; you may need to do some research before determining which driver is causing the issue. Many users noted that deleting the problematic drivers (most commonly Etron) fixed the problem.
In addition to drivers, it’s worth noting that an antivirus program might cause BSOD issues. So make sure to uninstall any third-party antivirus software and recently installed apps.
7. Disable Microsoft OneDrive
- Click the Start menu and type Edit group policy then hit Enter.

- When the Local Group Policy Editor appears, go to Computer Configuration, then click Windows Components under Administrative Templates.

- After that, scroll down the list to find OneDrive, and double-click it.
- Locate and double-click Prevent the usage of OneDrive for file storage.
- Select Enabled and click Apply and OK to disable OneDrive.

For many years, OneDrive was part of the Windows Essentials suite for many years, but as online storage became more popular, it became the default program on Windows 10 afterward.
OneDrive is a fantastic tool for collaborating and sharing files with others; however, numerous users have complained that it can also cause the PFN LIST CORRUPT problem.
8. Check your hardware
- Hit Windows + R, which will open the Run dialog box.
- Type mdsched.exe and click OK.

- Click Restart now and check for problems.

- The Windows Memory Diagnostics Tool screen will appear after that. Allow it to complete the RAM verification and wait a few minutes.
The PFN LIST CORRUPT error is frequently caused by malfunctioning hardware, most typically RAM, therefore ensure your RAM is in good working condition by following the steps above.
Even if your RAM is the obvious suspect, make sure all other components, such as your motherboard, network card, and graphics card, are in good operating condition.
Also, you can download MemTest86+ and run it for a couple of hours to know if there is a problem with your RAM. Many consumers stated that the issue was solved once they replaced their RAM.
There you have it: The fixes for the PFN list corrupt issue on Windows 11. With, everything in this guide, you should be able to solve the problem without fuss.
If you are facing the memory management BSOD issue on Windows 11, check our detailed guide for the surefire fixes to apply.
Feel free to let us the solution that helped you fix this problem in the comments below.
Read our disclosure page to find out how can you help Windows Report sustain the editorial team. Read more


Improve this guide

User forum
0 messages