Please insert the disk error on Windows 10/11 [Ultimate Guide]
Specialized software can help you solve this disk error more efficiently
10 min. read
Updated on
Read our disclosure page to find out how can you help Windows Report sustain the editorial team. Read more
Key notes
- Users have reported a Please insert the disk error on Windows 10 when trying to use a partition.
- The insert a disc issue can appear in different variations on Windows 10.
- Performing system scans and editing the registry should quickly get rid of these alerts.
- One other way to fix this problem is to update your system and its drivers.

Computer errors will occur on your PC sooner or later, and if that happens, you should know how to fix them. One error that users reported is Please insert the disk error.
Many things could cause this error message to appear, ranging from hardware problems specific to your CD or DVD readers to software problems related to your system.
The issue is prevalent in most Windows 10 PCs, and it is quite annoying, so today we’re going to show you how to solve this problem on your PC.
How can I fix Please insert the disk errors on Windows 10?
- Use a third-party partition manager
- Check for physical damage
- Update the USB drivers
- Run the Hardware Troubleshooter
How do I fix Please insert the disk into removable disk error?
1. Use a third-party partition manager
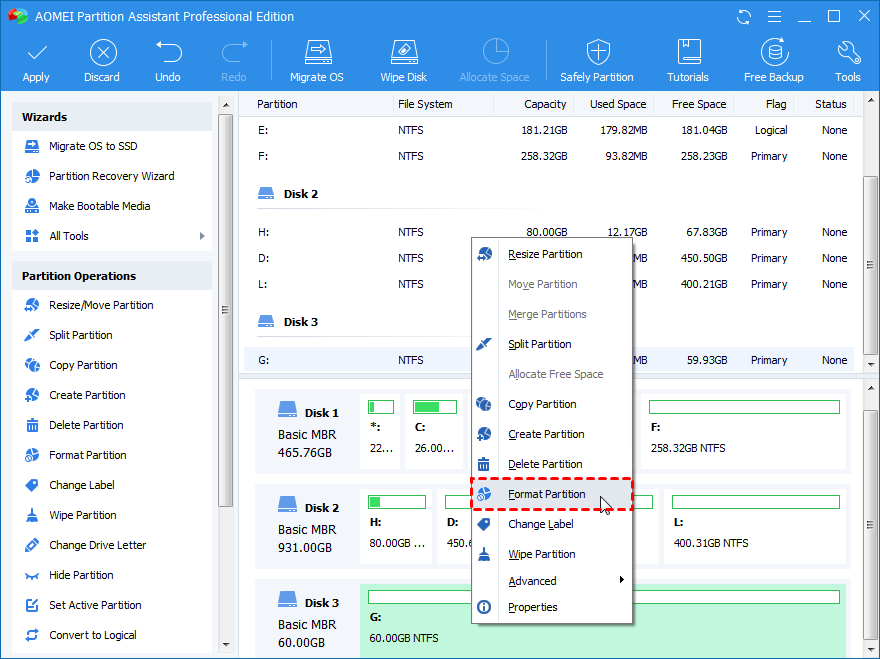
- Download and install Aomei Partition Assistant.
- Choose the partition and select Format Partition.
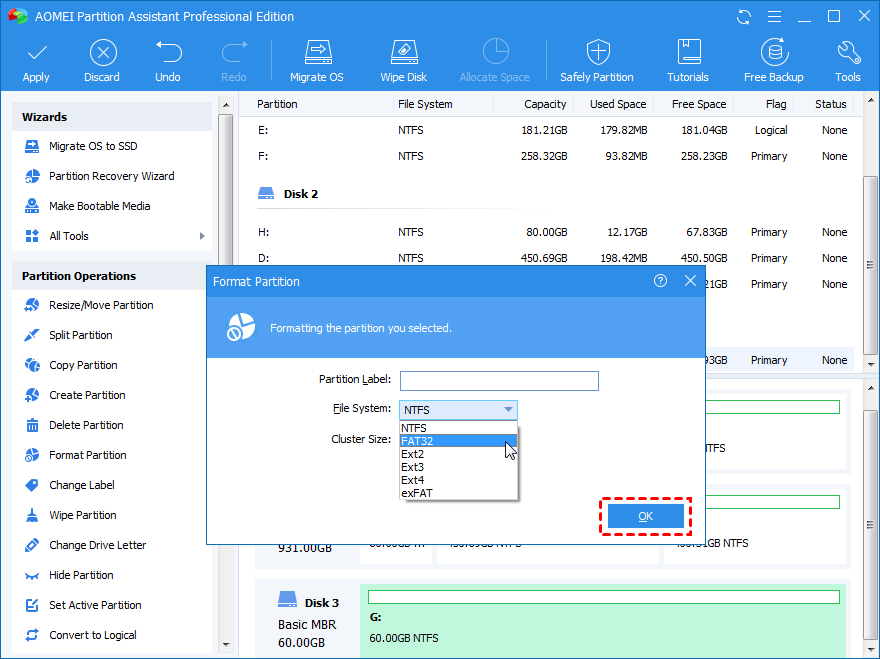
- Select the new partition settings.
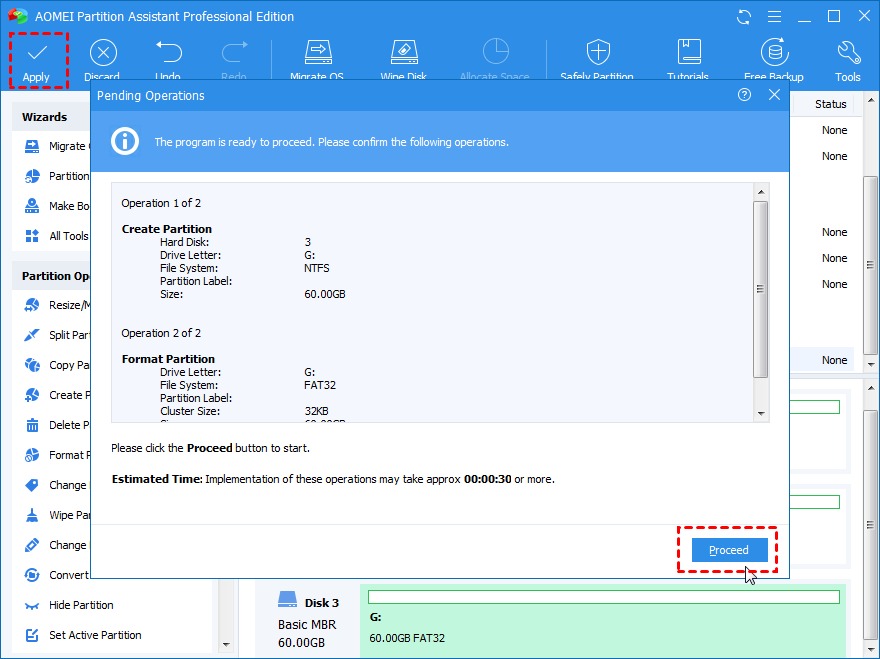
- Confirm your choices, and then select Proceed.
While you could manage your PC’s partitions using Windows 10’s built-in tools, they are very clunky to use and you can easily get them wrong somehow.
However, if you use a dedicated partition manager, you can create, manage, format, delete, and pretty much do whatever you like with your partition without losing any data with just a click of a button.
In the case at hand, solving the error can be done by formatting the troublesome partition, which you can do as shown above.

AOMEI Partition Assistant
Keep your data intact, and use this dedicated tool to create and manage your partition more easily.2. Check for physical damage
If your USB port is damaged, you obviously won’t be able to use it properly. So, if none of the software solutions got the job done, check if your USB port is physically damaged.
The same goes for the USB drive as well, since USB sticks can also get damaged. Check for dents, foreign objects, cracks, or anything that would signal possible problems.
3. Update the USB Hub drivers
- Go to Search, then type devicemngr, and open Device Manager.
- Expand Universal Serial Bus controllers
- Right-click the USB Root Hub, and go to Update driver.
- Let the wizard find new updates (if available) and finish the installation.
- Restart your computer.
If you haven’t updated your drivers in a while, there’s a chance your current USB Hub driver interferes with the current version of Windows 10, in which case you need to update the drivers.
Update drivers automatically
You can also approach the issue with a dedicated driver updater that will do all the job for you from the moment you launch it.
Not only will it fix the drivers automatically, but it will do so by itself, periodically scanning your hardware for newer versions so you don’t need to worry anymore.
4. Run the Hardware Troubleshooter
- Go to the Settings app.
- Go to Updates & Security > Troubleshoot.
- Select Additional troubleshooters.
- Select Hardware and Devices, and go to Run the troubleshooter.
- Wait for the process to finish, and follow further on-screen instructions.
- Restart your computer.
If none of the solutions listed above managed to solve the problem, we’re going to try Windows 10’s own hardware troubleshooter. This tool is actually multi-functional, but fortunately, it features a hardware department.
Here’s how to run the Windows 10 Troubleshooter to solve the Please insert the disk into removable disk error. If you’re having trouble opening the Setting app, take a look at this article to solve the issue.
How do I fix the Please insert the disk error?
- Edit your registry
- Change the drive letter
- Download the latest updates
- Run the Hardware and Devices troubleshooter
- Download and install a different chipset driver
- Use the default DVD driver
- Disable the USB device from Device Manager
- Repair the installation
1. Edit your registry
- Press the Windows Key + R and enter regedit.
- Press Enter or click OK.
- When the Registry Editor opens, in the left panel navigate to the following key:
HKEY_LOCAL_MACHINESYSTEMCurrentControlSetControlWindows - In the right panel, double-click the ErrorMode DWORD to open its properties.
- Enter 2 in the Value data field and set the Base as Decimal.
- Click OK to save changes.
- After making changes to your registry, restart the PC and check if the problem is resolved.
According to users, you can fix this problem on your PC simply by making a few changes to your registry.
Editing your registry can be somewhat dangerous, therefore we strongly advise you to create a backup of your registry before making any changes.
If you can’t edit your Windows 10 registry, read this handy guide and find the quickest solutions to the issue.
2. Change the drive letter
- Press Windows Key + X to open Win + X menu.
- Select Disk Management from the list of options.
- When Disk Management opens, locate your SD card, right-click it, and choose Change Drive Letter and Paths.
- Click the Change button.
- Make sure that Assign the following drive letter option is selected.
- Now select a different drive letter from the menu.
- Some users are suggesting choosing a letter V, W, or X since those letters are almost never used by Windows.
- After you’re done, click OK to save the changes.
Users reported that this error occurs when you insert a card into a card reader, and to fix this problem, you need to insert the card into the card reader and change the drive letter.
This solution works for card readers, USB flash drives, and any other removable storage device that you might use.
3. Download the latest Windows updates
Many Windows 10 issues are fixed by installing the latest updates, and the same applies to this problem.
If you’re having Please insert the disk error on your PC, be sure to check if you have the latest Windows 10 updates installed. If not, visit the Windows Update section and download them.
4. Run the Hardware and Devices troubleshooter
- Press Windows Key + S and enter troubleshooting.
- Select Troubleshooting from the list of results.
- When Troubleshooting window opens, click View all in the menu on the left.
- Select Hardware and Devices from the list.
- When Hardware and Devices Troubleshoot opens, click Next and follow the instructions on the screen.
You can sometimes solve Please insert the disk error simply by running the Hardware and Devices troubleshooter.
This troubleshooter is designed to fix common problems, and sometimes it can be used to fix this specific problem as well.
After the troubleshooter scans your PC, the problem should be completely resolved. You can’t open Control Panel? Take a look at this step-by-step guide to find a solution.
5. Download and install a different chipset driver
According to users, sometimes you can fix this problem simply by downloading the appropriate chipset driver and installing it.
This is a simple procedure, and in order to do it just go to your motherboard manufacturer’s website and download a different set of chipset drivers. After doing that, your issue should be resolved.
6. Use the default DVD driver
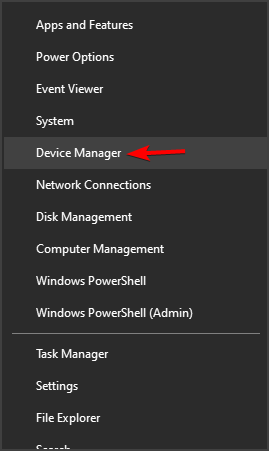
- Press Windows Key + X and select Device Manager from the list.
- When Device Manager opens, locate your DVD drive, right-click it, and choose Uninstall.
- When the confirmation message appears, click OK.
- After you remove your driver, restart the PC.
One way to fix Please insert the disk error is to use the default DVD driver. To do that, you need to uninstall your current DVD driver and let Windows 10 install the default driver instead.
After your PC restarts, the default driver will be installed and the problem will hopefully be fixed.
7. Disable the USB device from the Device Manager
Users reported that this problem can sometimes occur due to problems with their printers. For example, users reported this issue with a printer that has a USB port on it.
This port can be used to attach a USB flash drive and print pictures quickly. However, sometimes your computer might recognize that USB port on your printer as a USB port on your PC.
That can lead to all sorts of problems. One way to fix this problem is to open the Device Manager, locate this port, and disable it. While doing this, be sure not to disable any USB ports on your PC.
How do I fix the Please insert the disk 1 error?
1. Repair the installation
- Press Windows Key + S and enter programs and features.
- Select Programs and Features from the list of results.
- A list of all installed applications will appear.
- Locate AutoCAD software, select it, and choose Repair from the menu on the top.
- Alternatively, you can click on AutoCAD and choose Repair.
Users reported this issue while installing AutoCAD software on their PC, and according to them, you can fix this problem by installing the 64-bit version of the software.
To do that, simply insert the installation CD, navigate to the 64-bit folder and run the setup.msi file. After that, you should be able to install the application without any errors.
2. Run the proper setup file
- Go to the following directory:
cdrom/setup/x86/acad - Locate the acad.msi and double click it to start the setup.
According to users, this error can occur while installing AutoCAD, and if you want to fix it you need to run the proper setup file.
Users reported that running setup.exe will ask you to insert disk 1, but you can avoid this problem by using the method above. If you’re trying to install 64-bit version, you need to do the following:
- Open AutoCAD ISO file using any ISO application.
- Locate setup.ini file, move it to your PC and open it in Notepad.
- Add the following under [SETUP]:
USE_REMOVABLE_DRIVE=YES - Save the file and replace it on the ISO.
- Now run setup.exe and try to install the software again.
If you don’t like Notepad and you’re looking for an alternative, take a look at this list with the best note-taking apps for Windows 10.
3. Copy the installation files to your computer
If you’re having this error while installing AutoCAD 2016, you can easily fix it simply by copying the installation files to your computer.
Copy the entire installer folder from the installation media to your computer and try to run Setup.exe again. After doing that, you should be able to install the application without any problems.
If you’re trying to install a different application on your PC, you can just copy the contents of the ISO file to your hard drive and run the setup process from there and the problem will be solved.
Please insert the disk error can be caused by incorrect drive letter or by your security permissions, but you should be able to fix this problem by using our solutions.
If you are having trouble managing the files on your HDD, take a look at this thorough list of the best disk management tools and choose one that fits your needs.
If you have any other questions or suggestions, don’t hesitate to leave them in the comments section below and we’ll be sure to check them out.




User forum
0 messages