Quick Assist is Not Working or Opening? 5 Ways to Fix it
Recent updates can cause this issue

If Quick Assist isn’t working on your PC, you won’t be able to remotely help others, so today we’re going to show you a few solutions that can help you fix this issue on your PC.
Why does my Quick Assist not work?
Recent updates or problems with your temporary files can often cause this problem.
How can I fix Quick Assist not working, try again later error?
Before trying anything else, try running the app as administrator and check if that helps. You can also try opening Quick Assist again, without closing the instance that is stuck.
1. Remove recent updates
- Open the Settings app and go to Windows Update.
- Next, go to Update history and choose Uninstall updates.

- Locate the recent update and remove it.
Users reported issues with KB5044273 so if you have it installed, remove it and check if that helps.
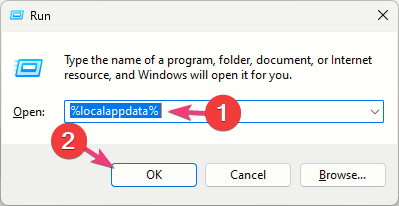
2. Recreate QuickAssist folder
- Press the Windows key + R, type %localappdata% and click OK.
- Next, go to the Temp folder.
- Locate QuickAssist folder and delete it.
- Start Quick Assist again.
3. Reset the Quick Assist app
- Go to Start and choose the Settings option.

- Choose the Apps section located on the left menu.

- Click on the Installed apps option.

- Find the Quick Assist app, right-click on the three-dotted line, and choose the Advanced options to open more settings.

- Under the Reset tab, click on the Repair option. It will take some time for the whole process to finish. After the procedure is over, try re-accessing the app again to see if the error persists.

Resetting the app will help when Quick Assist is stuck on the loading screen.
4. Reset the Internet settings
- Go to the Search box, type Internet options and click the Open tab.

- When the window opens, choose the Advanced tab.

- Scroll downwards and choose the Restore advanced settings option. Click on the Apply button and then OK to apply the changes.

- Restart the machine and try using the app again to see if the problem still exists.
5. Use Windows Powershell to reregister the User Account app
- Go to Search, type windows powershell, and choose the Run as administrator option.

- When the shell opens, type the following command and press Enter to run it:
Get-AppXPackage | Foreach {Add-AppxPackage -DisableDevelopmentMode -Register "$($_.InstallLocation)\AppXManifest.xml"}
- Restart the PC and try reusing the app again.
If the Quick Assist stopped working, it’s likely that a recent update caused the problem, or you might have a temporary glitch with the app cache. You can also view Quick Assist logs to determine what went wrong.
If the issue is still there, we also have a guide on how to download Quick Assist in case you need to reinstall it. For users who prefer different tools, we have a guide on how to enable Remote Assistance in Windows 11, so feel free to check it out.
Let us know which method worked for you by dropping us a comment in the section below.
Read our disclosure page to find out how can you help Windows Report sustain the editorial team. Read more


Improve this guide


User forum
0 messages