How to Remove Recent Files from Quick Access in Windows 10
Protect your privacy by deleting files from File Explorer's Quick Access
2 min. read
Updated on
Read our disclosure page to find out how can you help Windows Report sustain the editorial team. Read more

If you are a Windows 10 user and you are wondering if you can remove the recent files stored in the Quick Access folder, then the answer to your question is ‘Yes’.
So, follow the steps listed below to learn how to remove recent files from Quick Access in Windows 10. All this will take just five minutes of your time.
What is Quick Access?
The Quick Access feature of Windows 10 also includes two categories of files: the Frequent folders and also the Recent files, which is the one we will be focusing on in this article.
Seeing that a lot of the Windows 10 users want their privacy on the device to be as safe as possible, here’s how to delete or remove recent files from File Explorer‘s new feature Quick Access.
How can I remove recent files in Quick Access?
1. Disable recent files via Folder Options
1. Launch File Explorer.
2. Left click or tap on the File feature that is situated in the upper left side of the File Explorer window.
3. Left click or tap on the Change Folder and search options feature. The Folder Options window should pop up.
4. Navigate to the General tab, and then scroll down to the Privacy section.
5. Uncheck the box next to the Show recently used files in Quick Access feature.
Note: If you are interested in disabling the frequently used folders feature as well, you need to uncheck the box next to Show frequently used folders in Quick Access.
6. After you unchecked the box, you will need to left click or tap on the Apply button situated right at the bottom of the window.
7. Left click or tap on the OK button in order to close this window. And now you are done, you can go ahead and check if your recent files are disabled in Quick Access.
If you are looking to disable the Quick Access feature for recently used files, you can easily do this from within File Explorer’s options.
All you need to do is access the Folder Options settings window and uncheck the Show recently used files in Quick access feature.
2. Manually delete files from Quick Access
If you want to delete files from Quick Access, here are the steps to follow:
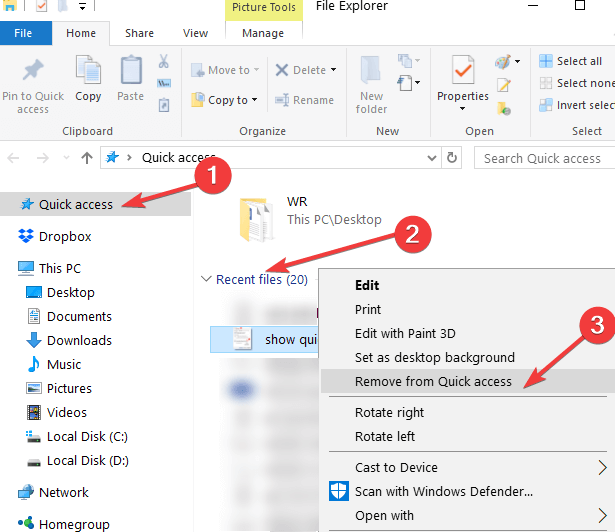
- Launch File Explorer > click on the Quick Access option in the left-hand pane
- Scroll down to Recent files and extend the list
- Select the file(s) that you want to delete > right-click on them > select Remove from Quick Access.
I am sure that any user of the Windows operating system will manage to follow this tutorial in no more than 10 minutes of their time.
If you run into any issues along the way, write us in the comments section below and we will help you as soon as possible.



User forum
0 messages