Can Samsung data migration change source disk? [Migration]
![]() 4 min. read
4 min. read
![]() Updated on
Updated on
Share this article

Improve this guide
Read our disclosure page to find out how can you help Windows Report sustain the editorial team Read more
Key notes
- Samsung Data Migration doesn't let you change the disk source and doesn't support disks with multiple operating systems installed.
- You can change the disk source using alternative tools, such as Ashampoo Data Migration.
- Explore our thorough Software hub for more useful and easy-to-follow guides.
- Don't hesitate to bookmark our extensive Buying Guides section to always be updated with the latest releases.
Using Samsung Data Migration to change source disk doesn’t work all the time. Migrations will work only if the conditions are right because the Samsung data migration tool has some limitations.
Further, you can only use selected Samsung SSD drive models as the destination drive. These limitations make users consider alternative disk cloning solutions.
Quick tip:
If you’re encountering the Samsung Data Migration wrong source disk error message, then it is safe to assume that you tried to change the disk source inside the application.
In order to resolve this issue and use a different disk source, you have to use an alternative utility.
One such software that offers even better features than Samsung Data Migration (SDM), is the powerful and versatile Ashampoo Backup.
Because of the limitations of the SDM software, you might not be able to use it at all, but Ashampoo Backup will do the job without any issues.
Ashampoo Backup Pro
This amazing software allows you to backup your hard drive and easily migrate it with just a few clicks of the mouse, so don't hesitate to try it out!Read on to find out more details about how to use Ashampoo Backup, and also to get the answer to the your question.
How can I change the source disk with Samsung Data Migration?
1. Use Ashampoo Backup
Create a system rescue disk
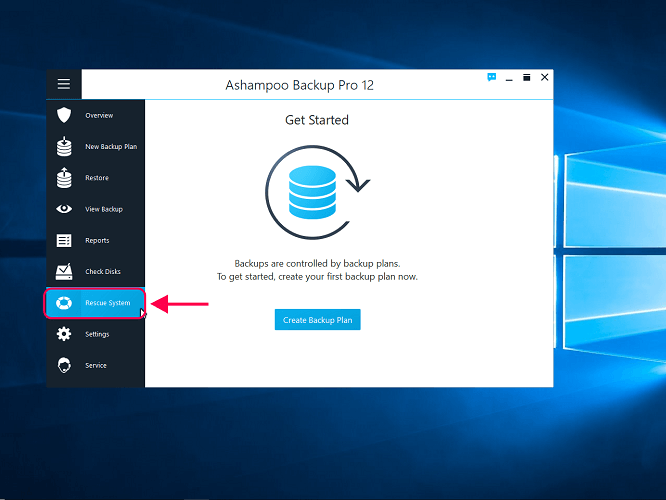
- Launch Ashampoo Backup.
- Click on the Rescue System tab on the left-hand panel.
- Choose your rescue medium.
- Select the USB Stick option.
- Connect your USB drive and click on this option.
- Check the option and hit the Next button to continue.
- Click on Yes on the popup. (if you don’t have the Windows Assessment and Deployment Kit (ADK) on your system, the program will now install it).
- Click OK to confirm the installation.
- Hit Yes to continue.
- Follow the on-screen guide to install ADK.
- Accept the agreement.
- Close the window
On completion, a Success screen will appear for the installation of ADK. You have successfully created a rescue disk from which you can boot your computer if your hard disk fails.
Back up your data and create a backup plan
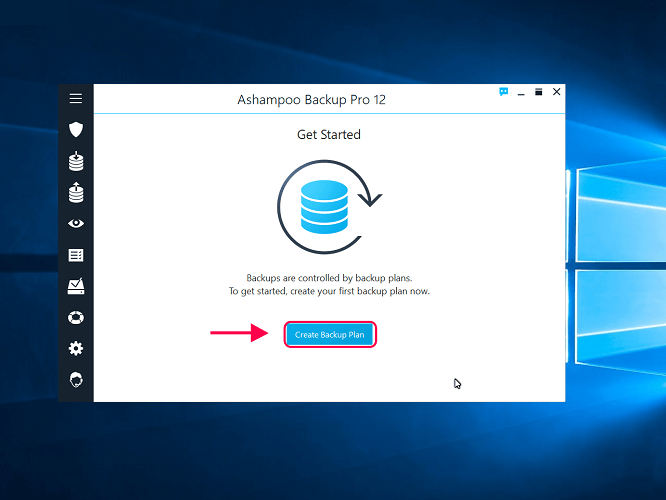
- Click Create a Backup Plan in the Get Started screen.
- Select the option labeled Local drive or network drive.
- Click Next to proceed.
- Specify the connected USB storage.
- Click on the Next button.
- Rename your backup plan and hit Next.
- Click on the Entire drives option and click Next again.
- Choose the location that holds the data you wish to back up and the Hidden system partition.
- Set a password, customize the compression settings, and specify how long you want to store backups.
- Optionally configure a backup schedule and what happens to missed backups among other features.
- Click on Start Backup Now.
You should now see a green shield graphic with a white tick inside it. This screen confirms that the backup is complete and your data is secure.
At this point, you’ve successfully backed up your data and created a backup plan. The next step is to restore the data.
2. Fix Samsung Data Migration

Prepare your PC
- Power off the computer.
- Disconnect every device connected to it.
- Turn on the system, and immediately the screen lights up, start pressing the BIOS entry key repeatedly.
- Navigate to the option to select a boot device.
- Choose the USB Storage Device option and hit Enter.
- Select your backup storage device type. Select the Local drive or network drive option and hit Next.
- Find your connected drive on the list on the next page. If you can’t, click on Refresh to update the list. Choose your device and click Next.
Use the backup created in the previous step
- Select the backup you previously created from the list, and click Next.
- Click on the Complete hard disks option, and choose Next.
- Assign backups by dragging a backup from the left side into the destination drive on the right.
- Click Yes to begin the restoration process.
- Wait to see the Restoration successful message.
- Disconnect the rescue USB drive and reboot your system.
Note: Check this guide if you’re not sure how to enter BIOS.
The answer to the question about the ability to change source disk for Samsung Data Migration is, unfortunately, that it can’t be done.
However, Ashampoo Backup Pro is an excellent alternative to the Samsung software. Even if you experience the Samsung data migration wrong source disk issue, you can still perform the migration.
[wl_navigator]