FIX: Skype problem with playback device in Windows 10
6 min. read
Updated on
Read our disclosure page to find out how can you help Windows Report sustain the editorial team. Read more
Key notes
- Skype is a one of the best applications on the market for instant messages and calls.
- Many users reported problems with their playback device in Skype.
- Fixing this issue is simple, and in most cases, you just need to reinstall your audio drivers or update them.
- Are you having additional problems with Skype? If so, be sure to check our Skype hub for more useful guides.

Although Skype is one of the most popular messaging services, certain issues can appear once in a while. Windows 10 users reported that Skype has a problem with a playback device, but fortunately for you, there is a solution available.
Problems with the playback device can be troublesome, especially because you won’t be able to hear the other person during a call, but you can fix these problems by following one of our solutions.
But first, here are some more examples of this problem:
- Skype call failed problem with playback device – If you’re experiencing problem with a playback device, you won’t be able to make any calls with Skype. But you’ll probably be able to resolve the problem with the solutions below.
- Skype cannot access sound card Windows 10 – You’re most likely experiencing the problem with playback device if Skype is unable to access your sound card.
How can I fix Skype problem with playback device on Windows 10?
- Delete audio device
- Temporarily disable audio device
- Make sure your audio driver is up to date
- Restart Skype
- Make sure the correct playback device is set in Skype
- Uncheck Automatically adjust speaker settings
- Enable and disable your speakers
- Turn off any audio programs running in the background
- Reset Skype configuration files
- Reinstall Skype
- Switch to the UWP version
- Run Audio Troubleshooter
How do I fix Playback device not working in Skype?
1. Delete audio device
- Press Windows Key + X and choose Device Manager from the list.
- Navigate to Sound, video and game controllers section and locate your audio device.
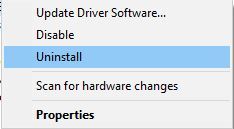
- Right-click the audio device and choose Uninstall.
- After your audio device has been uninstalled, restart your computer and Windows 10 should install it automatically.
- Check if the problem still persists.
2. Temporarily disable audio device
- Open Device Manager. You can open Device Manager by pressing Windows Key + X and choosing Device Manager from the menu.
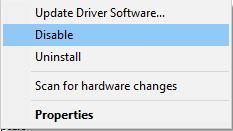
- When Device Manager opens, locate your audio device, right click it and choose Disable.
- Right-click the device again, and choose Enable from the menu.
- Close Device Manager and check if the problem still persists.
3. Make sure your audio driver is up to date
Problems with playback devices in Skype can occur if your audio driver isn’t up to date, and if that’s the case, it’s advised you update your audio driver.
To do that, just visit your motherboard or sound card manufacturer’s website and download the latest drivers for your device. After installing the latest drivers, the playback issue should be resolved.
However, if you don’t want the hassle of updating drivers manually you should think of using specialized software that can automate the process.
Using an advanced tool like PC HelpSoft Driver Updater will prevent PC damage that could appear by installing the wrong driver version. In fact, once you have selected the correct driver’s version for your device, the application will update them singularly or in groups in just a blink of an eye.
With a few clicks, the software will scan your PC’s hardware and peripherals for potential driver upgrades. With its library of up-to-date drivers, is ready to keep your PC system running smoothly, and you never have to worry about missing drivers.
Save yourself the time and stress of not having a playback device when you need to attend an important meeting or talk.
4. Restart Skype
Few users reported that problems with playback device can be fixed simply by restarting Skype. To do that, just find Skype icon on the Taskbar, right-click it and choose Quit.
After you’ve closed Skype, start it again and check if the issue is resolved.
5. Make sure the correct playback device is set in Skype
- Open Skype and choose Tools > Options.
- Navigate to Audio settings and expand Speakers section.
- Select the proper audio device and click Save to save changes.
- Check if the issue is resolved. You might have to try several different audio devices before you find the one that works for you.
6. Uncheck Automatically adjust speaker settings
Few users reported that Skype problems with playback can be fixed by turning off the Automatically adjust speaker settings option.
To turn this option off, just navigate to Tools > Options > Audio settings in Skype. Navigate to Speakers section, uncheck Automatically adjust speaker settings and click Save to save changes.
7. Enable and disable your speakers
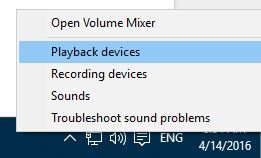
- Right click the speaker icon in the bottom right corner and from the menu choose Playback devices.
- Right-click on the empty space in Playback Devices window and make sure both Show Disabled Devices and Show Disconnected Devices are checked.
- Right click your audio device and choose Disable from the menu.
- Right click the device again and choose Enable.
- Click Apply and OK to save changes.
8. Turn off any audio programs running in the background
According to users, you can fix the problem with the playback device by turning off any applications that are using your sound card.
For example, if you have a multimedia player running in the background you might want to disable it before you start a Skype call.
9. Reset Skype configuration files
- Close Skype.
- Press Windows Key + R and enter %appdata%. Press Enter or click OK.
- Locate Skype folder and rename it to Skype.old. Keep in mind that by renaming your Skype folder your message history will be removed from Skype, but it will still be available in Skype.old folder.
- After you’ve renamed Skype folder, start Skype again and check if the issue is resolved.
10. Reinstall Skype
Users suggest that playback device problem can be fixed by reinstalling Skype, so make sure to try that.
Few users claim that they managed to fix this problem by installing an older version of Skype, so you might want to try that as well.
11. Switch to the UWP version
If you can’t make a call with a standard Desktop version of Skype, try using the new UWP version. Microsoft has been heavily insisting on using this version lately.
Truth be told, it’s still not the most stable app out there, but it’s improving.
You don’t need to install the UWP version of Skype, as it’s already pre-installed on your system. So, just give it a try.
12. Run Audio Troubleshooter
- Go to the Settings app.
- Head over to Updates & Security > Troubleshooting.
- Find Recording Audio and click it.
- Now, go to Run the troubleshooter.
- Follow further on-screen instructions and let the wizard find any issues.
- Restart your computer.
With playback device problems you won’t be able to perform Skype calls at all, and that can seriously affect your Skype experience.
We covered several major Skype issues in the past, and if you’re having Skype Error 0x80070497 or if you can’t close Skype in Windows 10, feel free to check some of our other Skype-related articles.
Did you manage to resolve the issue? Let us know how in the comment area below.







User forum
0 messages