FIX: The snip could not be sent on Windows 10/11
![]() 4 min. read
4 min. read
![]() Updated on
Updated on
Share this article
Improve this guide
Read our disclosure page to find out how can you help Windows Report sustain the editorial team. Read more

The Sniping Tool is a great way to take a quick screenshot of what is there on your screen, crop out the irrelevant portions and save the image. You can then share it with others or keep it in your own record.
Unfortunately, things aren’t free-flowing with the Send Snip Tool and a common error you are likely to get is that the snip could not be sent. This usually happens if your computer does not have MAPI-compliant mail client installed. In other words, you should have an email client software like Microsoft Office Outlook, Mailbird, or Mozilla Thunderbird installed on your device.
That apart, setting things right here is quite easy and can be accomplished in no time.
Fixing the snip could not be sent error
1. Repair Outlook Express
- Open the Run dialog box. You can do this simply by typing Run in the Cortana search box and selecting from the search result.
- In the Run dialog box, type regedit and press Enter.
- In the Registry Editor window, locate the subkeyHKEY_LOCAL_MACHINESoftwareClientsMailMicrosoft Outlook
- Select the subkey and press Delete.
- Click on Yes on any confirmatory box that appears.
- Close Registry Editor.
- Next launch Control Panel. Again, simply typing Control Panel in the Cortana search box will do.
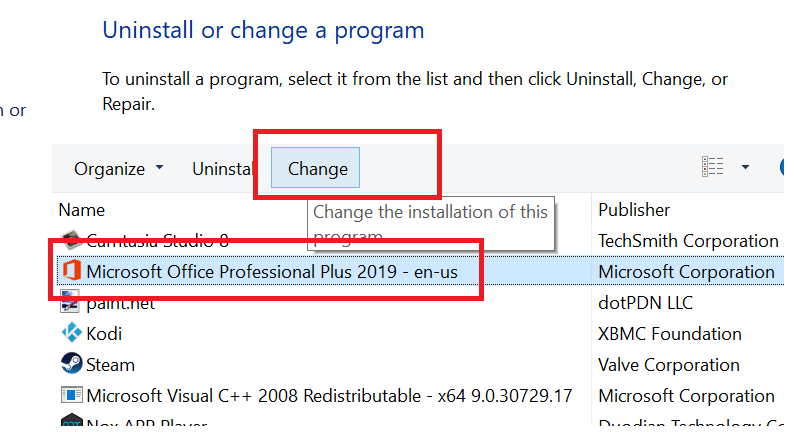
- In Control Panel, click on Programs > Programs and Features.
- Click on the Microsoft Office program and hit the Repair button that appears at the top.

- The subkey will be recreated.
- This should help deal with the snip could not be sent error.
Note: It is strongly recommended to create a backup of your registry before making any changes in it. In the Registry editor window, click on File > Export to create a back up.
2. Set default mail client in Registry
- Launch Registry Editor as before.
- Go to the following subkey: HKEY_LOCAL_MACHINESOFTWAREClientsMail
- In the panel on the right, check if the data for Default is set as Microsoft Outlook (or the email client installed on your device)
- If it’s something else, double click on Default and set the field accordingly.
- Also, expand the Mail key and check if Microsoft Outlook (or the mail client you have) is installed.

- If that isn’t the case, close Registry Editor and proceed to either repair or reinstall Outlook Express or whatever mail client you wish to have.
- However, if the Outlook Express key is present under Mail, select the same and check the MSIComponentID value on the right panel.
- The right GUID should be {6DB1921F-8B40-4406-A18B-E906DBEEF0C9}. (This applies to Outlook 2013 and Outlook 2016.)
- Double click on MSIComponentID and set the right value if that isn’t already the case.

3. Check MSI Components Registry Permissions
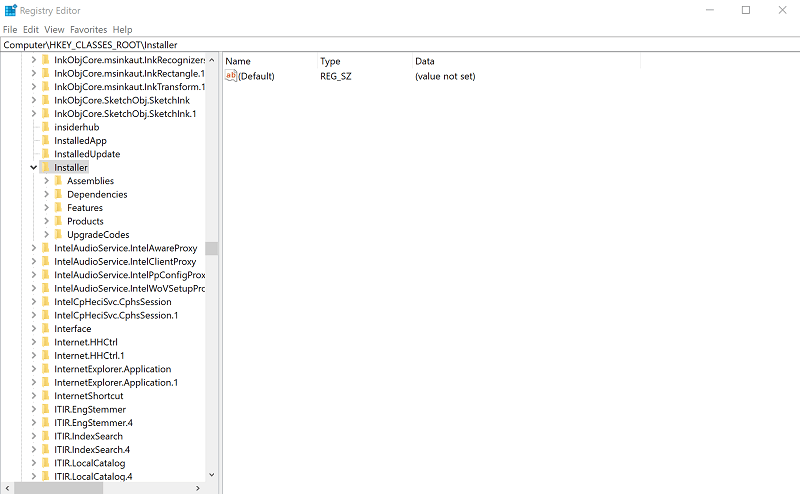
- In the Registry Editor window, go to the following branchHKEY_CLASSES_ROOTInstallerComponentsF1291BD604B860441AB89E60BDEE0F9C
- Right click on the key and select Properties.
- In the Properties window, select the Security
- Check if Users group is present.
- If it is, ensure the Users group has Read permission for the key.
- However, if Users group is not present, click on Add, type Users and press Enter.
- Close Registry Editor.
4. Repair Msmapi32.dll file

- Close Outlook Express if it’s open.
- Launch File Explorer and click on This PC from the options on the left.
- Open the C: folder and navigate to Program Files (x86) > Common Files > System > MSMAPI > 1033.
- Delete the file dll.
- Re-launch Outlook Express. This will recreate the DLL file and hopefully, should also fix the error as well.
- You are also recommended to update Windows to the latest build available.
This should be all you need to do to get rid of the snip could not be sent error.
Further, here are some related topics to browse.


User forum
0 messages