FIX: TeamViewer proxy error on Windows 10 [Versions 11 & 12]
Key notes
- If you experienced a TeamViewer proxy error in Windows 10, you won't get a connection.
- Reportedly, this issue occurs more frequently on older versions of the app but can happen on newer ones as well.
- The proxy problem can be solved by changing the DNS settings so make sure you try that.
- Using a third-party remote desktop application can also avoid this problem completely.

If you experienced the dreaded TeamViewer proxy error, you’ve definitely come to the right place, as we’ll shine some light on it.
TeamViewer is a nifty remote-access tool that’s used by people all around the world, especially for remote assistance.
It involves a TeamViewer ID and a password, which are used for authentication. Thus, in order to connect to another PC through TeamViewer, you’ll need to know its ID and password. Quite simple.
What is a TeamViewer proxy error? Sometimes, the program might encounter certain connectivity issues. As a result, you may not be able to use it properly and establish a connection.
Reportedly, this especially happens to version 11 and version 12 users. Upon attempting to establish a connection to another device, the app urges you to check your Internet connection.
More so, it suggests that you’re probably using a proxy server, in which case you’d have to configure the program properly.
The thing is, almost none who complained about this error weren’t using proxy servers. Let’s see how we can get to the bottom of this.
How can I fix the TeamViewer proxy error?
1. Change your DNS
- Type control and click on Control Panel from the results.

- Select Network and Internet.

- Click on the Change adapter settings button.

- Right-click your active connection.
- Select the IPv4 option from the list (make sure it’s checked and highlighted).
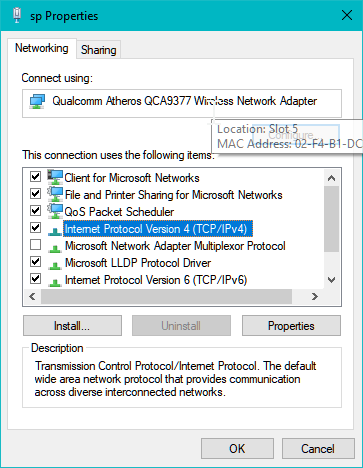
- Click the Properties button.
- If your DNS is set to auto, click the Use the following DNS server addresses radio button.
- Type 8.8.8.8 in the Preferred DNS server field.
- Go to the Alternate DNS server field and type 8.8.4.4.

- Click the OK button.
- Launch CMD and type the following commands:
ipconfig /flushdns
ipconfig /registerdns
ipconfig /release
ipconfig /renew
netsh winsock reset
- Restart your computer.
- Check if the problem still persists.
It’s worth mentioning that you can also use other DNS servers than the Google Public DNS ones we’ve suggested. For instance, you can use 1.1.1.1 in the first field and 1.0.0.1 in the other one.
2. Check your firewall
TeamViewer uses port number 5938 to establish connections to their servers and relay them to other PCs.
For that reason, you need to make sure that your firewall of choice (whether it’s Windows’ built-in one or another third-party solution) doesn’t block this port.
Furthermore, you can also check if your firewall or antivirus isn’t actively blocking the TeamViewer application. Last, but not least, check if your router blocks outgoing connections on port 5938.
If that’s the case, you’ll need to manually unblock them for TeamViewer to work.
3. Restart the app on your PC
Some users reported that the error started occurring if their PCs went in and out of sleep mode. That’s not exactly unheard of, apps becoming unstable after a good sleep.
Therefore, you can try closing the app (make sure it’s not still running in the tray) and launching it again. It did the trick for certain users, maybe it’ll also work for you.
Alternatively, you can try the old PC restarting trick. That is almost never prone to fail, and it definitely seems to work for some users.
4. Check if you’re not actually using proxy
4.1 Check the proxy settings on your system
- Hit the Windows key on your keyboard.
- Type Proxy.
- Click the Proxy settings button.

- Take a look at the proxy section.
- Scroll down and make sure it’s completely turned off.
If you’re not using a proxy, try the methods we’ve described above. Also, make sure that you turn off any VPN and try establishing the TeamViewer connection once more.
However, if your system is using a proxy, then write them down and then follow the steps above. If you can’t turn off the proxy in Windows 10, we have the perfect guide to help you do that.
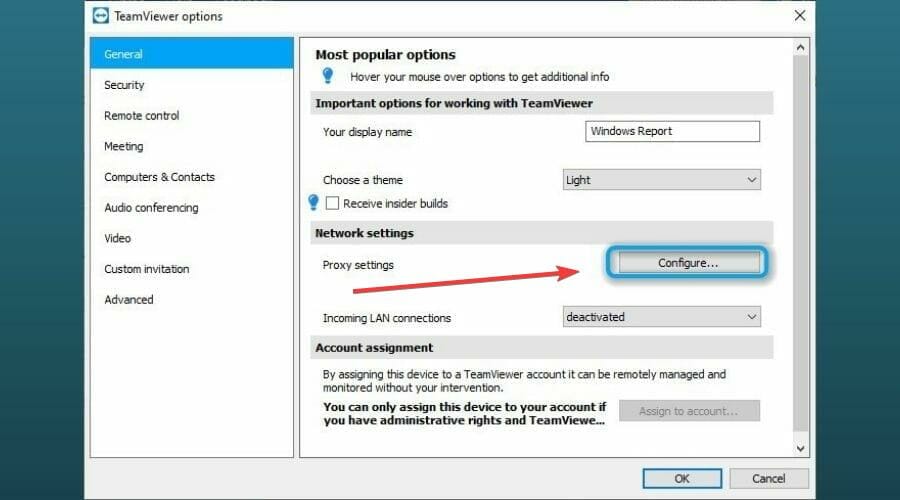
4.2 Check the proxy settings on TeamViewer
- Launch the TeamViewer app.
- Click the Extras button.
- Select Options from the menu.
- Locate the Proxy settings section.
- Click the Configure button (check the screenshot).
- Select Use manual proxy (not Automatically detect settings).

- Type the proxy settings you’ve written down earlier (IP, port).
- Input your proxy username and password if necessary.
- Click OK.
- Restart TeamViewer.
- Check if the issue still persists.
It’s not a good idea to let TeamViewer detect proxy settings automatically. Many users reported that this feature doesn’t work and TeamViewer ignores proxy settings by default.
All things considered, if you’re unable to establish a connection on TeamViewer due to fake proxy detection, there are many things you can do about it.
Apparently, the most popular fix is changing your default DNS servers, but if this fails, feel free to try our other suggestions.
We also have an excellent guide on how to fix TeamViewer issues in Windows 10 so you should also check that for help.
TeamViewer is one of the best conferencing tools for business and personal use but when errors and problems start appearing, you should consider other solutions.
If your problems keep occurring, it might be time to pick an alternative remote control tool. Try Mikogo, a cross-platform solution that provides session recording and file transfer options, among other things.
You can also take a look at some of the best remote management software and choose whichever you prefer.
If you have any other suggestions or ideas, don’t hesitate to communicate them in the comments section below.
Read our disclosure page to find out how can you help Windows Report sustain the editorial team. Read more


Improve this guide


User forum
0 messages