Fix: The Property Requested was not Found
Problem editing audio? Try repairing or resetting the app
Key notes
- To fix the property requested was not found error, you need to repair any corrupt system files.
- Depending on your OS and the program you are using, it might be a quick fix or have more to do with the technical aspects of the software.
- Either way, we explore different ways to approach this issue in this article.
If you’re an audiophile who loves FLAC files, then you’re probably familiar with how difficult it can be to edit the files, and the property requested was not found error is not new to you.
Having encountered the same issue in Windows 11, we compiled this guide to help others in a similar predicament.
What does the property requested was not found mean?
This error message appears when you attempt to play, view, or edit your audio files most notably the FLAC format. The most likely scenario is that the file is corrupt or the audio format is unsupported.
Also, if your computer has recently been through a major change or problem, such as an upgrade, virus scan, or disk defragmenting, some files may be missing on your computer that are causing this miscommunication.
How do I fix the property requested was not found error?
Try the following basic troubleshooting steps before moving on to the more advanced solutions:
- Terminate all running processes on your PC then retry playing or editing the audio file.
- Check for app updates from the Microsoft Store or the official website.
1. Perform a DISM and System File Checker scan
- Hit the Start Menu icon, type cmd in the search bar, and click Run as administrator.

- Type the following commands and press Enter after each one:
DISM.exe /Online /Cleanup-Image /Restorehealthsfc /scannow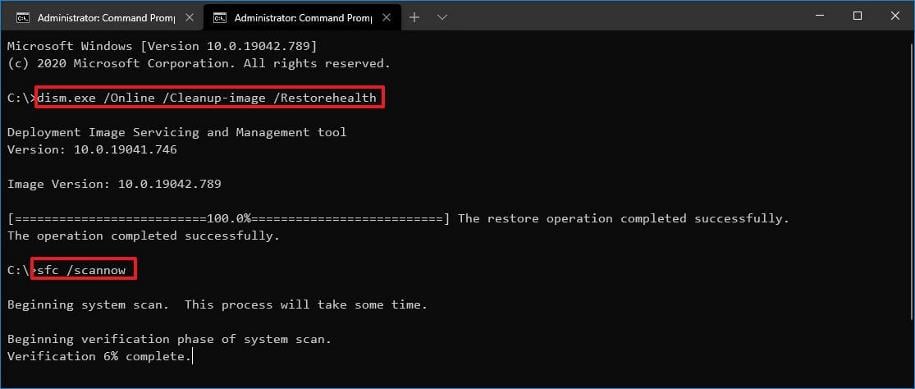
System files are sensitive so you should always handle them with utmost care. Using specialized software can automate this process, making it faster and safer.
2. Run the MediaPlayer troubleshooter
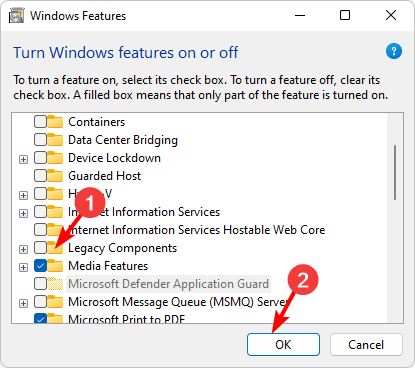
- First, verify that Media Player is enabled.
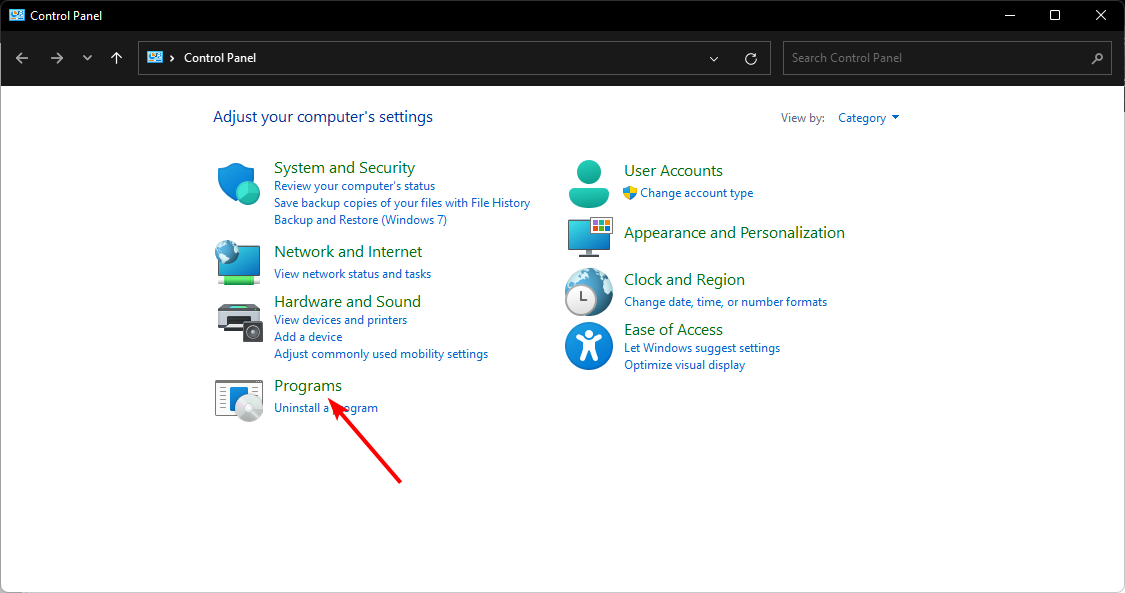
- Hit the Windows key, type Control Panel in the search bar, and click Open.

- Click on Programs.
- Select Turn Windows features on or off.
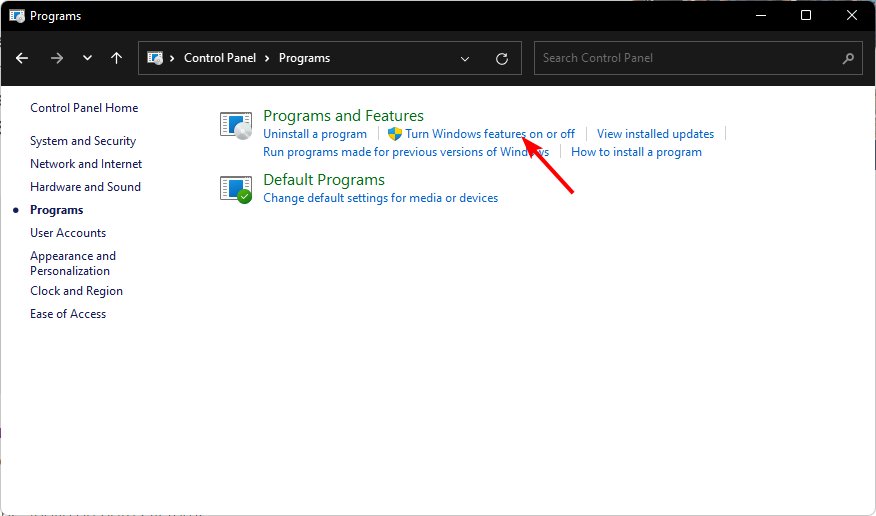
- Find the Media Features option, check it, and hit OK.
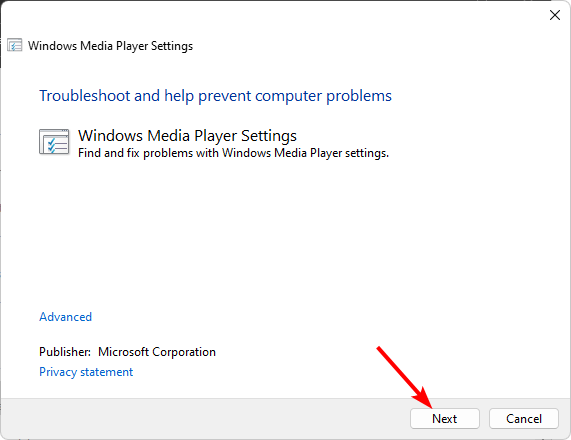
- Hit the Windows + R keys to open the Run command.
- Type in the following command in the dialog box and hit Enter:
msdt.exe -id WindowsMediaPlayerConfigurationDiagnostic - Click on Next and wait for the wizard to troubleshoot any issues with Media Player.
3. Repair/reset the media player app
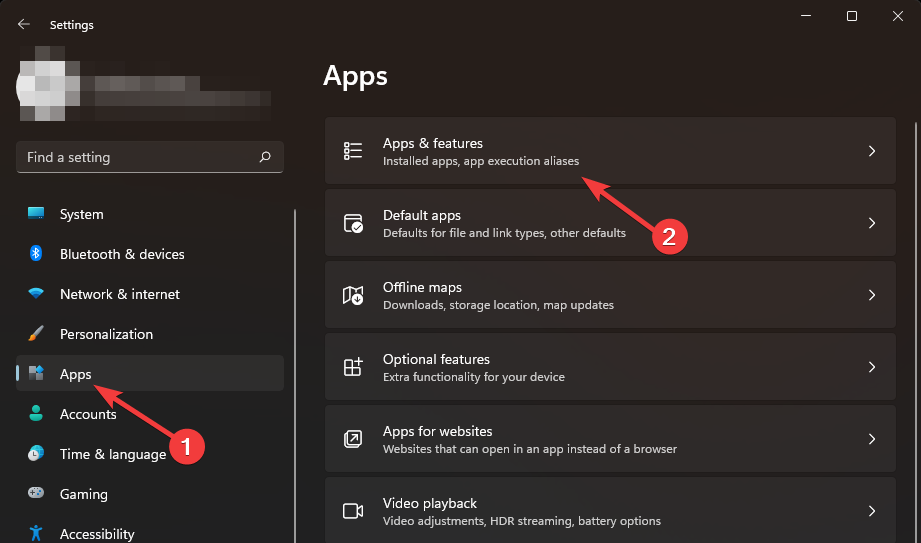
- Hit the Windows key and click on Settings.

- Click on Apps on the left pane then Apps & features on the right pane.
- Locate the media player app (Groove was the most common), click on the three vertical ellipses, and select Advanced options.
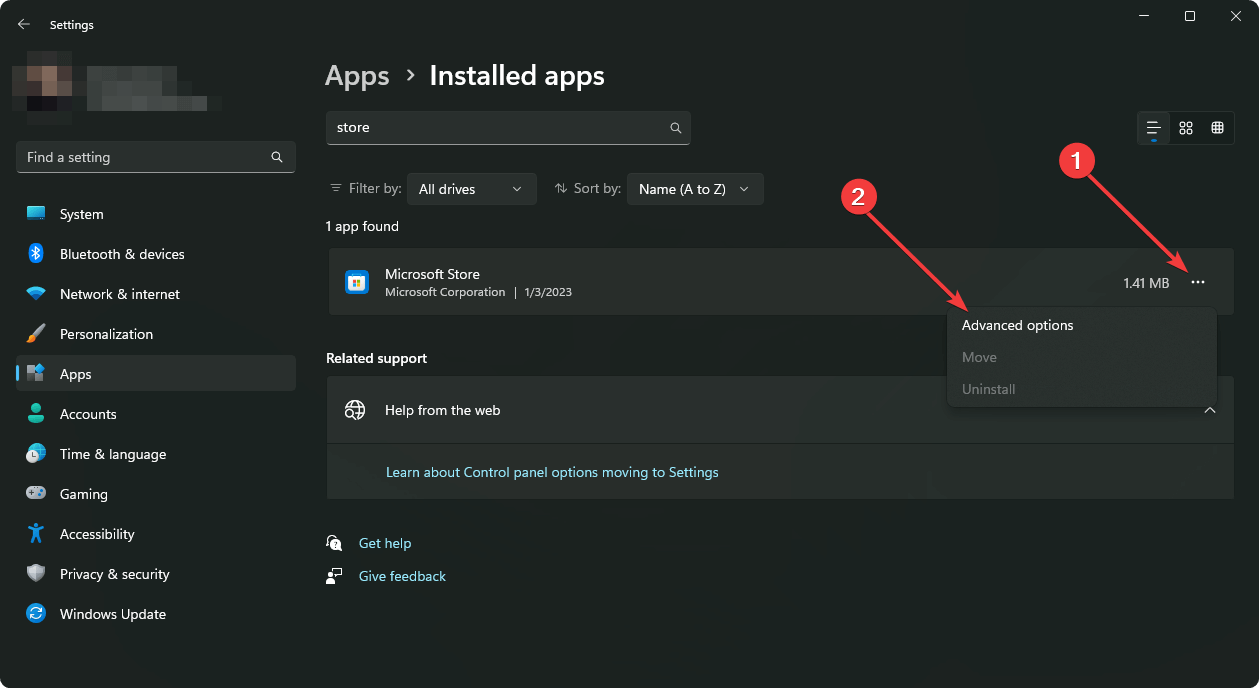
- Click on Repair.
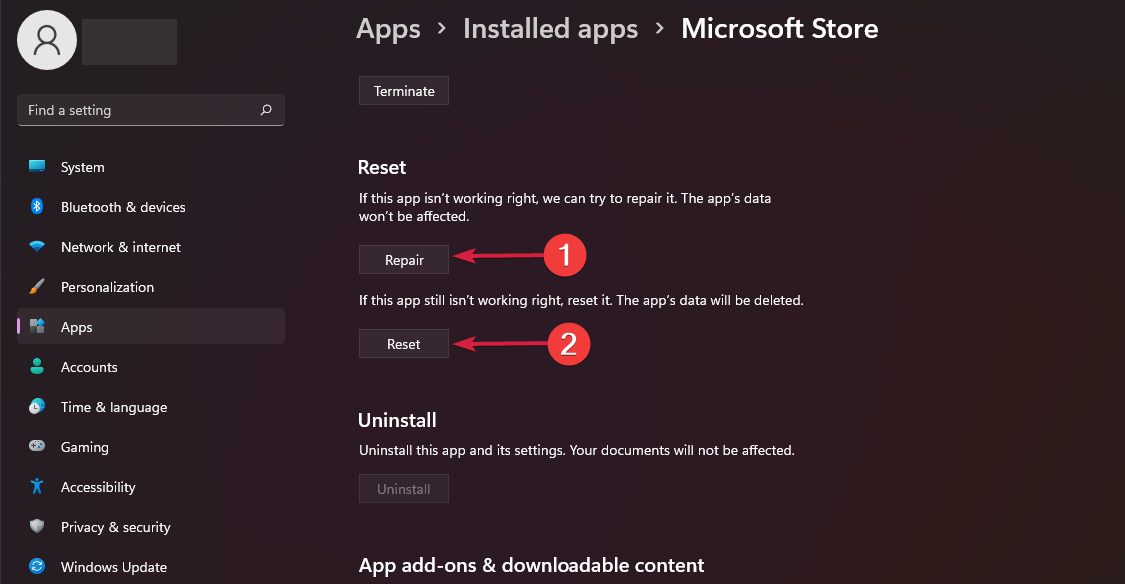
- Go back and click on Reset if the repair option failed.
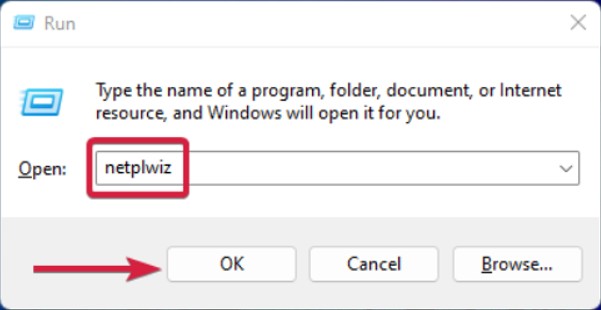
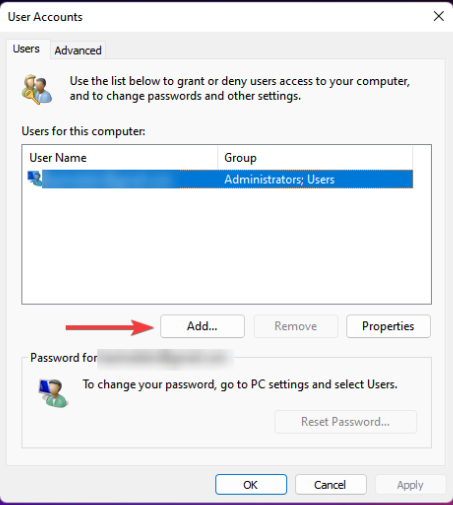
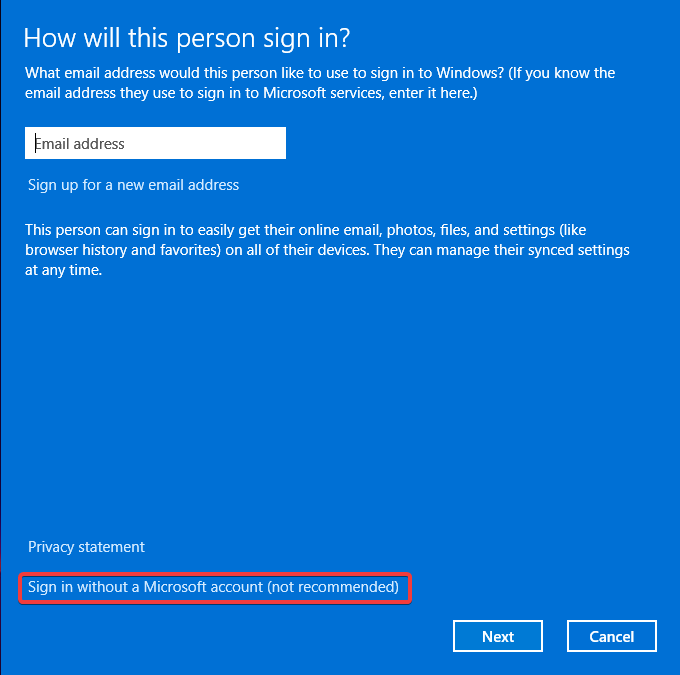
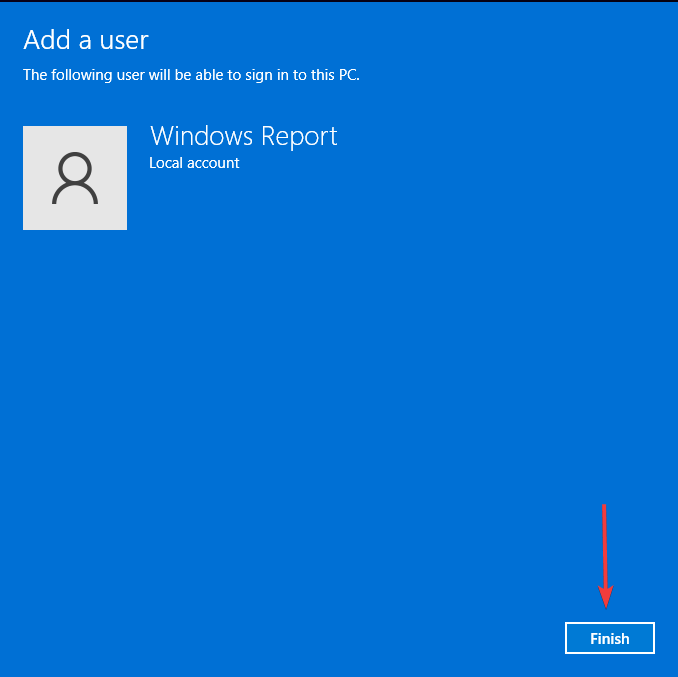
4. Create a new user profile
- Press Windows + R to launch the Run console, enter netplwiz in the text field, and click OK.
- Click Add in the User Accounts window.
- Select Sign in without a Microsoft account (not recommended).
- Click on Local account button.

- Enter a username and password (optional) for the new user account, and a hint, in case you set a password. Once done, click on Next.
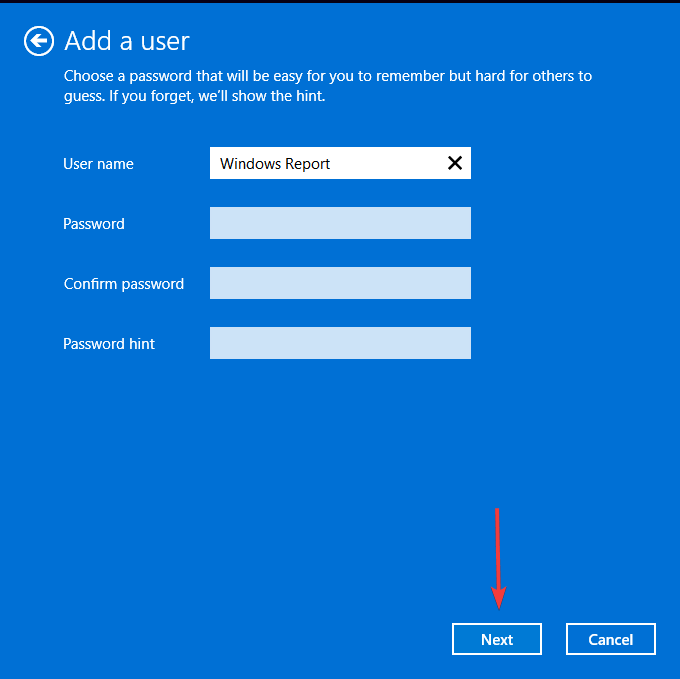
- Click on Finish to create the Local account.
When creating a new user profile, it’s usually to test whether the same error occurs in a different account. This could help you isolate the issue whether it is profile-related or app-related.
If the property requested was not found error disappears in the new profile, you need to repair your old profile and try again.
5. Reinstall the problematic app
- Click on the Start Menu icon, type Control Panel on the search bar, and click Open.
- Select Uninstall a Program under Programs.
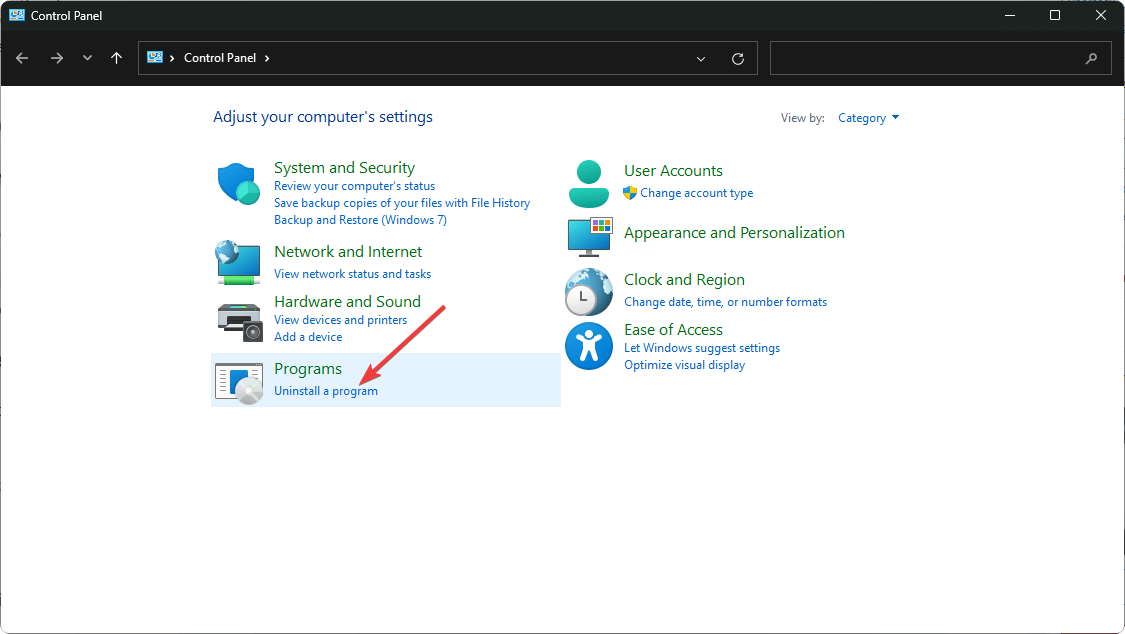
- Find the problematic app, click on it, and select Uninstall.
- Confirm uninstallation in the next pop-up.
6. Uninstall recent Windows update
- Press the Windows + I keys simultaneously to open Settings.
- Navigate to Windows Update, then go to Update history.
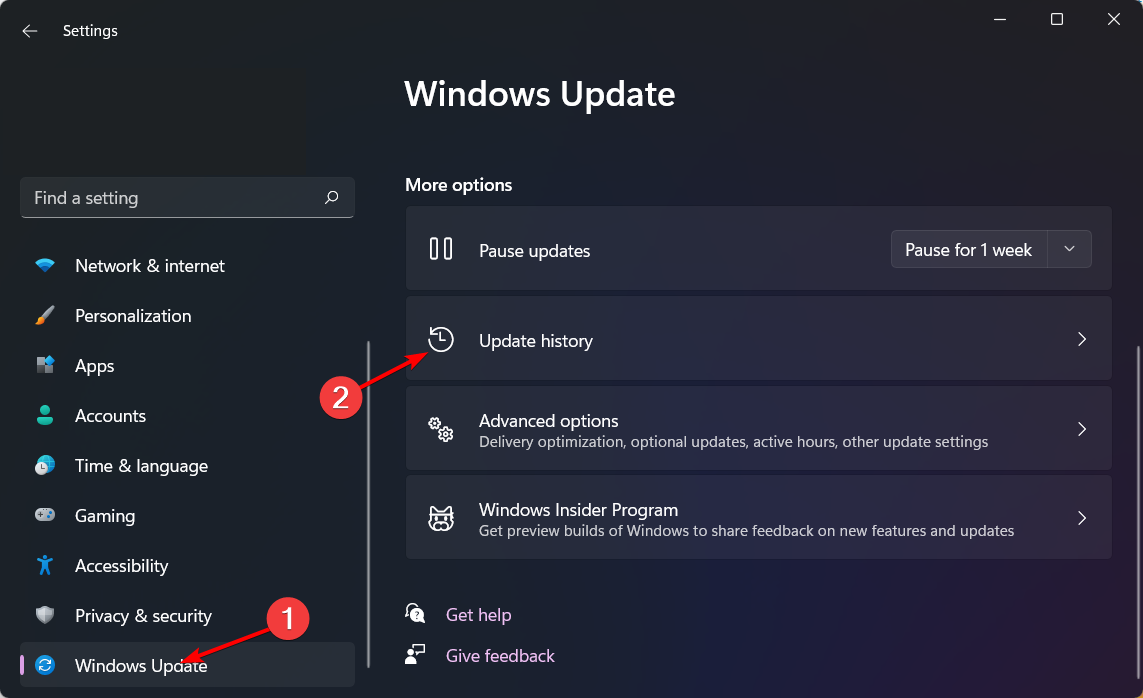
- Click on Uninstall updates.
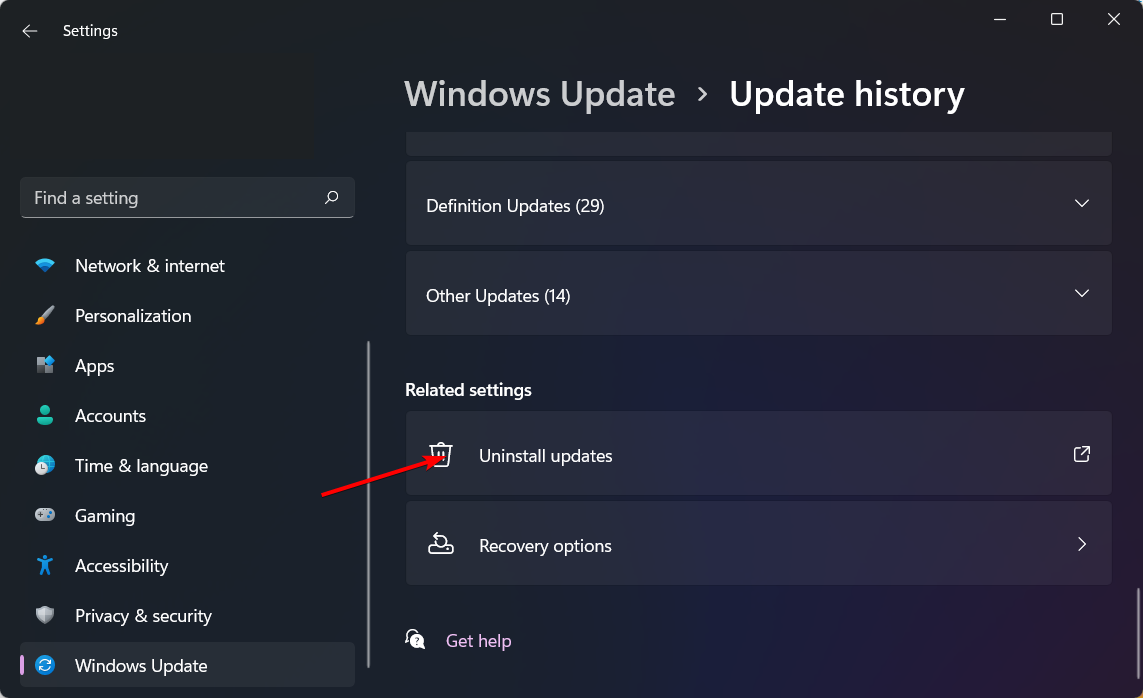
- Select the most recent update, then click Uninstall.
If you notice the property requested was not found error began after a recent update, it could mean there are some compatibility issues. Removing the new update could help you resolve this issue.
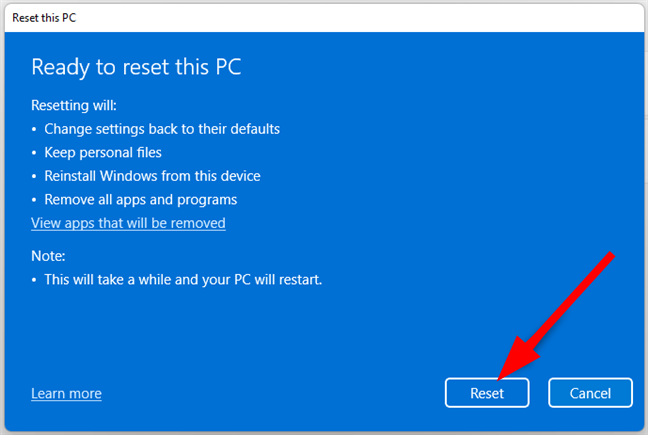
7. Reset your PC
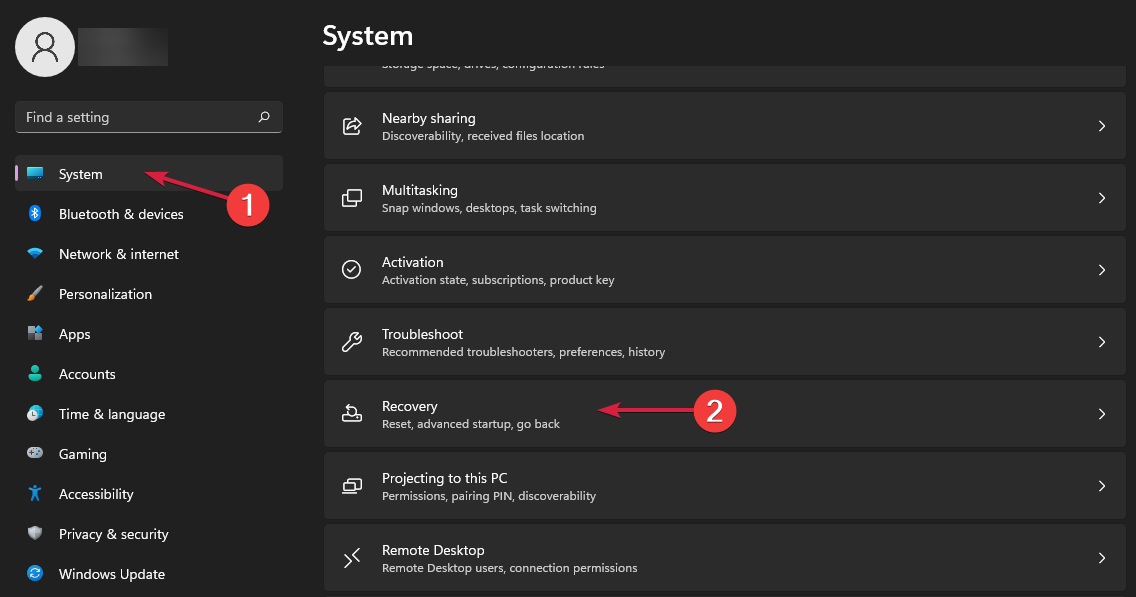
- Hit the Windows key and select Settings.
- In the left window pane, select System, then click on Recovery on the right pane.
- Click on Reset PC from the right side.
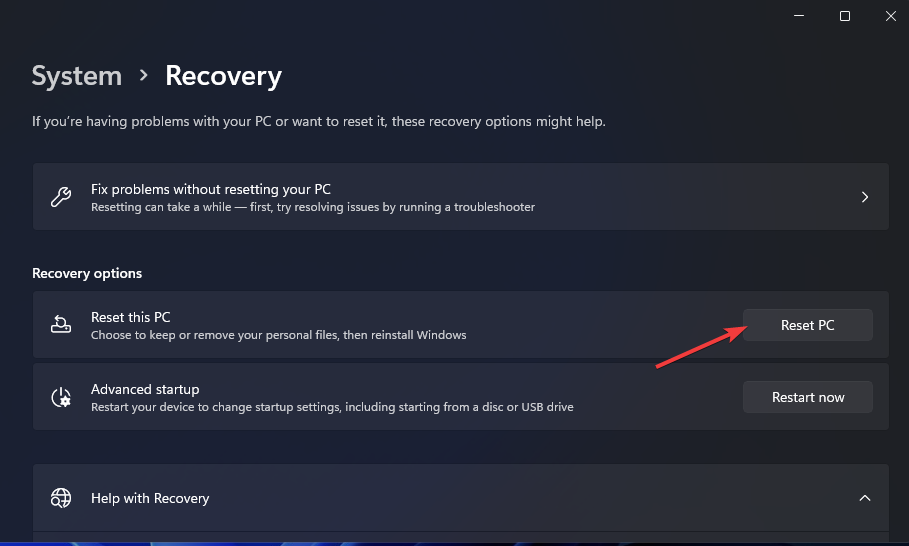
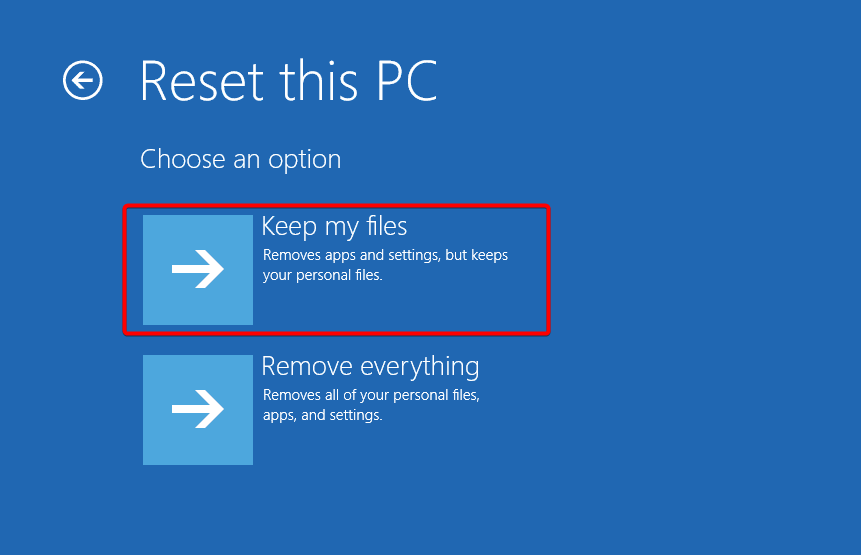
- Choose the type of factory reset you need. You can keep your files or completely delete all the files, apps, and settings on the PC.
- Select the option you want to reinstall Windows: Cloud download or Local reinstall.
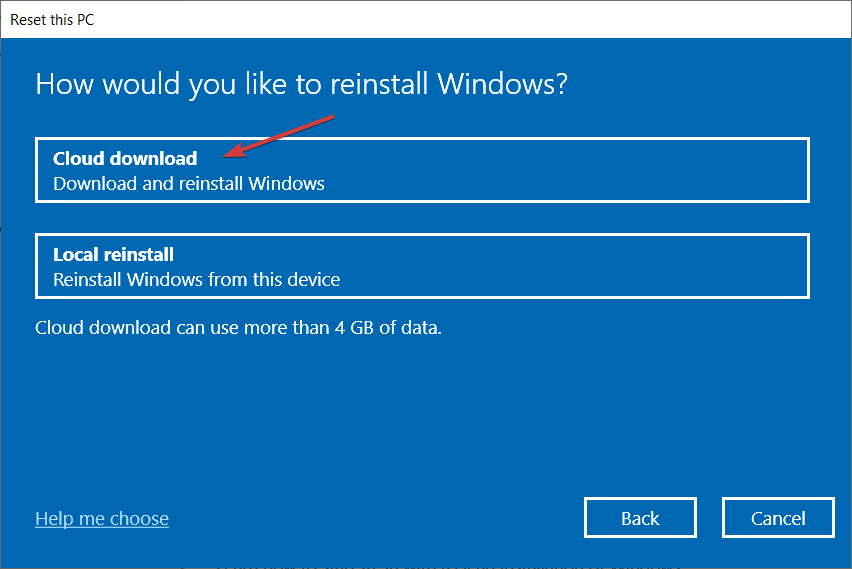
- Click on Next.

- Finally, press the Reset button.
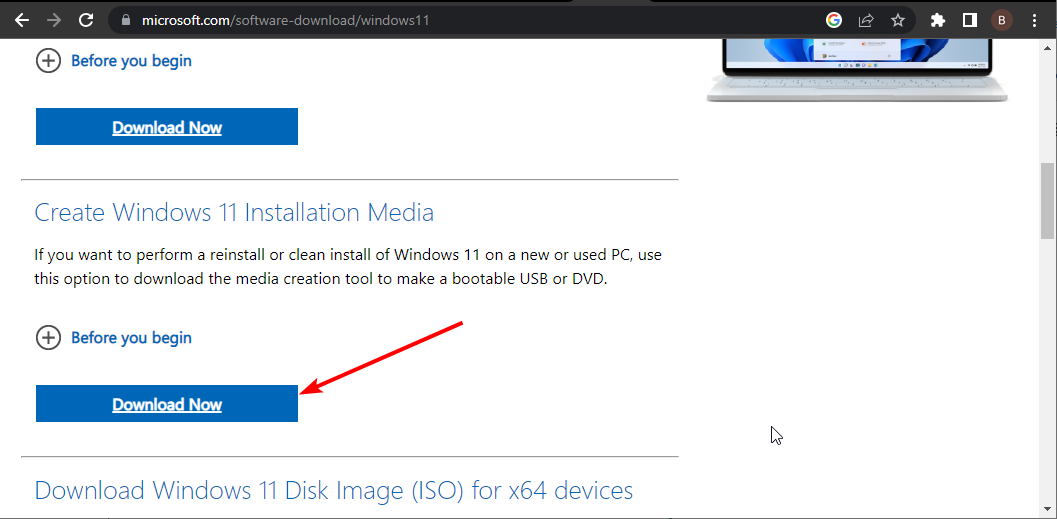
8. Perform an in-place upgrade
- Go to the official Windows 11 download website and click Download Now under the Create Windows 11 Installation Media section.
- Double-click the downloaded file to run it.
- Now, wait for Windows to prepare the setup and click Yes when prompted.
- Next, accept the Licence Agreement and wait while Windows downloads the required updates.
- Select between keeping your files and apps and removing them. Since you want to perform an in-place upgrade, leave the recommended settings, i.e., keep your files and apps.
- Now, click the Install button to start the in-place upgrade.
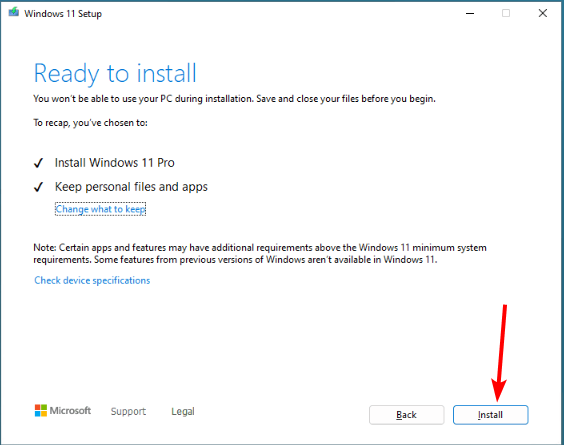
- Finally, wait for Windows to copy the necessary files to upgrade your device and restart your PC.
Whereas the FLAC format is convenient especially if you’re into tweaking your audio files, it doesn’t respond well to most media players. As such, we’d recommend you convert your lossless audio into a widely acceptable format like MP3.
You just need to be careful as some programs can handle this format without a problem, but others might have trouble with it. Generally, dealing with audio files can be difficult. Worse is when it involves a complex format like FLAC.
It’s possible some components of your FLAC file are corrupted and this issue will prevent you from editing it. You can try your luck with audio repair software and see if the issue goes away.
In case you have additional ideas that will help other users, don’t hesitate to leave a comment down below.
Read our disclosure page to find out how can you help Windows Report sustain the editorial team. Read more


Improve this guide


User forum
0 messages