How to: Track 3G, 4G data on Windows 10
![]() 5 min. read
5 min. read
![]() Updated on
Updated on
Share this article

Improve this guide
Read our disclosure page to find out how can you help Windows Report sustain the editorial team Read more

Many Windows 10 users use 3G or 4G data connection to access the Internet. Although both these connections are great, they usually have certain data cap, and therefore is important that you keep a close eye on how much network traffic do you use on monthly basis. Since this is an important aspect, today we’re going to show you how to keep track of 3G and 4G data on Windows 10.
How to keep track on 3G and 4G data on Windows 10?
Many Windows 10 laptops and tablets have a SIM card slot that allows you to access the Internet using 3G or 4G connection. This is an extremely useful feature, especially if there’s no available Wi-Fi in the area. Many mobile operators offer basic contracts with a data cap, and if you exceed the predefined limit you usually have to pay some extra fees. To avoid extra fees, it’s important that you keep track on your data consumption. Luckily, you can do that right from Windows 10.
Microsoft added an ability to check data usage in Windows 8, but this feature had limited functionality. Using this feature you could only check how much data does a specific Windows Store app uses, and although this feature was somewhat useful, many users were disappointed that there’s no support for standard Windows applications. Microsoft decided to remedy this limitation in Windows 10, and it corrected all the previous flaws of its data tracking system thus allowing you to keep track on how much data both Universal apps and standard apps use. In order to track 3G or 4G data usage on your Windows 10 PC, you need to turn on Metered connection first. To do that, follow these steps:
- Make sure that you’re connected to your 3G or 4G network.
- Now open the Settings app and go to Network & Internet > Wi-Fi.
- Click Advanced options and turn on Set as metered connection option.
- READ ALSO: Dripcap makes network traffic analysis simple
It’s recommended to turn this option on if you use a connection that comes with limited monthly traffic. In addition, by turning on Metered connection option you’ll disable automatic download of Windows updates. You’ll also disable automatic updates for apps and peer-to-peer uploading of updates. We also have to mention that your Live Tiles might not update if you turn this option on, and some of your apps might work a bit differently if you turn on Metered connection. This is because this feature tries to limit network usage by disabling certain Windows 10 features. After turning on Metered connection, you should be able to check your data usage by using one of our solutions.
How to – Track 3G, 4G data usage on Windows 10
Solution 1 – Use Task Manager
One of the easiest ways to check how much data your applications use is to use Task Manager. Task Manager comes with a useful little feature that allows you to check how much data does each app use so you can easily keep track on how much data you use on monthly basis. To check the data usage in Task Manager, you need to do the following:
- Open Task Manager by pressing Ctrl + Shift + Esc on your keyboard.
- When Task Manager opens, go to App history tab. There you’ll see a list of applications as well as CPU time, Network and Metered network data usage. If you’re using 3G or 4G connection you should keep an eye on Metered network section.

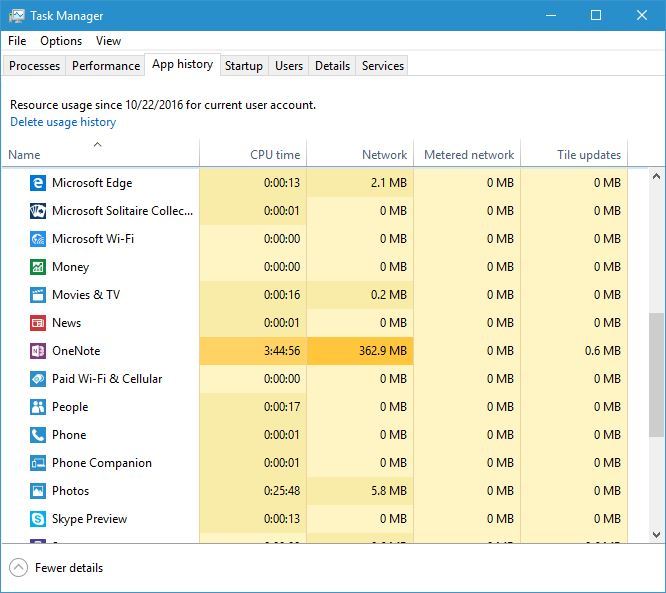
As you can see, checking data usage for each app in Task Manager is rather simple, but it has one crucial limitation – it only shows data usage for Universal apps. Although all relevant data is listed, you can only use Task Manager to view data usage for Universal apps, which isn’t something that all users want.
Solution 2 – Use Settings app
As we shown you earlier, Task Manager is the simplest way to check data usage, but it doesn’t show you information regarding all applications that are installed on your PC. If you want complete report about data usage on your PC, we strongly suggest that you use Settings app. To see 3G and 4G data usage in Settings app, do the following:
- Open Settings app by pressing Windows Key + I on your keyboard.
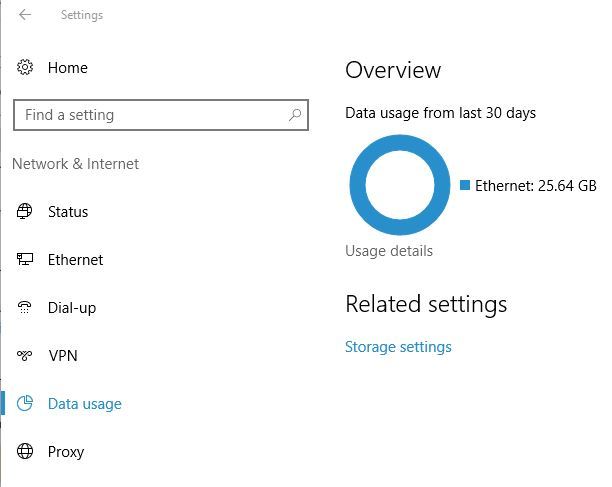
- When Settings app opens, go to Network & Internet > Data usage section.
- Now you’ll see a small chart regarding data usage in the last 30 days.
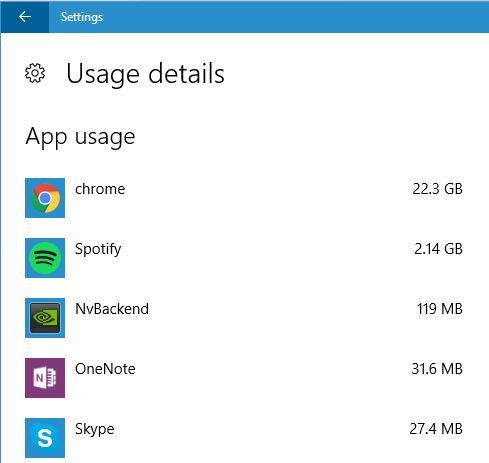
- Optional: To see detailed information regarding data usage, click Usage details.

Now you should see detailed information regarding each installed application.

Solution 3 – Use third-party applications
You can also track 3G and 4G data usage simply by using third-party applications. If you want, you can use Universal app called Network Data. If you prefer classical applications, we covered some of the best bandwidth monitors for Windows 10, so be sure to check them out.
Tracking your data usage on Windows 10 is crucial if you use 3G or 4G network. As you can see, you can easily do that on Windows 10 without any third-party apps, and if you’re not tracking data usage on Windows 10, we strongly suggest that you start as soon as you can.
READ ALSO: