Solved: Your Virus and Threat Protection is Managed by Your Organization
First, verify if you have the latest version of Windows installed
Key notes
- To remove Your Virus and threat protection is managed by your organization message from the Windows Security app, reset the app, make changes to the registries, or uninstall the third-party app.
- Continue reading to learn the detailed steps!

Many users have complained about being stuck with Your Virus and threat protection is managed by your organization and unable to use the Windows Security app. If you are one of them, this guide can help!
We will explore the common causes of the issue and delve into the expert-recommended methods with step-by-step instructions to fix it.
Why do I see Your Virus & Threat Protection is Managed by Your Organization?
- Windows Defender is corrupted.
- Malware infection.
- Windows update is pending.
How do I fix a Virus and threat protection is managed by your organization on Windows 11?
Before proceeding with any steps to fix this error, go through the following preliminary checks:
- Ensure you have installed the latest Windows updates.
- Restart your computer and run it in a clean boot state to understand the cause of the issue.
- Make sure you log in using a personal Microsoft account or a local user account with admin privileges.
- Disable third-party antivirus software temporarily.
1. Using the Command Prompt to DisableAntiSpyware
- Press the Windows key, type cmd, and click Run as administrator.

- In the Command Prompt window, copy & paste the command and hit Enter:
REG DELETE “HKLM\SOFTWARE\Policies\Microsoft\Windows Defender” /v DisableAntiSpyware
- Once the command is executed, reboot your PC to complete the action.
2. Modify the Group Editor Policy
- Press Windows + R to open the Run dialog box.

- Type gpedit.msc and click OK to open the Group Policy Editor.
- Navigate to this path:
Computer Configuration\Administrative Templates\ Windows Components\Microsoft Defender Antivirus - Click the arrow next to Microsoft Defender Antivirus to expand it.
- Now locate the Turn off Microsoft Defender Antivirus option from the right pane and double-click it to open its Properties.

- Select Not Configured or Disabled, and click Apply, then OK.

- Go to this path:
Computer Configuration\Administrative Templates\Windows Components\Windows Security\Virus and threat protection - Locate and double-click Hide the Virus & threat protection area.

- Select Not Configured, then click Apply, then OK. Once done, restart your computer to let the changes take effect.

3. Disable the Intrusion Prevention System in Windows Defender
- Press the Windows key, type powershell, and click Run as administrator.

- Copy & paste the following command in the PowerShell window, and press Enter:
Set-MpPreference -DisableIntrusionPreventionSystem $true
- Reboot your PC to save the changes.
4. Using the Registry Editor
- Press Windows + R to open the Run dialog box.

- Type regedit and click OK to open the Registry Editor.
- Go to this path:
Computer\HKEY_LOCAL_MACHINE\SOFTWARE\Policies\Microsoft\Windows Defender - Click the Windows Defender folder, double-click DisableAntiSpyware, and set the Value data to 0 to disable it.

- Now click OK.
- Next, navigate to this path:
Computer\HKEY_LOCAL_MACHINE\SOFTWARE\Policies\Microsoft\Windows Advanced Threat Protection - Locate and right-click Windows Advanced Threat Protection, then select Delete.
- Click OK
- Go to this path:
Computer\HKEY_LOCAL_MACHINE\SYSTEM\CurrentControlSet\Control\DeviceGuard\Scenarios\HypervisorEnforcedCodeIntegrity - Locate and double-click Enabled DWORD, and set Value data to 0, then click OK to confirm the change and restart your PC.

In case you still face the issue, you need to tweak a few more registry entries:
- Open the Registry Editor again with the steps mentioned.
- Go to these paths one by one:
Computer\HKEY_LOCAL_MACHINE\SYSTEM\CurrentControlSet\Services\SecurityHealthService
Computer\HKEY_LOCAL_MACHINE\SYSTEM\CurrentControlSet\Services\WinDefend
Computer\HKEY_LOCAL_MACHINE\SYSTEM\CurrentControlSet\Services\WdNisSvc
Computer\HKEY_LOCAL_MACHINE\SYSTEM\CurrentControlSet\Services\MpsSvc
- Locate & double-click Start DWORD, then set Value data to 2, and click OK.

- Reboot your computer.
5. Verify if the Windows Defender service & its dependencies are running
- Press Windows + R to open the Run dialog box.

- Type services.msc and click OK to open the Services app.
- Locate Windows Defender Firewall service and double-click it.

- Select Automatic from the drop-down menu for Startup type and ensure Service status is Running. If it is not running, click the Start button to initiate it.

- Click Apply, then OK.
- Now locate the Security Center service, right-click it, and select Restart.

- Next, locate Windows Security Service, double-click it, and choose Manual from the drop-down menu for Startup type.

6. Re-register the DLL files
- Press the Windows key, type cmd, and click Run as administrator.
- Copy & paste the following commands one by one and press Enter after every command:

regsvr32 softpub.dll
regsvr32 wintrust.dll
regsvr32 initpki.dll
regsvr32 wups.dll
regsvr32 wuweb.dll
regsvr32 atl.dll
regsvr32 mssip32.dll
- Restart your computer to let the changes take effect.
7. Reset/reinstall the Windows Security app
- Press Windows + I to open Settings.
- Go to Apps, then Installed apps.

- Locate Windows Security, click the three dots icon, and select Advanced options.

- Click the Reset button. This action will delete the app’s data. If the issue persists, proceed with the steps to reinstall the app.

- Press the Windows key, type powershell, and click Run as administrator.
- Copy & paste the following command to reinstall the app and hit Enter:
Get-AppXPackage -AllUsers | Foreach {Add-AppxPackage -DisableDevelopmentMode -Register "$($_.InstallLocation)\AppXManifest.xml"} - Reboot your computer.
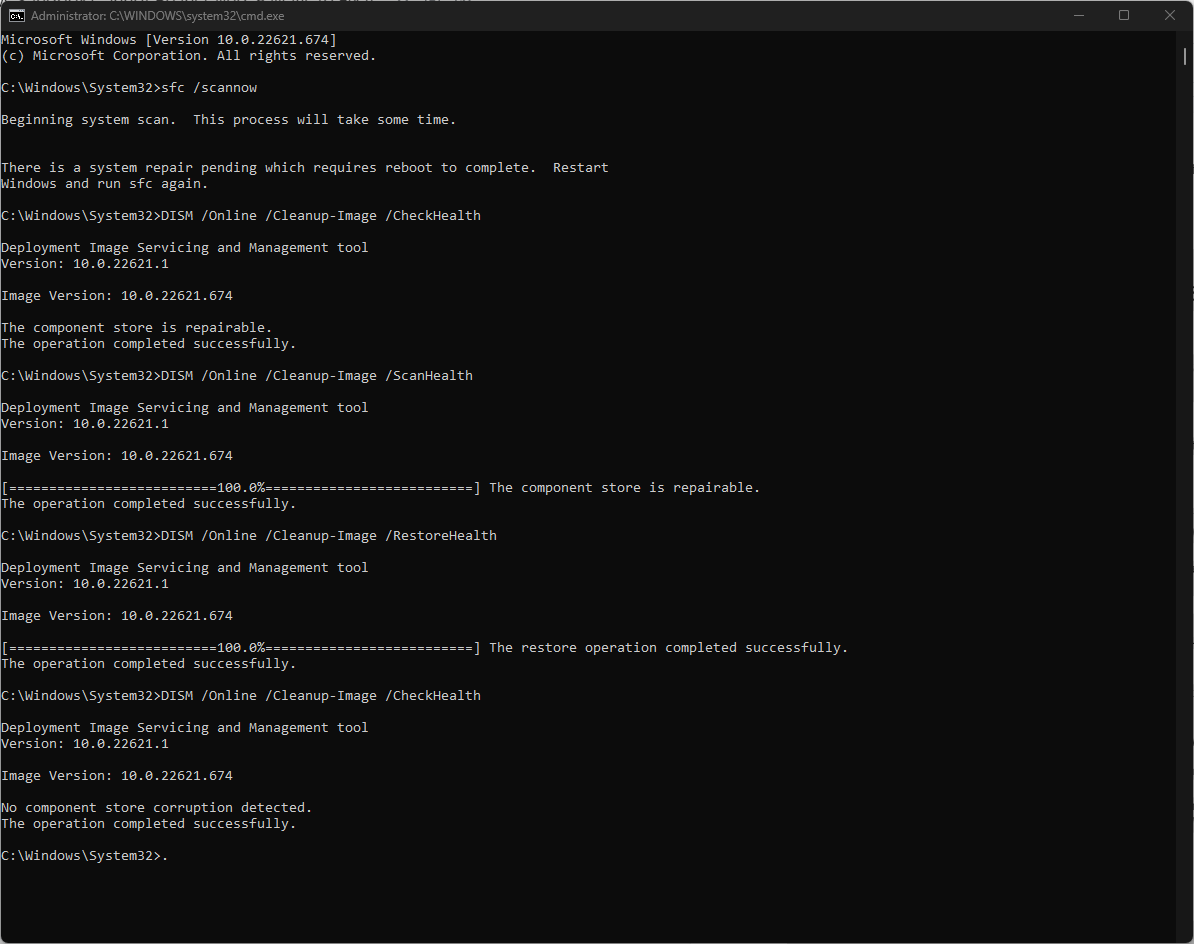
8. Run an SFC scan
- Press the Windows key, type cmd in the search box, and click Run as administrator.
- Type the following command to identify and replace the problematic system files with a clean copy from the local cache or the original installation media and hit Enter:
sfc /scannow
- Restart your PC.
If nothing worked for you so far, chances are your system files are damaged beyond repair, and the best way to eliminate the problem is to reinstall the Windows operating system.
If you are restricted to modifying system settings due to a similar error message, Some settings are managed by your organization; read this guide to find quick solutions.
To conclude, remember to always keep your computer up to date, turn on real-time protection & scan your system using an antivirus tool periodically to avoid virus attacks.
If you cannot update Windows and are greeted with an error, Your organization manages updates on this PC message on your PC; read this guide to learn about the solutions.
Did we miss a step that worked for you? Don’t hesitate to mention it in the comments section below. We will happily add it to the list.
Read our disclosure page to find out how can you help Windows Report sustain the editorial team. Read more


Improve this guide


User forum
0 messages