How to make Windows 10/11 connect to VPN before login
Key notes
- You can make Windows 10 connect to a VPN before logon to maximize your computer security and online privacy. It's also a shortcut to connect to your office PC and access files through VPN.
- Unfortunately, Windows 10 doesn't have an easy option to connect to a VPN before signing in. However, you can make some tweaks to your PC to make this happen, without any special skills.
- To find out the best features of Microsoft's OS, check out our Windows 10 section.
- Join our VPN Troubleshooting Hub if you frequently have to fix VPN issues.


World-class 24/7 support with 82% for a 2 years plan and 2 months free
70% of our readers choose Private Internet Access
70% of our readers choose ExpressVPN
Amazing connection speed with 61% off and 4 months free for the 2-years plan.
Best security protocols with 83% off and 2 months free for a 2-year plan.
If you’re interested in protecting your online privacy and digital identity, you can make Windows 10 automatically connect to a VPN as soon as you turn on your computer. However, this happens only after you log in with your Windows account.
Connecting to a VPN as soon as the Internet connection is established is a much safer solution, especially if you typically use a public, unprotected Wi-Fi at work, at a restaurant, or while traveling.
In that case, it’s a better idea to make Windows 10 connect to the VPN before login since it provides a higher level of protection against hackers and other Internet dangers.
Check out our step-by-step instructions below to find out how to auto-connect to a VPN before signing into your Windows 10 PC. Although you can do this without having to install any additional software, we suggest getting a premium VPN subscription for better privacy and security.
How do I make Windows 10 connect to VPN before login?
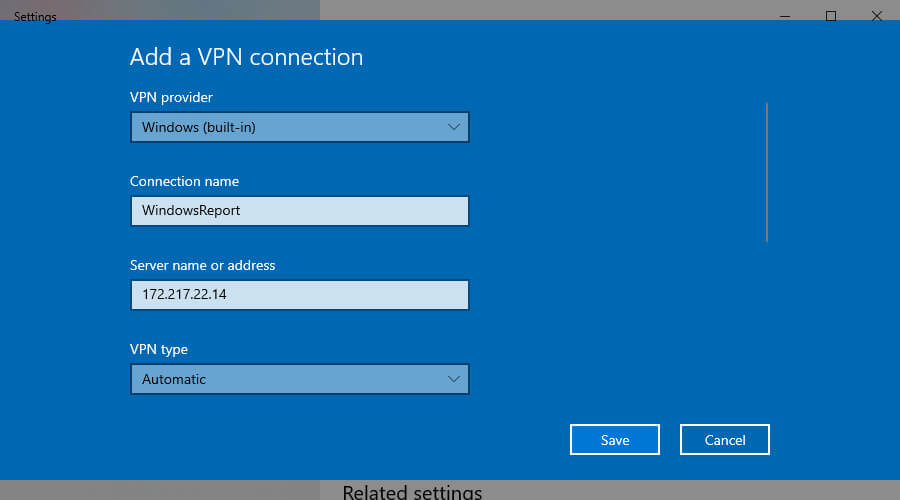
Add a VPN connection
- Right-click Start and open Network Connections.
- Choose VPN and click Add a VPN connection.
- Specify the VPN connection details.
- Write down the Connection name, User name, and Password.
- Click Save.
Don’t know what VPN details to add? Discover how to create a VPN connection in Windows 10.
Create a BAT file
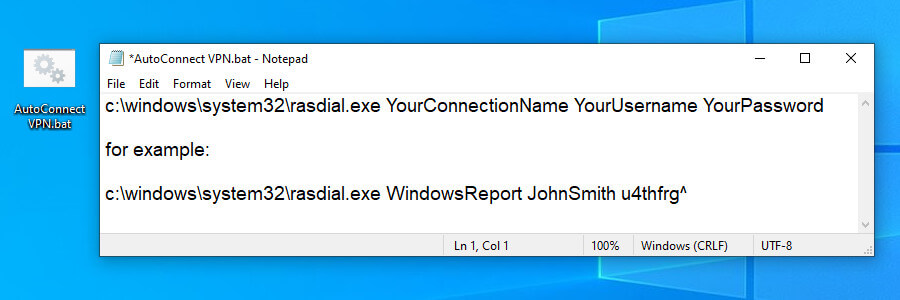
- Launch the Notepad app in Windows 10 (press Ctrl + R, type notepad, press Enter).
- In the empty document, paste the following code:
c:windowssystem32rasdial.exe YourConnectionName YourUsername YourPassword - Replace the info above with the VPN details you wrote down.
- Save the Notepad document (press Ctrl + S) and exit.
- Rename the Notepad file to change the TXT format* to BAT.
- Store the document in a safe place.
*If the file formats are not displayed, you must show file extensions in Windows 10 to be able to change them.
Create and schedule a task
- Hit the Win key and type Task Scheduler*.
- Press Enter to launch this app.
- Go to the Actions panel on the right side.
- Click Create Task (not Create Basic Task).
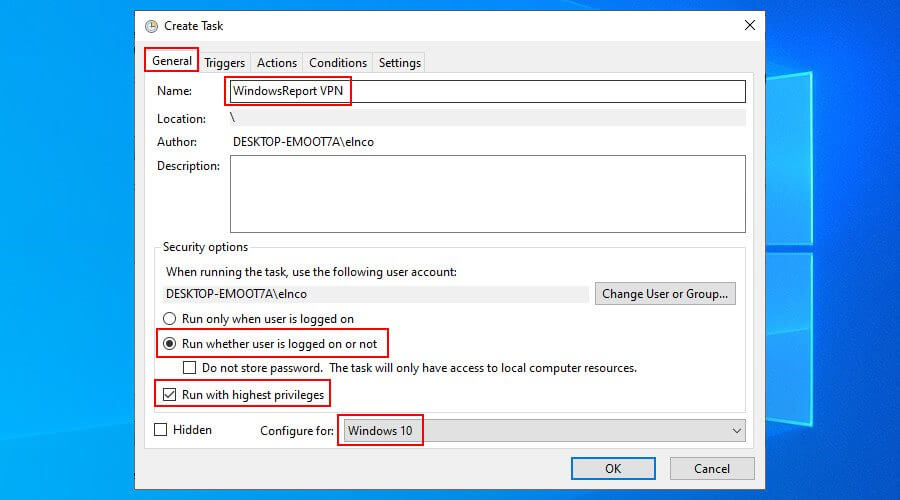
- General tab
- Write a task name, such as WindowsReport VPN.
- At Security options, select Run whether user is logged on or not.
- Enable Run with highest privileges.
- Set Configure for to Windows 10.
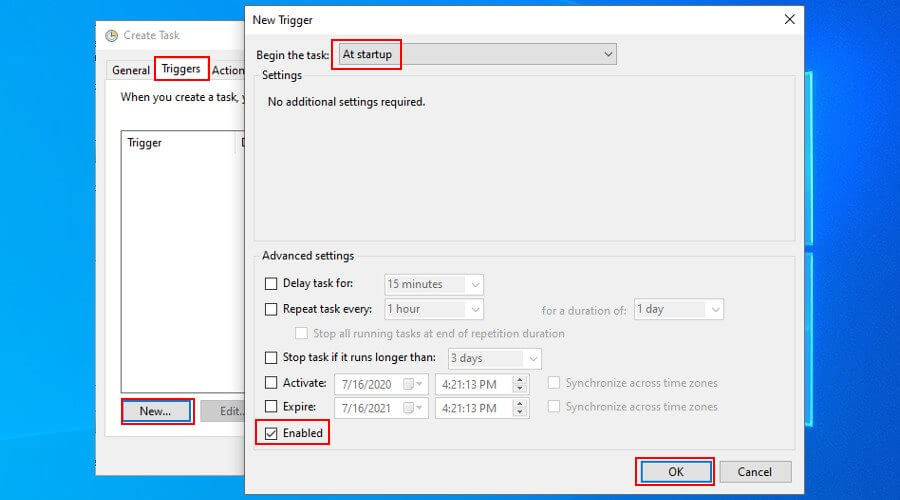
- Triggers tab
- Click New.
- Set Begin the task to At startup.
- Make sure the Enabled box is checked.
- Click OK.
- Actions tab
- Click New.
- Set Action to Start a program.
- Click Browse and select the BAT file you created.
- Click Open and then OK.

- Conditions tab
- Deselect all options.
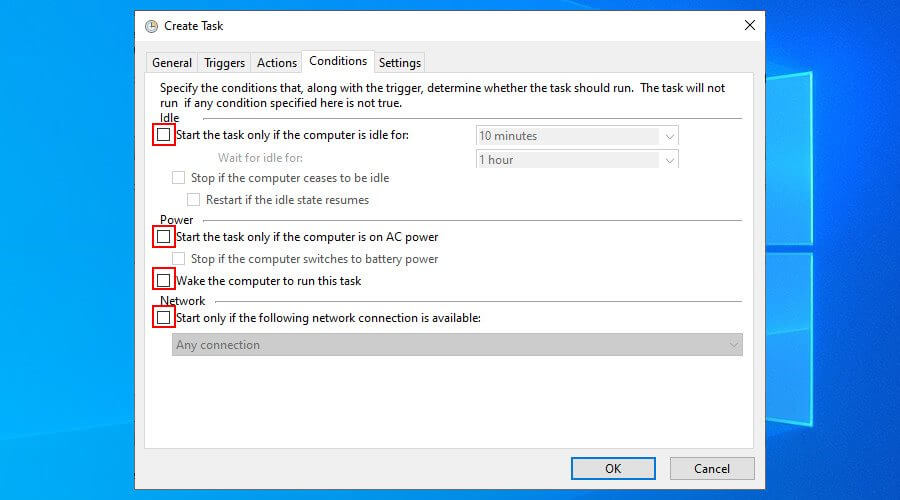
- Deselect all options.
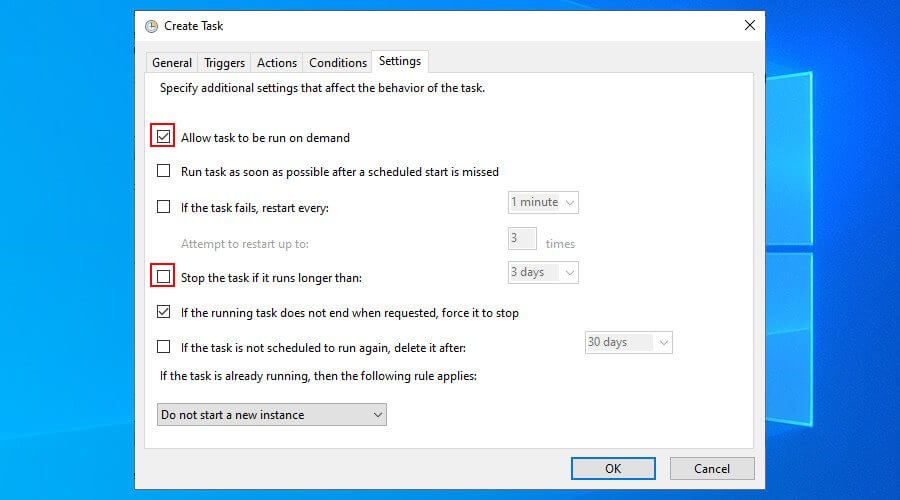
- Settings tab
- Enable Allow task to be run on demand.
- Disable Stop the task if it runs longer than.
- Click OK.
- Enter your user account information to confirm.
*You can find out everything about the Windows 10 Task Scheduler to master this application.
At every system startup, Windows 10 will connect to the VPN before logon. To disconnect, you just have to press the Network icon in the systray, select the VPN connection, and press Disconnect.
To temporarily disable the task, open the Task Scheduler app, select the task, right-click it, and press Disable. To permanently remove it, press Delete instead of Disable. You can also edit the task settings.
However, keep in mind that, if you wish to use a different VPN server, you must manually edit the VPN connection details in Windows 10 (at Step 1, where you added the VPN connection).
If you also change the VPN connection name, username or password, then you also have to update the BAT file you created (at Step 2 after updating the VPN profile in Windows 10).
How about connecting to a VPN client before logon?
Unfortunately, using Task Scheduler to schedule a VPN client to run before logon doesn’t work the same way as scheduling a manual VPN connection. Regardless of the settings configuration in Task Scheduler, a VPN client can’t run earlier than logon.
However, you can obtain the manual connection details of your VPN service to create a connection using the Windows 10 built-in VPN provider, such as Private Internet Access. Then, by following the instructions we provided above, you can make Windows 10 connect to the VPN before login.
Why use Private Internet Access

Private Internet Access (PIA) is a premium virtual private network solution and the best VPN for Windows 10. A product of Kape Technologies, PIA can hide your IP address, encrypt your entire network traffic, and keep you safe from hackers.
Furthermore, unlike Windows 10 that offers native support for few VPN protocols, PIA includes OpenVPN and WireGuard, which offer the best security features for your computer.
You also use native port forwarding without having to configure router settings, as well as set up an emergency kill switch to preserve your online anonymity.
Additionally, PIA supports exclusive DNS servers, up to 10 simultaneous device connections, split-tunneling mode, together with a malware and ad blocker.
It’s compatible with all major platforms, has a user-friendly interface, and provides manual configuration settings for OpenVPN, PPTP, L2TP, and SOCKS.
More about PIA:
- +3,300 VPN servers in 48 countries
- A zero-logging policy
- No IP or DNS leaks
- 24/7 live chat support
- 30-days money-back guarantee (no free trial)

Private Internet Access
Use this fast VPN to secure your browsing sessions, access blocked websites, watch online streaming, and more.To sum up, you can make Windows 10 connect to a VPN before login if you manually create a VPN connection and add its details to the Task Scheduler.
In older Windows versions, it was also possible to view the VPN connections on the logon screen and choose to connect or not (including Windows 8). But it doesn’t seem to work on Windows 10 anymore.
Nevertheless, by using the workaround we described above, you can instruct Windows 10 to automatically connect to a VPN before you get the chance to sign in with your user credentials.
To maximize security, though, we recommend signing up for a premium subscription service like PIA and obtaining the manual configuration settings for PPTP or L2TP. PIA’s VPN servers facilitate a higher level of security for your home PC.
[wl_navigator]
Read our disclosure page to find out how can you help Windows Report sustain the editorial team. Read more


Improve this guide


User forum
2 messages