Windows 10/11 Deleted GRUB [Fixed by Experts]
Relax, it might not be deleted just overwritten
8 min. read
Updated on
Read our disclosure page to find out how can you help Windows Report sustain the editorial team. Read more
Key notes
- GRUB (GRrand Unified Bootloader) is a bootloader software that is crucial in the boot process of many computer OS, especially Linux.
- If you can’t get the GRUB screen to load, keep reading to find the solutions.
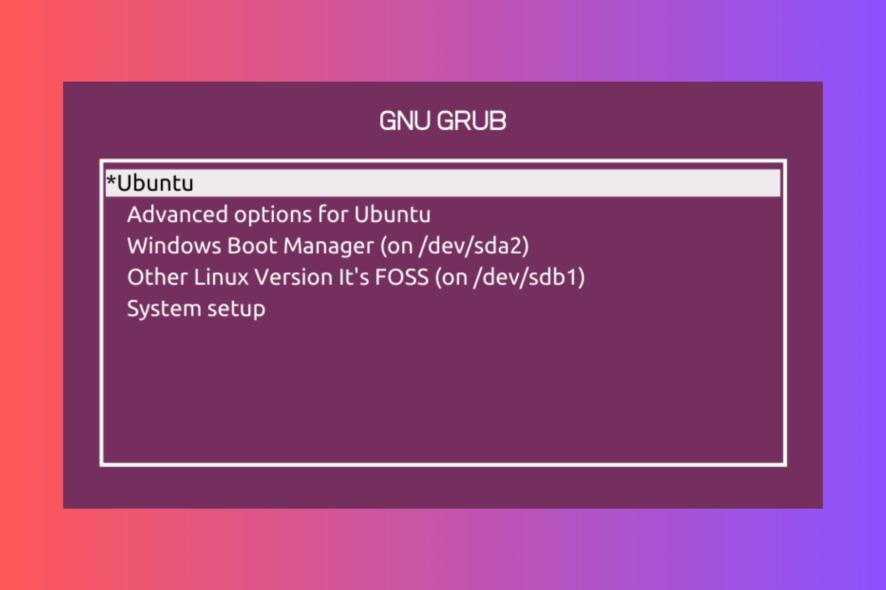
If you have a multi-boot setup like Windows 10 and Linux, and you aren’t getting the Grub Bootloader screen to choose which operating system to load, and every time you restart, the Windows OS loads, this guide can help!
This is a common problem users report after they update Windows or install Windows 10. When you update or install Windows, the Windows bootloader overwrites the Grub bootloader.
Some other causes of the GRUB Deleted and Windows 10 loading up are Linux reinstallation, fast startup feature, malware activity, changes to BIOS settings, and third-party boot manager conflicts.
How do I recover GRUB after installing Windows?
1. Disable Fast Startup
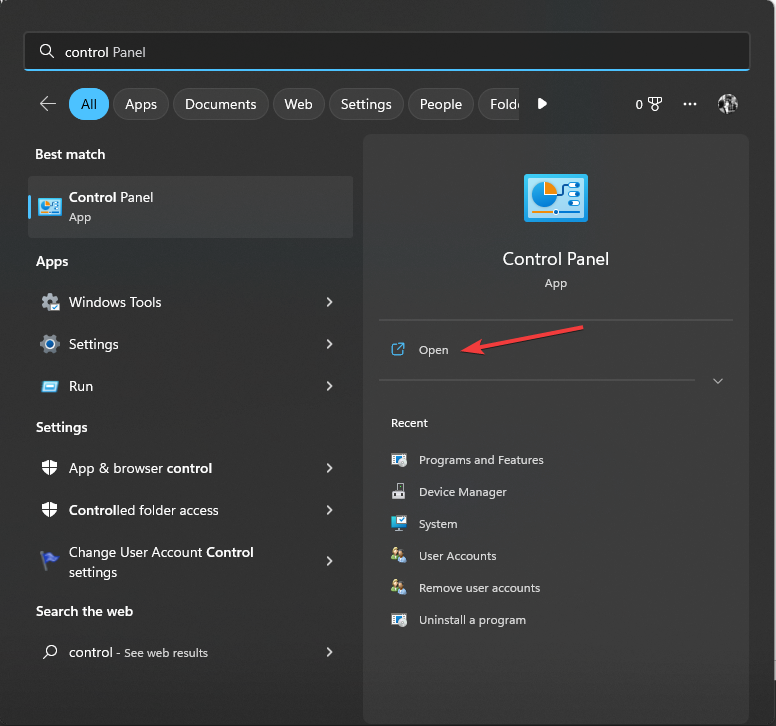
- Press the Windows key, type control panel, and click Open.
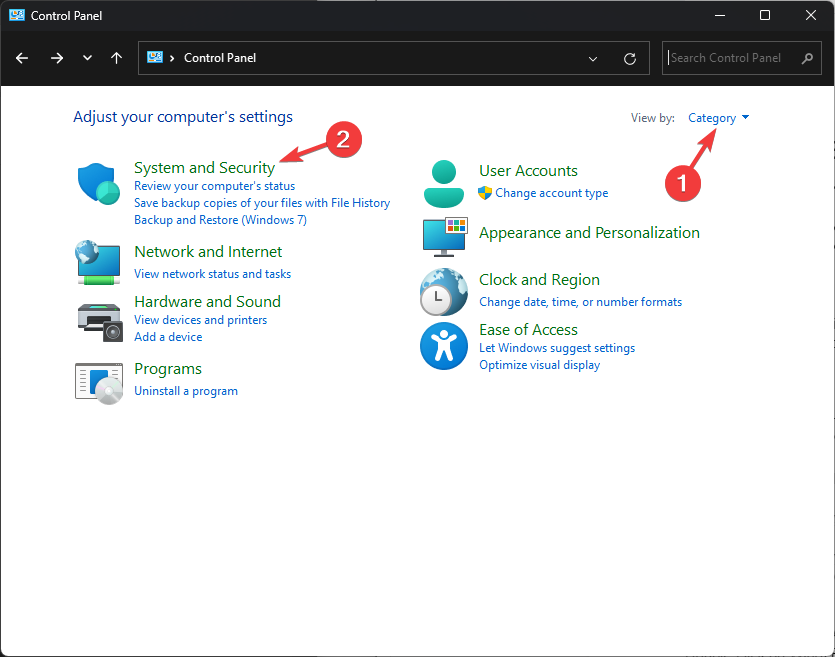
- Select Category for the View by option, and click System and Security.
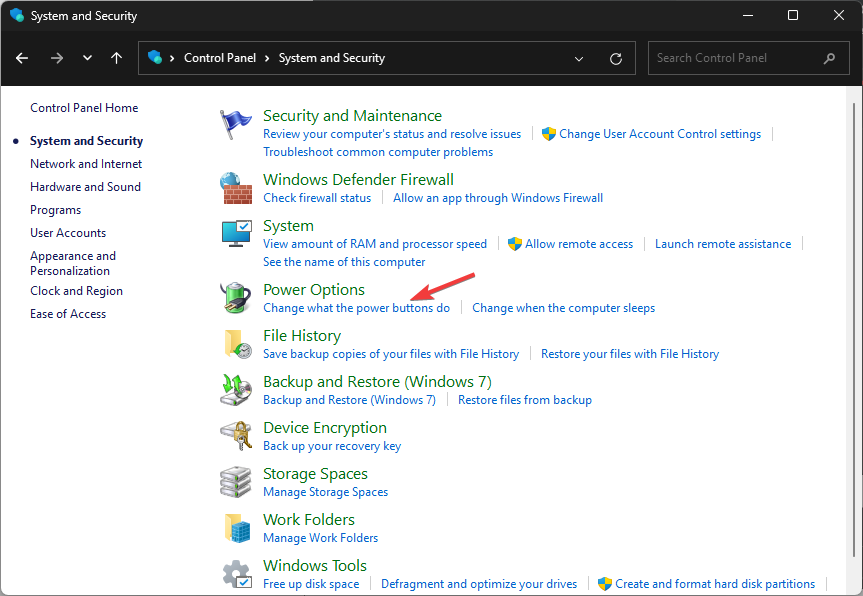
- Next, locate Power Options and click Change what the power buttons do.
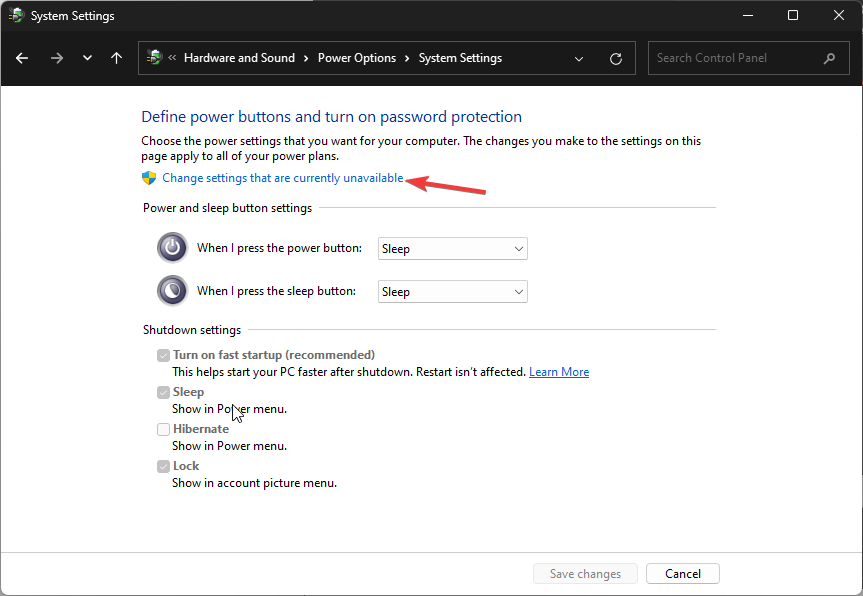
- Click the Change settings that are currently unavailable link.
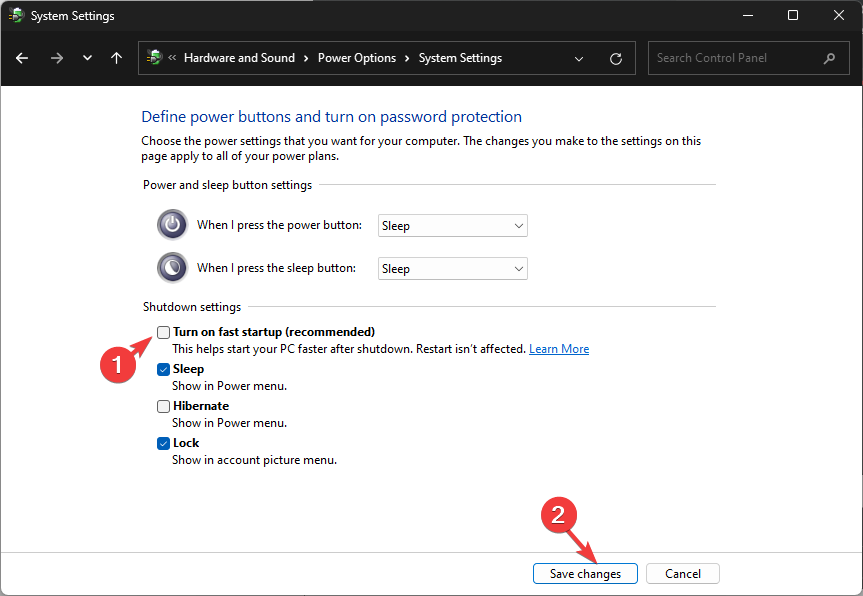
- Remove the checkmark next to Turn on Fast Startup and click Save changes.
- Restart your PC, and you will see the GRUB screen.
Windows Fast Startup is a feature that can interfere with the boot process of other operating systems; that’s why it is advised to disable it to avoid issues. It is not a direct solution but is a preventive measure
2. Change the boot order
- Restart your computer. When you see the manufacturer’s logo, press the function key designated by the manufacturer to access the boot menu. For example, for HP, it is F9; for Dell, it is F2.
- Go to the Boot menu, locate the Boot priority order, look for Linux, and press F5 to move it up the order.
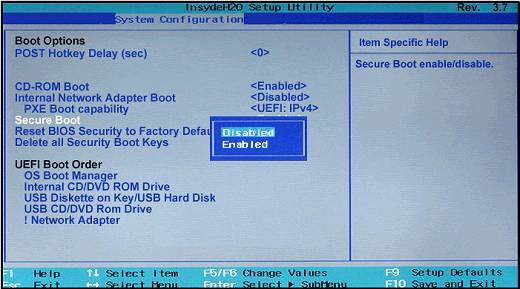
- Next, locate Secure Boot, and select Disabled.
- Press F10 to save & exit the boot menu.
This method will work if you have the Ubuntu or Linux entry in the boot menu; if you can’t find it, move to the next one.
3. Add Linux boot entry
- Use the steps mentioned in Step 2 and enter the BIOS menu.
- Locate Boot or Security and look for the Add Boot Option.
- You will either get an option to add an EFI file or will be taken to the hard drive Linux distribution installed.
- Select EFI. Locate and choose the folder with your name.
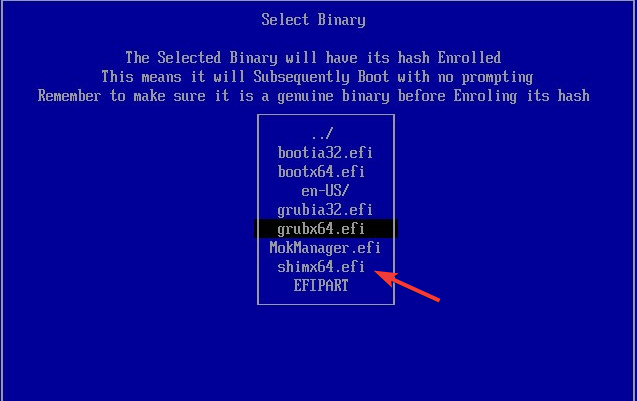
- From the folder, choose shimx64.efi file and press Enter.
- Click Yes or OK to confirm the changes.
- The boot option will now appear; press F10 to save the changes.
4. Modify the registry settings
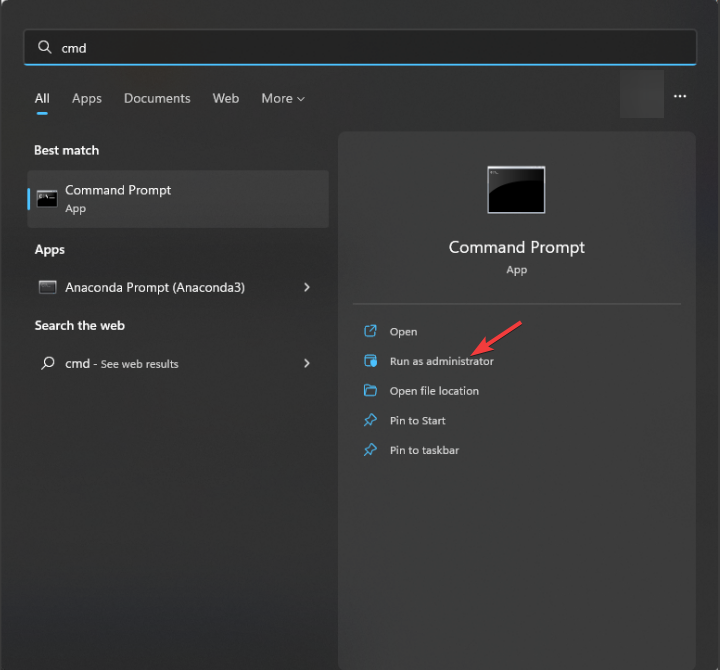
- Press the Windows key, type cmd, and click Run as administrator.
- Type the following command to change the bootloader back to GRUB after replacing Ubuntu with your distribution and press Enter:
bcdedit /set {bootmgr} path \EFI\ubuntu\grubx64.efi - Reboot your PC; you will get the GRUB menu back.
If you have similar issues but can’t load the Windows bootloader instead, we recommend you check out this guide
5. Reinstall GRUB
 NOTE
NOTE
First, you need to create a bootable USB drive with Linux Live in it.
- Go to Linux’s official website and download the Linux distribution you want.
- The ISO file will be downloaded on your computer; plug in the USB drive that you want to use.
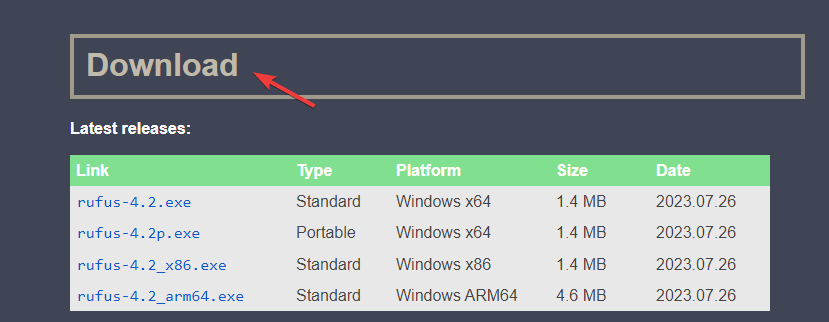
- Download and install Rufus from the official site.
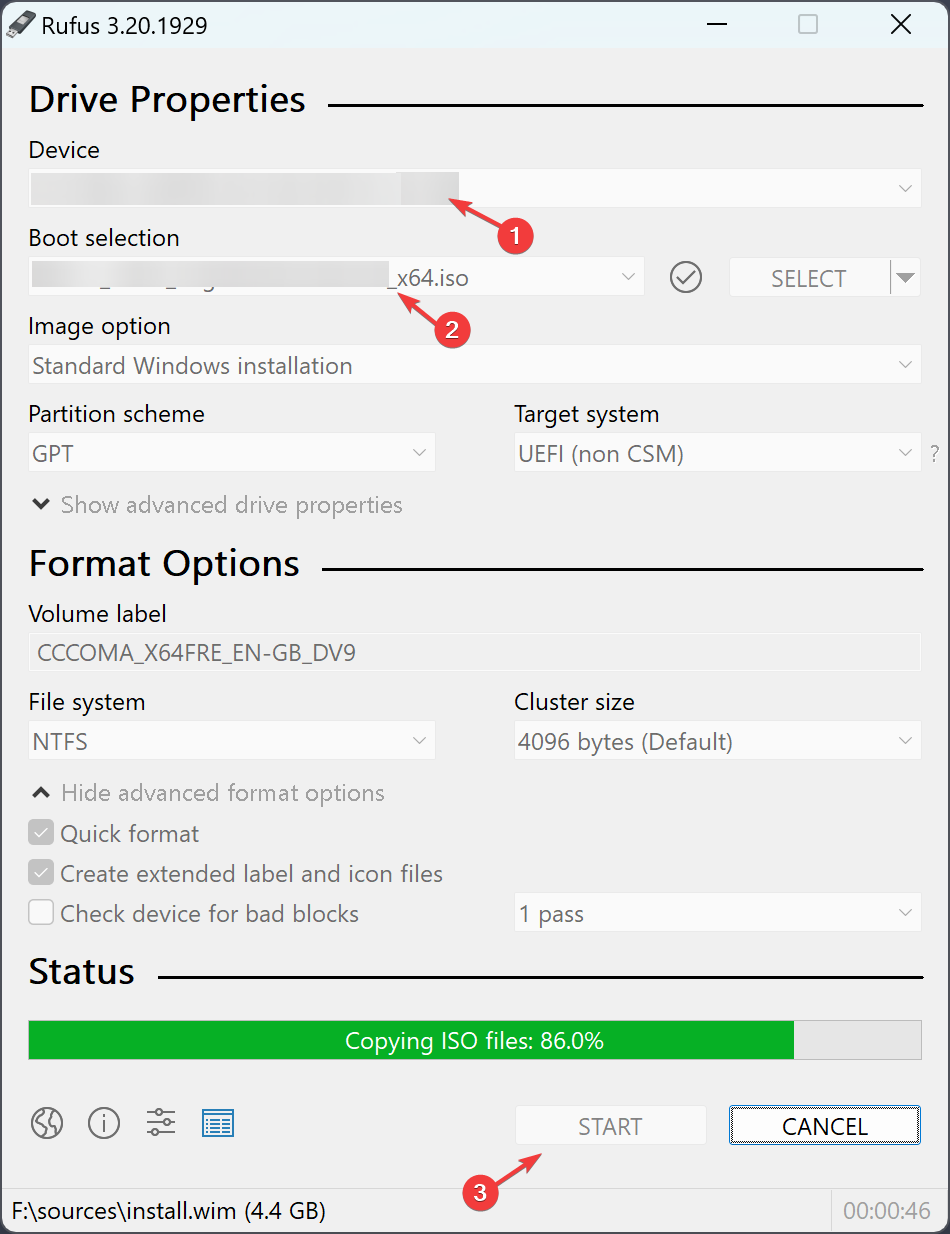
- Launch Rufus, and choose your USB driver under the Device section.
- Locate Boot selection, select the downloaded Linux ISO file, and click Start.
Once completed, you will have a bootable Linux USB flash drive. Now follow these steps to make the USB priority to boot
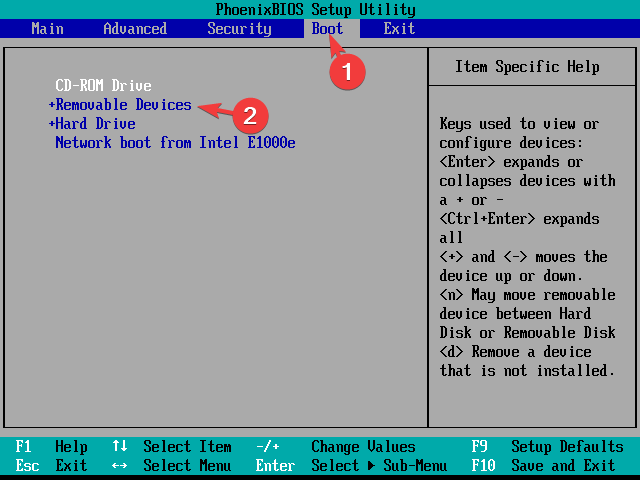
- Restart your computer and press the function key designated by the manufacturer to access the boot menu when you see the manufacturer’s logo.
- Go to the Boot menu, locate the Boot order, look for a USB drive, and press F5 to move it up the order.
- Press F10 to save & exit the boot menu.
Now when your computer boots up, you will get a functional Linux environment to reinstall GRUB.
- Open Terminal and copy & paste the following command to get the list of available disks and hit Enter:
sudo fdisk -l - Carefully look through the output to recognize the partition that is related to Linux installation, then type the following command after replacing /dev/sdXY with the actual partition designation and press Enter:
sudo mount /dev/sdXY /mnt - Next, to mount virtual file systems, copy & paste the following commands one by one and press Enter after each command:
sudo mount --bind /dev /mnt/dev
sudo mount --bind /sys /mnt/sys
sudo mount --bind /proc /mnt/proc
sudo mount --bind /run /mnt/run
- To change the root to your Linux installation, type the following command and hit Enter:
sudo chroot /mnt - Copy & paste the following command to reinstall GRUB as per your Linux distribution and press Enter:
- On Debian/Ubuntu-
sudo grub-install /dev/sdX - On Red Hat/Fedora –
sudo grub2-install /dev/sdX
- On Debian/Ubuntu-
- Once it is installed, type the following command to update its configuration to detect the installed OS and hit Enter:
sudo update-grub - Next, to exit the Chroot environment, type exit and press Enter.
- To unmount the mounted partitions in the reverse order, copy & paste the following commands one by one and press Enter after each command:
sudo umount /mnt/dev
sudo umount /mnt/sys
sudo umount /mnt/proc
sudo umount /mnt/run
sudo umount /mnt/boot
sudo umount /mnt
- Reboot your system, and you will get the GRUB menu with both operating systems listed.
6. Use the Boot-Repair tool
Create the bootable USB drive with Linux Live distribution and change the boot order using the steps mentioned in Step 3, then plug the flash drive into your computer, and follow these steps:
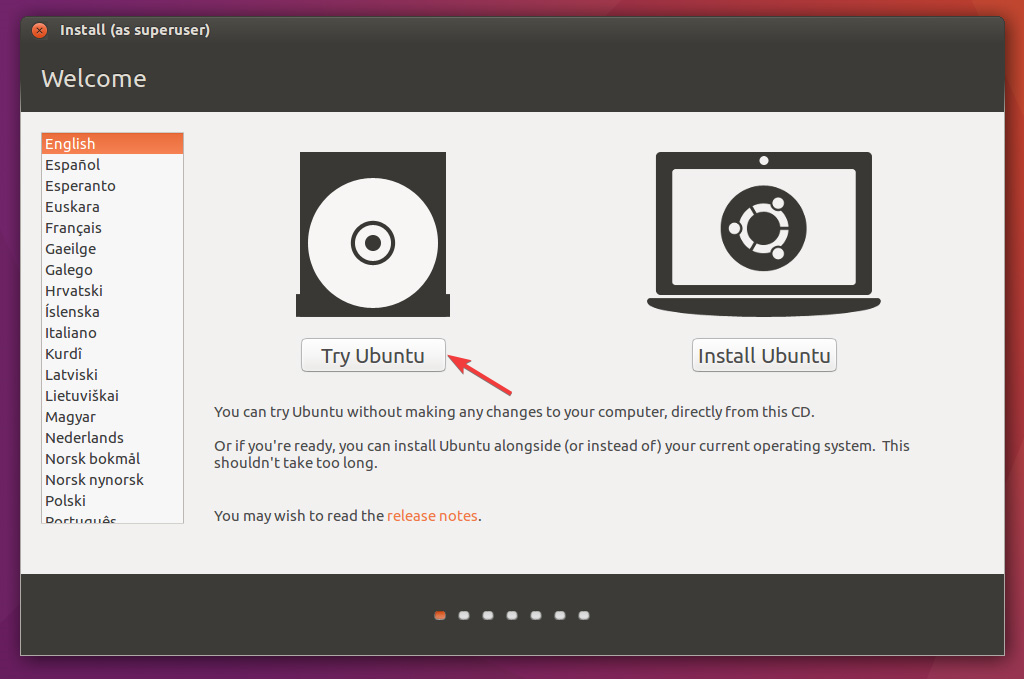
- Restart your computer, and the Ubuntu Live environment will load; choose the Try Ubuntu option to get a functional Ubuntu session.
- To install Boot-Repair, launch the Terminal, and copy & paste the following commands one by one and press Enter after every command:
sudo add-apt-repository ppa:yannubuntu/boot-repair
sudo apt-get update
sudo apt-get install -y boot-repair
- Now type the following command to launch Boot-Repair and press Enter:
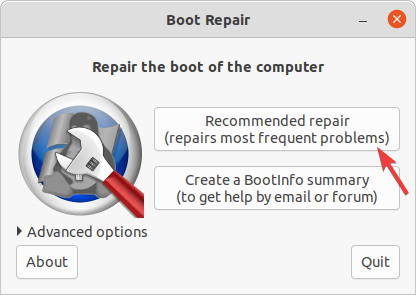
boot-repair - The Boot-Repair tool window will come up, and select the Recommended repair option.
- Follow the on-screen instructions to complete the process.
- Restart your computer using the Power Off or Shut Down option. Remove the pen drive, and the GRUB menu will appear upon restart.
If you can’t see Windows in the GRUB menu, then read this guide to understand the reasons and solutions to fix it.
How can I fix can’t boot up Windows 10 after removing Ubuntu?
Before proceeding with any steps, go through the following preliminary checks:
- Ensure you have a USB drive with a minimum of 8 GB of storage
- Stable internet connection
1. Create installation media and change the boot order
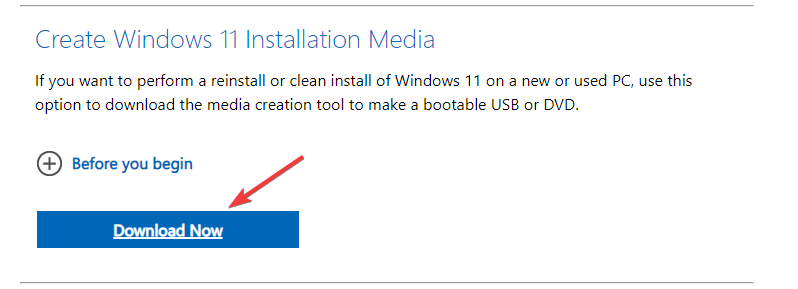
- On another PC, go to the Windows 11 website, locate Windows 11 Installation Media, and click Download Now.
- The mediacreation.exe file will be downloaded; double-click to open it.
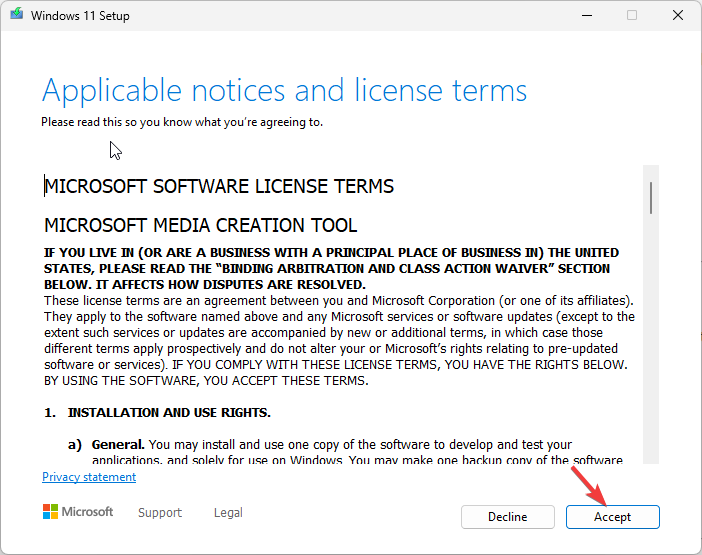
- Select Accept.
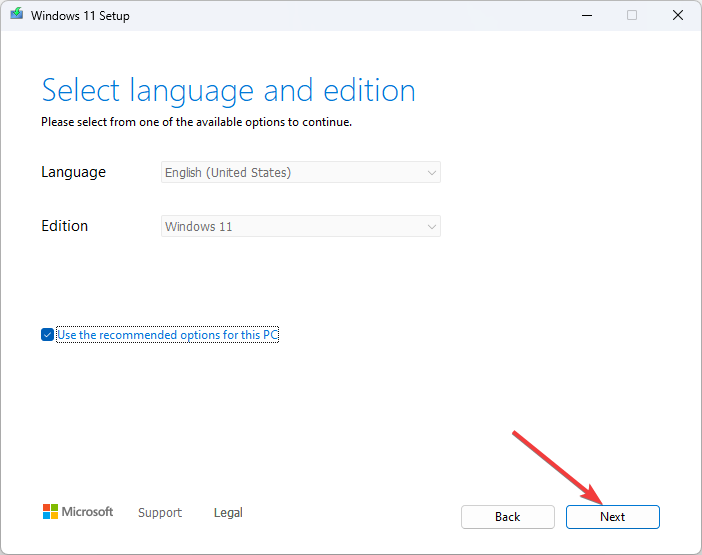
- For Select language and edition, choose Language and Edition and click Next.
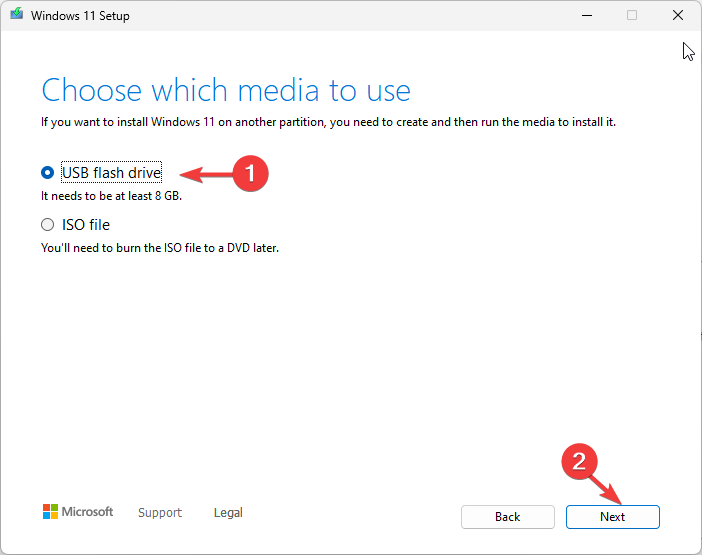
- Select the USB flash drive option and plug in the flash drive.
- The Windows 11 Setup will detect it and show the drive; click Next.
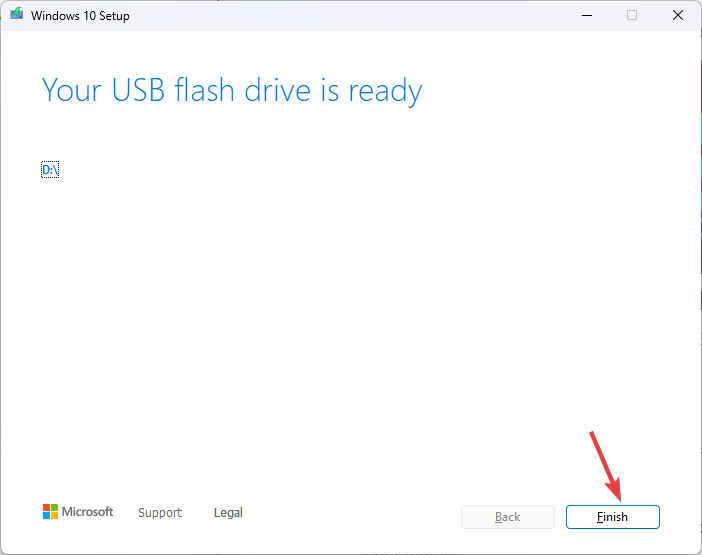
- The files will be mounted to the drive; once ready, click Finish.
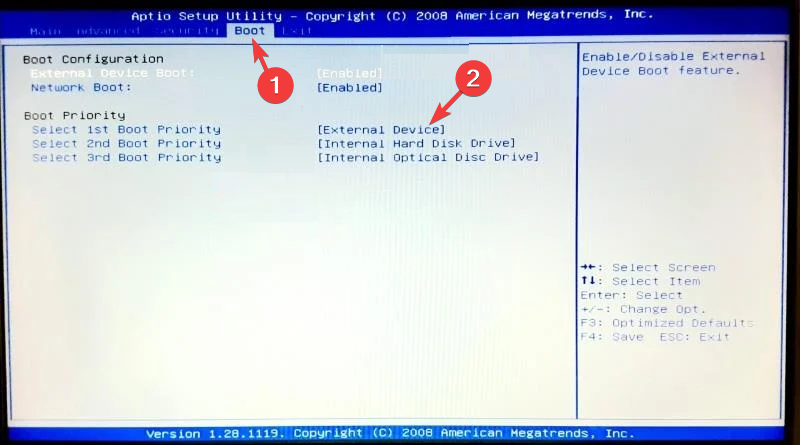
- Plug in the flash drive to the affected computer and turn it on. Press the key designated by the manufacturer to enter Boot options. Go to Boot and locate the USB flash drive, use the arrow keys to move it up in the list, and save the changes & restart.
2. Repair your PC
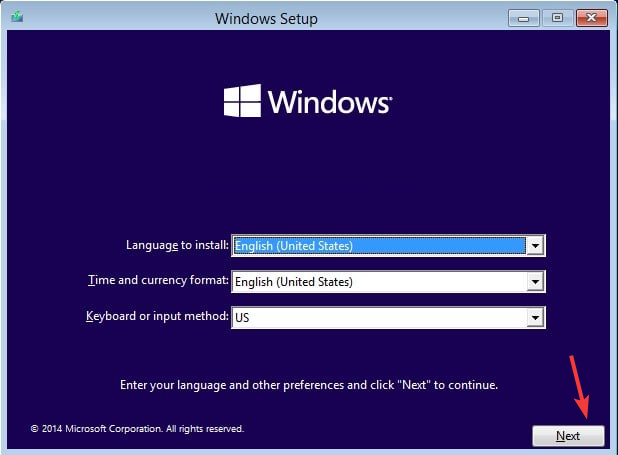
- Upon restart, on the Windows Setup screen, select Language to install, Time and currency format, and Keyboard or input method.
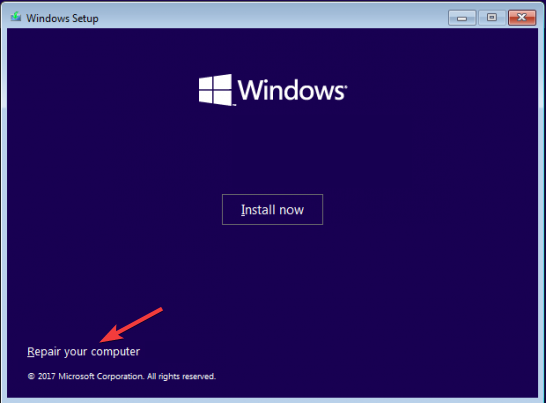
- Click the Repair your computer option from the next page.
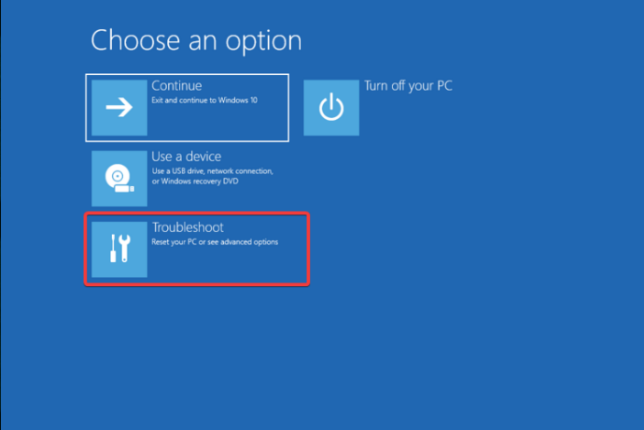
- From the Choose an option page, select Troubleshoot.
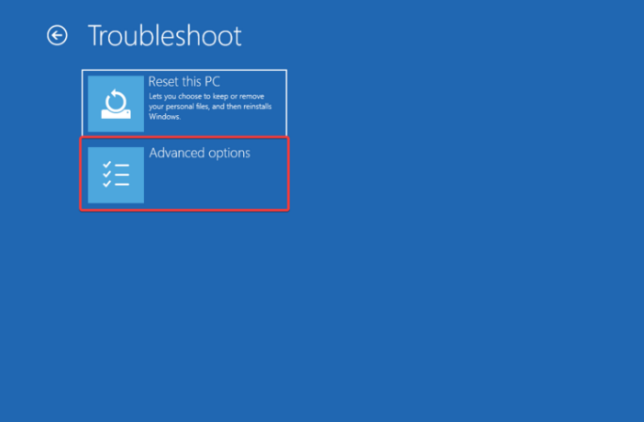
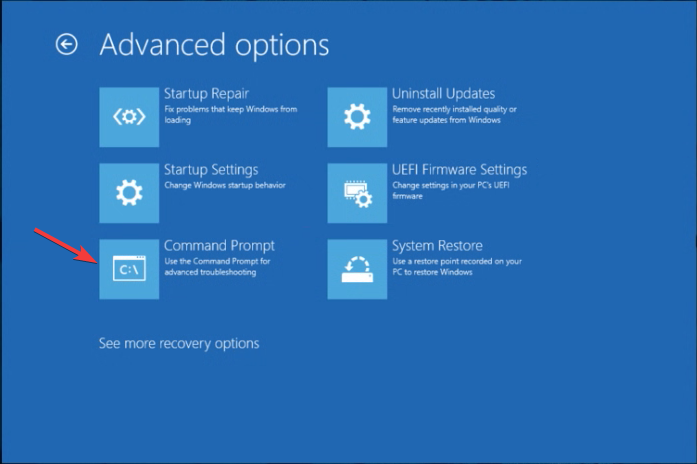
- Choose Advanced options.
- Select Command Prompt from the advanced options.
- The computer will restart, and you might be prompted to enter user credentials.
- On the Command Prompt window, type this command after replacing D with your Windows system drive and hit Enter:
D: - Type the following command to scan your drive with Windows installed after replacing the system driver letter and hit Enter:
chkdsk D: /f /r - Copy & paste the following commands one by one and hit Enter after every command:
bootrec /fixmbr
bootrec /fixboot
bootrec /scanos
bootrec /rebuildbcd
sfc /scannow
- Once the commands are successfully executed, reboot your PC to save the changes.
Windows bootloader often overwrites the GRUB bootloader after an update or upgrade, resulting in the missing GRUB menu.
To avoid GRUB being deleted on Windows 10, you can keep the Fast startup feature on Windows disabled, install Windows & Linux on separate hard drives or partitions, and keep GRUB updated.
This isn’t the only issue, and we wrote about the Grub rescue message on Windows 10 in one of our previous guides.
Stuck somewhere? Feel free to mention your queries in the comments section below. We will be happy to help!






User forum
1 messages