Windows 10 Disk Management Recovery - How To Recover Files
![]() 6 min. read
6 min. read
![]() Updated on
Updated on
Share this article
Improve this guide
Read our disclosure page to find out how can you help Windows Report sustain the editorial team. Read more
Does Windows 10 Disk Management recovery actually work? Let’s find out below!
The Windows 10 Disk Management tool allows you to manage your internal storage drives. It also controls how you can use removable USB and HDD/ SSD storage.
Find below the tried and tested methods to recover lost partitions or system files. Also, learn if the tool works efficiently as a recovery tool or if you need specialty third-party software for partition and file recovery.
What Is Windows 10 Disk Management Recovery?

Windows 10 Disk Management is a built-in tool for advanced storage operations, but it doesn’t offer any partition or system file recovery services.
You’ll find a Recovery Partition linked to the Windows OS installation drive. You’ll notice it doesn’t have a drive letter. Also, the Windows File Explorer tool won’t show this partition in the This Computer or Computer window.

Windows 10 uses the Recovery Partition to recognize the current operating system, configurations, and customizations for OS recovery purposes. It automatically accesses the Windows 10 Disk Management Recovery Partition files in the event of major failures, like BSOD, HDD issues after a power outage, and more.
Microsoft has continued the same functionalities and features of Windows 10 Disk Management in Windows 11. Therefore, you won’t find the recovery feature for this tool in Windows 11 as well.
Recreate a Lost Partition Using Windows 10 Disk Management
This tool will allow you to recreate the lost partition. However, when you create a new partition from an unallocated disk space, Windows 10 must format it using NTFS or FAT file systems. In this stage, you’ll lose the content of the lost partition.
Here’s how to use it:
- Right-click on the Windows Start Menu or Flag to access the Power User context menu.
- Click on the Disk Management tool.

- The Disk Management app will open.
- You should see separate ribbons for each disk. For example, Disk 0, Disk 1, etc.
- Inside the disk ribbon, you should see navy blue and dark-colored boxes. These are the partitions in the selected disk.
- You should see a box in the ribbon with a dark strip and a text saying Unallocated. That’s the lost partition.

- However, if there was an existing Unallocated disk space, the recently lost partition would be merged with that one.
- Let’s assume there was no Unallocated disk space in your SSD or HDD.
- Then, click on the Unallocated box, right-click, and choose the New Simple Volume option.

- The New Simple Volume Wizard will pop open. Click Next.

- Click Next again on the Specify Volume Size window.
- The Unallocated space will automatically show the drive letter of the previously lost partition in the Assign Drive Letter or Path dialog.
- Click Next to choose the auto-selected drive letter.

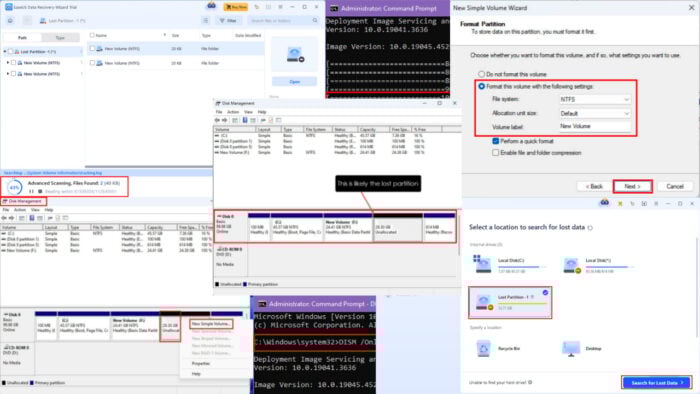
- You’ll now see the Format Partition dialog. Enter the relevant information in fields, like Volume label, File system, etc.

- Click Finish on the next screen.

- The previously lost partition will now show up in the File Explorer tool.

Although you’ve recreated the lost partition, it’ll be empty since the partition wizard has formatted the drive.
At this stage, don’t create any new files or paste different files in this newly-created partition. You’ll need to use a third-party file recovery tool to get back recoverable files of the lost partition. If you start copying files in the new partition, old files will get overwritten and might get lost forever.
Recover a System File
There are no commands or functionalities to force system file recovery using Windows Disk Management. However, you can run the following commands if you suspect a system file has been deleted accidentally. Still, keep in mind that Windows 10 won’t allow you to delete any critical system files.
Run SFC Scan
- Open the Windows 10 terminal by searching for Command Prompt in the Start Menu, then right-click on it and select the Run as administrator option.

- Type the
sfc /scannowcommand in the terminal window and press Enter. - The SFC scan command will start and can take some time to complete. It should take anything between 10 minutes to up to an hour depending on the size of the Windows 10 installation partition.

- Don’t interrupt the scanning session while it’s running.
Once the scan is over, the Command Prompt tool will display the outcomes. Here are some possible results:
- Windows Resource Protection found no integrity violations: System files are okay, and no action is needed further.
- Windows Resource Protection found corrupt files and successfully repaired them: You’ve recovered lost system files.
- Windows Resource Protection found corrupt files but was unable to fix some of them: Run DISM.
If you see the third message, move on to the next method.
Run DISM Scan
- Open the Windows 10 CLI with elevated rights just like in the previous method.
- Enter the following command in the terminal and hit Enter:
DISM /Online /Cleanup-Image /ScanHealth
- It might take a while to finish the initial scan.
- When CLI shows any issues with the system files after the scan, run the following command:
DISM /Online /Cleanup-Image /RestoreHealth
- Windows 10 will attempt to restore corrupted system files online.

- If everything works well, the restoration should be successful as shown below.

Use a Third-Party App To Recover a Lost Partition
The most convenient way to recover a lost partition is by using a specialty data recovery app, like EaseUS. You can download and install the tool for free.
However, you’ll only get a free evaluation. If you like what you see, you can buy a license key and then it’ll let you recover lost partition data.
Here’s how to use it:
- Launch the app using the Desktop or Start Menu shortcut.
- It should open the Hardware Disk window.
- If there are any accidentally deleted partitions on the SSD or HDD, you’ll see the Lost Partition notification for the respective drive.
- Select that drive, like Lost Partition 1, and hit the Search for Lost Data button in the bottom right corner.

- The app will start automatically scanning for the lost files.

- Click Go to Recover once scanning is over.

- If you’re on an activated EaseUS version, you’ll see the option to choose a drive where you want to save the recovered files from the lost partition.
- Follow the on-screen instructions.
Summary
Unfortunately, there’s no Windows 10 Disk Management recovery option for your old partitions or system files. However, you can create a new one with the tool and then use third-party software, like EaseUS to recover the deleted files. For system files, you must use SFC and DISM commands.
If the article helped you or you wish to submit feedback, feel free to comment below!


User forum
0 messages