Windows is Stuck on Welcome Screen: How to Fix it
Disabling the Credentials Manager in Safe Mode should fix this
Key notes
- A computer gets stuck on the Welcome screen usually after a bad system update.
- Make sure the necessary services are running, or try removing the recent updates.

If Windows is stuck on the welcome screen, you won’t be able to access it at all, and this can be a major problem since all your files and apps will remain inaccessible.
This is a major problem especially if you’re on a deadline, but there are a couple of solutions that can help you fix this.
Why is my computer stuck on the starting Windows screen?
- Problems with Credential Manager or Windows Update service.
- Fast Startup is another common cause of this issue.
- Recent Windows updates can also lead to problems.
- Corrupted installation will often prevent you from starting Windows properly.
What do I do if my computer is stuck on the Welcome screen?
Before we try any complex solutions, we suggest performing the following checks:
- Disconnect from the Internet by turning off Wi-Fi or by unplugging the Ethernet cable.
- Remove any hardware that can cause issues. This includes internal SD cards, USB devices, and other hardware that was installed recently.
- Try removing your laptop battery and starting your PC without it.
- Remove SmartPass and fingerprint reading software from your PC since it can cause compatibility issues.
- Disable the WAN adapter in BIOS. For detailed instructions, check your motherboard manual.
1. Use a debugging software
One of the easiest ways to quickly troubleshoot the problem, even if you don’t know the cause, is to use system restoring and optimization software.
2. Disable Credential Manager
- Start Windows 10 in Safe Mode.
- Press Windows key + R and enter services.msc. Click OK.

- In the Services window, locate the Credential Manager service on the list and double-click it to open its properties.

- When the Properties window opens, set the Startup type to Disabled and click Apply and OK to save changes.

- Restart your PC and check if the problem still appears.
Some users claim that this problem occurred on their PC because Credential Manager was disabled, so try enabling it and check if that helps.
In some cases, Windows Update service can cause this problem, but you can fix it by doing the following:
- Open the Services window.
- Locate the Windows Update service on the list and double-click it to open its properties.

- When the Properties window opens, set the Startup type to Automatic (Delayed Start) and click on Apply and OK to save changes.

After doing that, restart your PC and check if the problem still appears.
3. Disable the Fast Startup feature
- Press the Windows key + S and enter control panel. Select Control Panel from the list of results.

- When Control Panel opens, select Power Options.

- Select Choose what the power button does from the menu on the left.

- Click on Change settings that are currently unavailable.

- Uncheck Turn on fast startup (recommended) option and click on Save changes.


After you disable the Fast Startup feature, your PC might start a bit slower but the problem with the Welcome screen should be fixed.
4. Remove recently installed updates
- Enter Safe Mode again.
- Open the Settings app. The fastest way to do that is to press the Windows key + I.
- When the Settings app opens, go to Update & security.

- Now click on Update history.

- A list of all recently installed updates will appear. Memorize the names of the recent updates. Click on Uninstall updates.
- Now you should see the list of recent updates. Locate the problematic updates on the list and double-click them to remove them.


If removing the updates fixes the problem, you might want to temporarily prevent Windows from installing these updates.
5. Delete the Ngc directory
- Start your Windows in Safe Mode.
- When Safe Mode starts, navigate to this directory:
C:\Windows\ServiceProfiles\LocalService\AppData\Local\Microsoft Keep in mind that some of these files are hidden so you need to show hidden files and folders. To do that, click the View tab at the top and check Hidden item.
 - Look for the Ngc folder and try to delete it. By default, this folder is protected by the system, so you’ll need to take ownership of it first. To do that, right-click the directory and choose Properties from the menu.

- Go to the Security tab and click on Advanced.

- When the Advanced Settings window opens, click on Change in the Owner section.

- Enter your user name in the Enter the object name to select and click on the Check Names button. If everything is in order, click on OK to save changes.

- Check Replace owner on subcontainers and objects and click on Apply and OK to save changes.

- A security warning might appear. Click Yes to continue.

- After doing that, you’ll have full control over the Ngc folder. Now you just have to delete it from your PC and restart your PC.

Keep in mind that this solution works if you’re using a PIN number to sign in to Windows 10. If you aren’t using a PIN, this solution might not work for you.
6. Perform an Automatic Repair
- Restart your computer a few times during the boot sequence. Click on the Advanced options button once it appears.

- Now select Troubleshoot and then Advanced options. Lastly, select Automatic Repair.

- Automatic Repair will now start. Follow the instructions on the screen to complete the repair.
If you can’t find the Automatic Repair option, you can use Startup Repair instead. After you complete the repair process, the issue should be resolved.
7. Use Command Prompt
- Restart your computer a couple of times while your PC boots to start Automatic Repair.
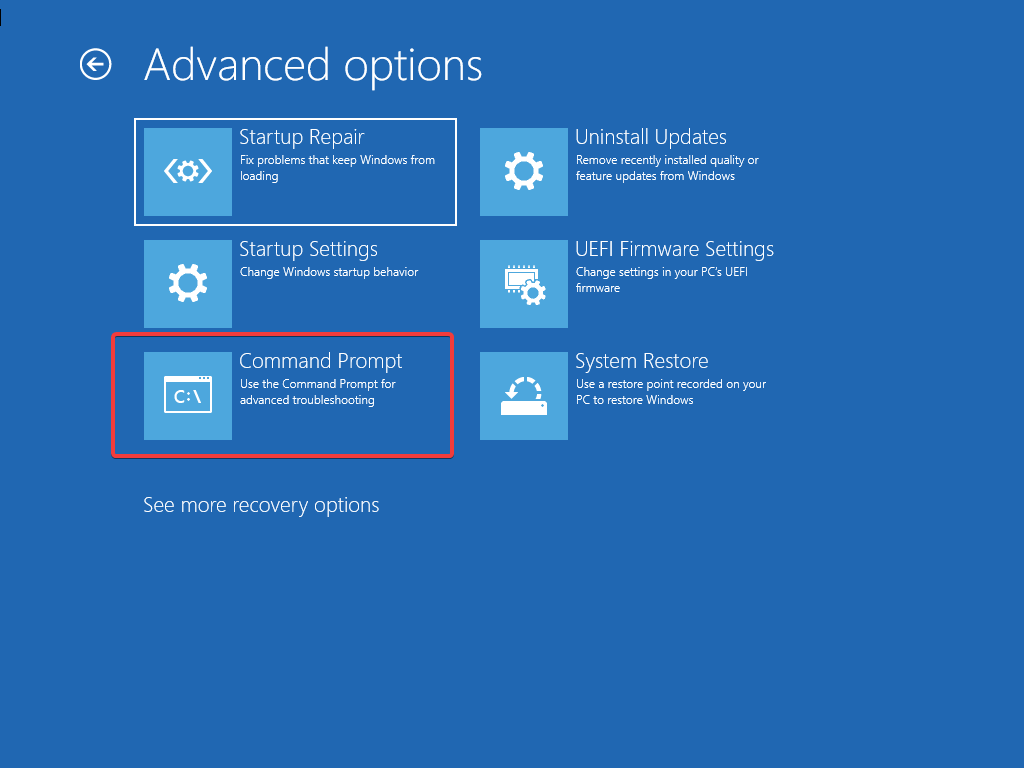
- Click on the Advanced options button once it appears.
- Now select Troubleshoot, choose Advanced options and then Command Prompt.
- When Command Prompt opens, enter the following to check for file corruption:
sfc /scannow - Some users are suggesting to use the following to check your hard drive:
chkdsk c: /f /r - After the scan is completed, restart your PC and check if the problem still appears.
Several users reported that you can fix this problem simply by using bootrec command. To do that, you need to start Command Prompt by using the steps above and run the following commands:
bootrec /fixmbr
bootrec /fixboot
bootrec /scanos
bootrec /
rebuildbcd
After the commands are executed, check if the error message still appears. Some users are suggesting to try using these commands instead:
bcdedit /export C:\BCD_Backup
C:
cd boot
attrib bcd -s -h -r
ren c:\boot\bcd bcd.old
bootrec /RebuildBcd
8. Restart Windows Update service
- Enter Safe Mode as explained above.
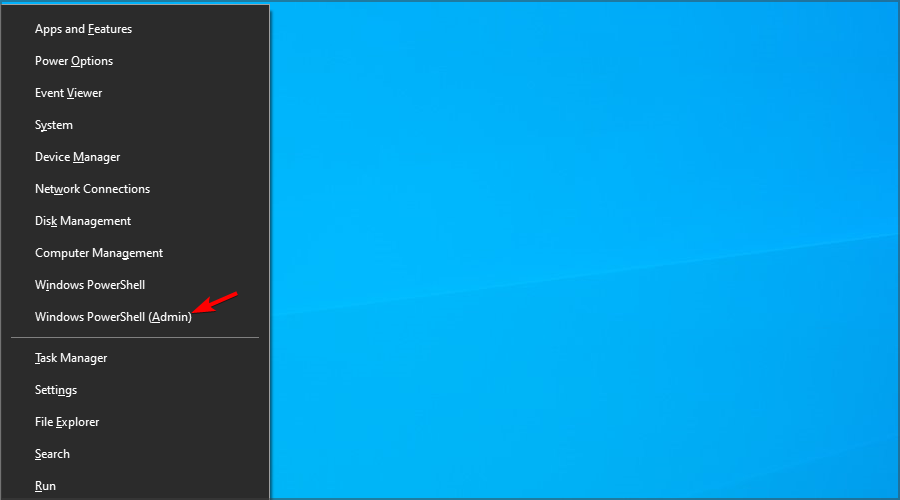
- Press the Windows key + X to open and choose PowerShell (Admin) from the menu.
- When PowerShell opens, you need to enter the following commands:
net stop wuauserv
cd %systemroot%
ren SoftwareDistribution SD.old
net start wuauserv - After doing that, close PowerShell and restart your PC. Now check if the problem is resolved.
9. Use System Restore
- Restart your PC a few times during the boot until the Automatic Repair message appears.
- Now go to Troubleshoot and then to Advanced options. Lastly, select System Restore.

- Select your username and enter your password.
- Click on Next, select the desired restore point and follow the instructions on the screen to restore your PC.

- After your PC is restored, check if the problem still appears.
10. Perform a startup repair from an installation disc
- Create Windows 10 installation media.
- Insert your installation media and boot your PC from it.
- When the setup starts, click on Next.

- Next, choose Repair your computer.

- Next, choose Startup Repair and wait for the process to finish.

11. Reset Windows 10
 NOTE
NOTE
- Restart your PC a few times until you start Automatic Repair.
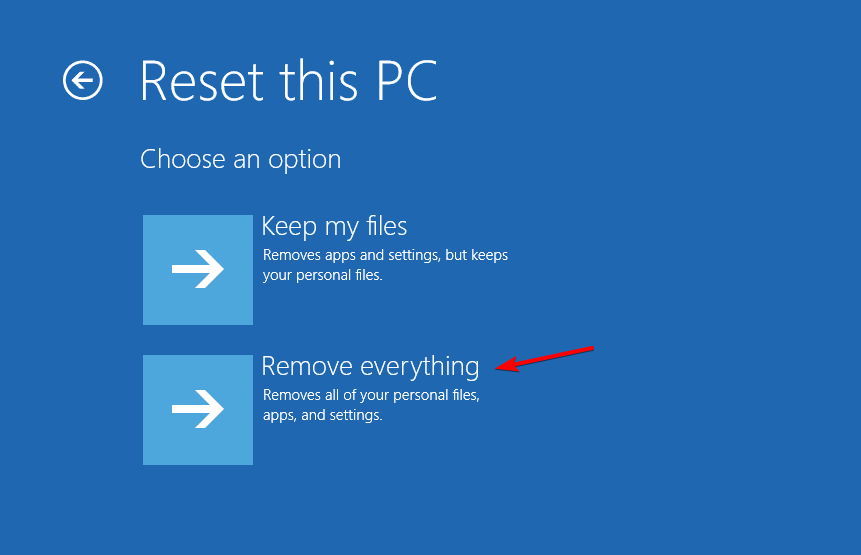
- Choose Troubleshoot and select Reset this PC. After that, choose Remove everything.
- For the next step you might be asked to insert Windows 10 installation media, so be sure to have it ready.
- Now select your version of Windows and click on Only the drive where Windows is installed and then Just remove my files.

- You should now see a list of changes that the reset will perform. If you’re ready to start, click on the Reset button.
- Now follow the instructions on the screen to complete the reset.
How do I force restart Windows?
- Press and hold the Power button for a couple of seconds to turn the PC off. Then press the same button again.
- Many desktop PCs have a dedicated Restart button that you can use to quickly restart your PC.
If Windows is stuck on the welcome screen, the most likely cause is corrupted files or a bad update, but that can be fixed with our solutions. However, this isn’t the only issue and many reported that Windows is stuck on the login screen.
Many users reported that Windows is stuck after login or that Windows is stuck on spinning circles, but we covered those in separate guides.
Did you find a different solution for this problem? If so, share it with us in the comments section.
Read our disclosure page to find out how can you help Windows Report sustain the editorial team. Read more


Improve this guide


User forum
5 messages