8 Ways to Stop Your Mouse from Auto Scrolling in Windows 11
Auto scroll issue is often caused by misconfiguration of the mouse
Key notes
- Outdated Windows can cause issues with the mouse functionality on your computer.
- Disconnecting and reconnecting the mouse from your computer can help fix the Windows 11 mouse auto-scrolling problem.
- Enabling some mouse features like inactive scrolling in the computer settings can result in an issue.

Over the years, Windows has gone through several upgrades and improvements. Microsoft makes it easier for people to interact with their computers without stress because of their advanced implementations in recent Windows devices.
However, implementing these features can cause some issues with computer productivity. Furthermore, Windows 11’s mouse auto-scrolling is one of the issues users complain of.
Mouse auto-scrolling in Windows 11 operates without the intervention of the user. However, seeing your computer do things you don’t permit it to do from the start can be annoying. Consequently, it can cause Windows 10/11 to scroll down automatically, and Windows automatically scroll to the top issues.
Many things can be responsible for this issue. However, the case may be different on various Windows computers. Some are connection issues with the mouse, update or driver issues and lots more.
Fortunately, this article will discuss the causes of the mouse auto-scrolling issue in Windows 11 and some fixes you can use to solve the problem.
Why is my mouse scrolling automatically?
- Issues with the mouse connection: Many things can go wrong if there are difficulties with your computer and the mouse, irrespective of the connection mode. Some mice use wireless connections, while some are connected via USB cords. However, the connection can be faulty. So, it can affect how the mouse functions on the computer and can result in the mouse scrolling on its own Windows 11.
- Battery problem in the wireless mouse: Wireless mice are prone to develop issues and malfunction when there is a problem with the battery. Sometimes, powering the mouse with a faulty battery can result in some parts of the mouse performing out of scope.
- Low battery charge on the mouse: Users can encounter some difficulties with the mouse if it is not properly charged. Likewise, not charging a wireless mouse properly before using it can affect the battery life and cause damage earlier.
- Outdated Windows: Most users ignore the number of difficulties outdated Windows can cause on their computers. It affects the way components of the computer work, and it can result in Windows 11 mouse auto-scrolling. Windows releases updates and patches to fix the bugs affecting the previous version on the computer. So, if the system is not up-to-date, it’ll lack essential updates.
- Allowed auto scroll in Settings: Users may encounter the Windows 11’s mouse auto scrolling issue if some features are turned on in the device’s Settings. Features like scrolling inactive windows when I hover over them automatically allow the mouse to perform actions without your intervention.
- Issues with the Mouse: There may be several issues with the mouse that the user is not paying attention to. However, when your mouse falls, it can damage its parts and cause some problems.
How do I stop my mouse from scrolling automatically?
1. Unplug and plug in the mouse
Unplugging the mouse from the USB port connected will help it refresh and rest. However, you can plug it back into a different USB port after some seconds. It should help fix any connection issues with the mouse.
2. Update the mouse drivers
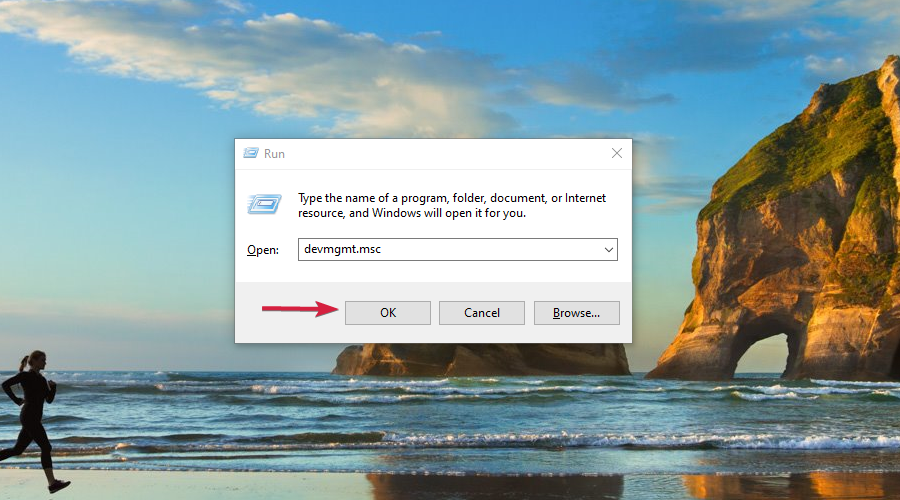
- Firstly, open the Run command windows by pressing Windows + R simultaneously.
- Then, in the opened window type: devmgmt.msc and press OK.
- Now find Mice and other pointing devices, expand it, find your mouse, right-click on it and click Update driver.
- Click on Search automatically for updated driver software and let Windows do the rest for you.
Otherwise, you can use specialized software which will save you time and will do the work on your behalf.
If you are facing problems with the mouse itself, and updating the driver seems impossible, we highly recommend checking also our guide on how to install mouse drivers without a mouse.
3. Disconnect the mouse and reconnect it (for wireless connection)
- Click start on your computer and select Settings from the drop-down.
- Select Devices and click on Bluetooth & other devices.
- Go to paired devices and click on the mouse name.
- Click on Forget device, then OK.
- Close the Settings windows.
- Repeat steps 1&2.
- Go to Bluetooth, and toggle it On.
- Then click the + button to add a device.
- Select Bluetooth on the Add a device window.
- Press and hold the pair button on the mouse.
- Select the mouse from the Discovered devices and click on connect.
Disconnecting the mouse will help fix wireless mouse connection issues.
4. Restart your computer
Restarting your computer will help fix issues that may prompt the mouse not to respond to clicks or the laptop to scroll down automatically.
5. Update Windows
- Click on Start.
- Select Settings from the options.
- Click on Windows Update, then select Check for updates.
Windows will automatically search and download updates if there are any available.
6. Change the mouse settings on your computer
- Click on start on your screen, and select Settings.
- Click on Bluetooth and Devices and select the mouse on the left side of the screen.
- Turn Off the Scroll inactive windows when I hover over them.
Restart your computer and see if the Windows 11 mouse auto-scrolling issue persists.
7. Switch to another mouse
Switching to another mouse can help you discover exactly where the problem is coming from. Get a perfectly working mouse and connect it to your computer (wirelessly or plugged).
If the laptop scrolling down/up automatically issue does not persist, then you should change your mouse. Likewise, if the issue persists, the problem is coming from your computer.
8. Uninstall recent updates
- Click on Start on your screen, select Settings, or press Windows + I.
- Click on Windows Update and select Update history.
- Go to Related settings and select Uninstall updates.
- Right-click on the update and select Uninstall.
How do I open mouse properties in Windows 11?
- Press Windows + I to open Settings.
- Click on Devices.
- Select Mouse from the left pane.
- Click on Additional mouse settings.
Or
It will open Properties.
However, you can read about other difficulties people have encountered with their mice and the guides to solve them here. Mouse keeps clicking on Windows 10/11 – that’s one of the concerns users complain about, and our article should help out.
Also, you can check out this article to efficiently fix the lagging mouse in Windows 10/11.
If you have further questions and suggestions, leave them in the comments section. We’d love to hear from you.
Read our disclosure page to find out how can you help Windows Report sustain the editorial team. Read more


User forum
0 messages