How to install mouse driver without mouse
Key notes
- Having issues with your mouse? You’re in luck because today we’ll show you how to install a mouse driver without a mouse.
- The simplest way to do that is to use a reliable driver updater software that will update all drivers on your PC.
- Installing the latest Windows updates is one of the easiest ways to install missing drivers.
- Wondering how to reinstall a mouse driver? You can quickly do that from the Device Manager.

Your mouse isn’t working properly, and you can’t use it at all? This can be inconvenient, so today we’ll show you how to install a mouse driver without a mouse.
Many users reported that their mouse drivers aren’t installed properly, and this can significantly impact your performance and make your mouse useless.
To fix this problem, you need to rely on keyboard shortcuts, use the touchpad, or your phone to control your PC. Now that you’re ready to go, let’s see how to fix this problem, shall we?
How can I install a mouse driver without a mouse?
1. Use driver updater software
The simplest and fastest way to install the missing drives is by using driver updater software. With such a tool, all your drivers will get updated with just a couple of clicks.
These tools are also great for long-term maintenance of your system as they can be set up to perform regular scans so you can make sure your drivers never go out of date again.
2. Install the latest Windows updates
- Press Windows Key + I to open the Settings app.
- Navigate to the Update & Security section.

- Now select the Check for updates button.
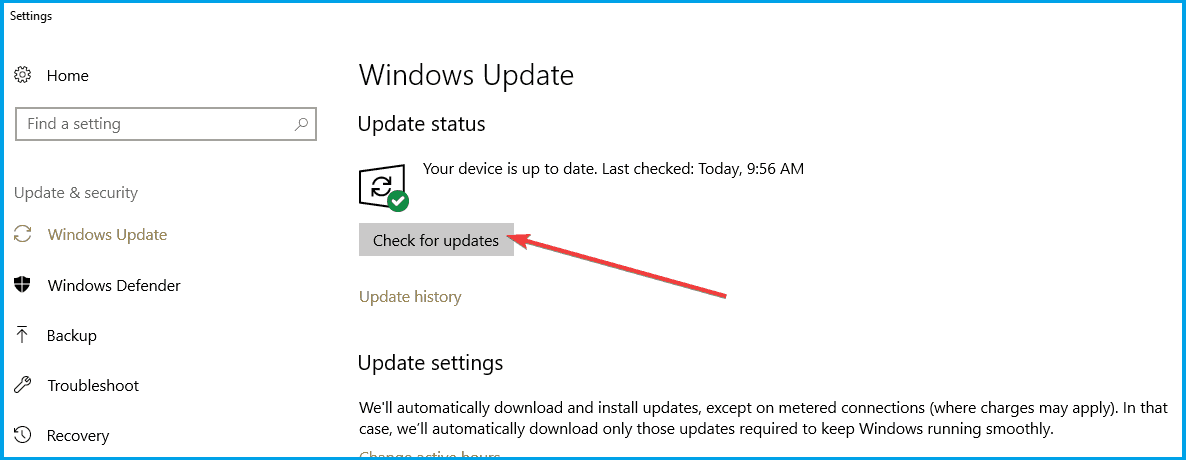
If any updates are available, they will be installed automatically. Once your system is up to date, the latest mouse driver should be installed.
3. Use the Device Manager
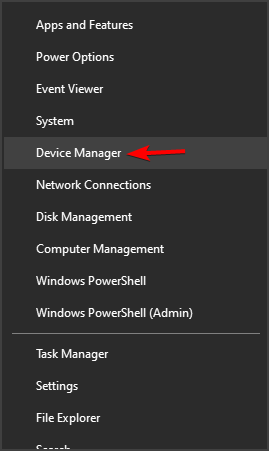
- Press Windows Key + X and select Device Manager from the list.
- Expand the Mice and other pointing devices section.
- Right-click your mouse (or use the context menu key on your keyboard) and select Update driver.

- Select Search automatically for updated driver software.

- Windows will now scan for missing drivers and install them automatically.
This is the simplest and the fastest method to install mouse drivers on your PC but keep in mind that you’ll need to rely on your keyboard and keyboard shortcuts or any other input method to perform these steps.
4. Reinstall the current drivers
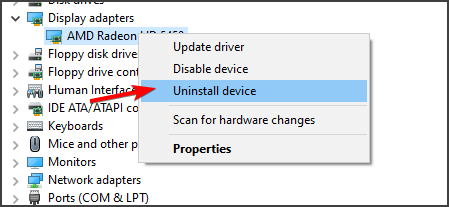
- Open the Device Manager.
- Now expand the Mice and other pointing devices section.
- Right-click your mouse or use the context menu key on the keyboard.
- Now select the Uninstall device option.
- When the confirmation dialog appears, select Uninstall.

- Do this for all mouse devices that you have on your system.
- After you remove them all, restart your PC.
This is a simple workaround that should force Windows to automatically install the default mouse driver on your PC.
Few users reported that they managed to fix the problem by leaving just one mouse device on their PC, so feel free to try that as well.
5. Try a different port or mouse
If you need to install a mouse driver, try connecting the mouse to a different port. Sometimes certain USB ports won’t recognize your mouse, so be sure to try all ports on your PC.
Moreover, be sure that your mouse isn’t faulty in any way. In the worst-case scenario, try using one of the best PC mouse models and check if that helps.
To install a mouse driver without a mouse you need to rely on other input methods or keyboard shortcuts, but this isn’t as hard as it may seem.
We hope that you found this guide informative and that you managed to install the missing drivers without too much hassle.
Read our disclosure page to find out how can you help Windows Report sustain the editorial team. Read more


Improve this guide


User forum
0 messages