Windows 11 Network Sharing Not Working? How to Turn it On
In some cases, a router reset saves you troubleshoot time
Key notes
- If network sharing is not working in Windows 11, you will have trouble sharing files between various systems on the network.
- It’s generally the misconfigured system settings, issues with the current version of the OS, or lack of permissions to be blamed.
- To fix the error, try updating the OS, running the critical services, and reconfiguring sharing settings, amongst other methods here.

Network sharing allows users to transfer and receive files with other users on a local network. It’s great for offices or people with multiple devices at home. But many users, after upgrading to Windows 11, reported that network discovery is not working.
This could be due to several reasons, including issues with the installer version of the OS. Also, misconfigured settings, absence of critical services, or lack of permissions can lead to network sharing not working in Windows 11.
Many with Windows 10 and Windows 11 devices on the local network noticed that though the device running Windows 11 could access the Windows 10 PC, the reverse is not true. Here upgrading all devices to Windows 11 may work.
So, let’s now walk you through the most effective fixes.
Why is my Network discovery not working?
Network discovery is a Windows feature that allows your computer to see other devices and shared resources on your local network. If network discovery is not working, it could be due to several reasons, including:
- Firewall Settings – Windows Firewall or third-party firewall software could block network discovery.
- Network Profile – Your network profile might be set to Public, which disables network discovery.
- File and Printer Sharing – Ensure that file and printer sharing is enabled on your computer. This is required for network discovery to work.
- Network adapter drivers – Outdated or incorrect drivers for your network adapter can cause network discovery problems.
- Router Configuration – Your router may have settings that are blocking network discovery.
How do I turn on network discovery on Windows 11?
- Press Windows + I to open the Settings app.
- Select Network and Internet; pick your network from the list (you can share Ethernet or Wi-Fi networks) and enable it. Then click on it to open its settings panel.

- Set the Network profile type to Private.

As you can see, you can find information about each network profile directly in the settings app. Once you enable the Private profile, you can share files with other devices on that network.
How do I force network discovery?
Sometimes, changes to your system will not apply until you reboot your PC. That allows it to reconfigure and load the OS with the new setup.
So if you have not tried that already, we advise you to do it. Many users report being able to use Network Discovery without an issue after a simple restart.
Also, check all the suggestions in this guide to learn how to configure your file permissions, share settings correctly, and more. Even if Network Discovery is enabled, other settings may prevent it from working correctly.
How can I fix Network discovery if it’s not working on Windows 11?
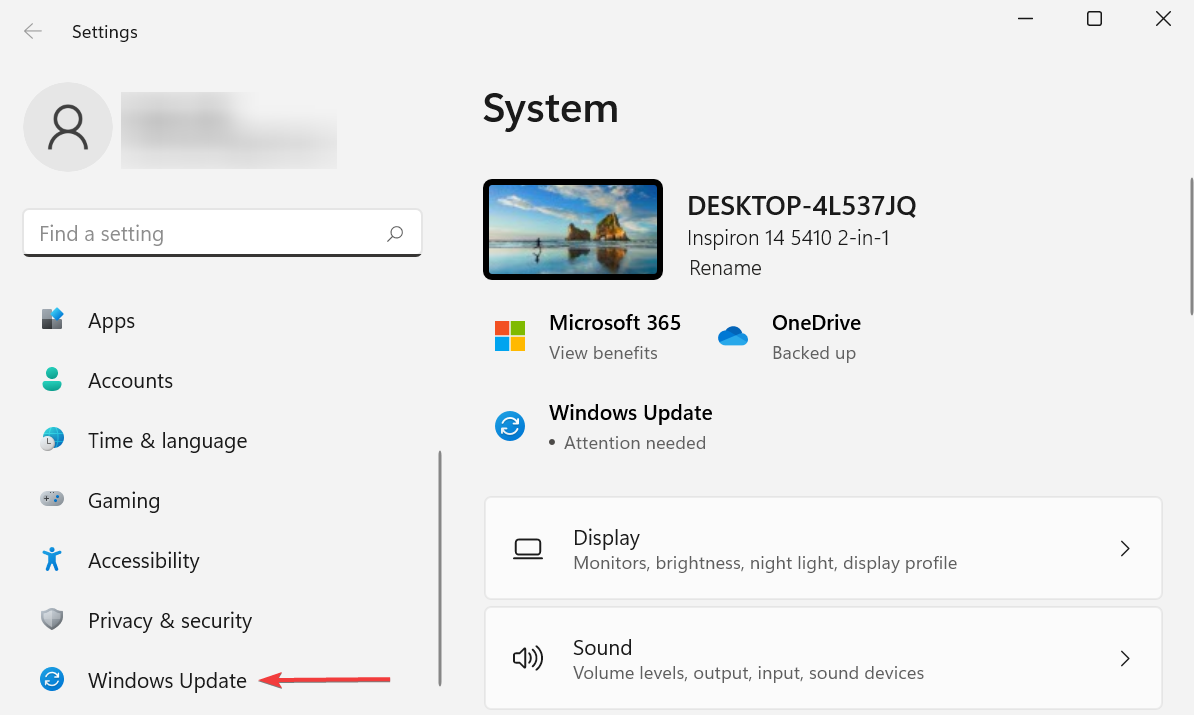
1. Update Windows 11
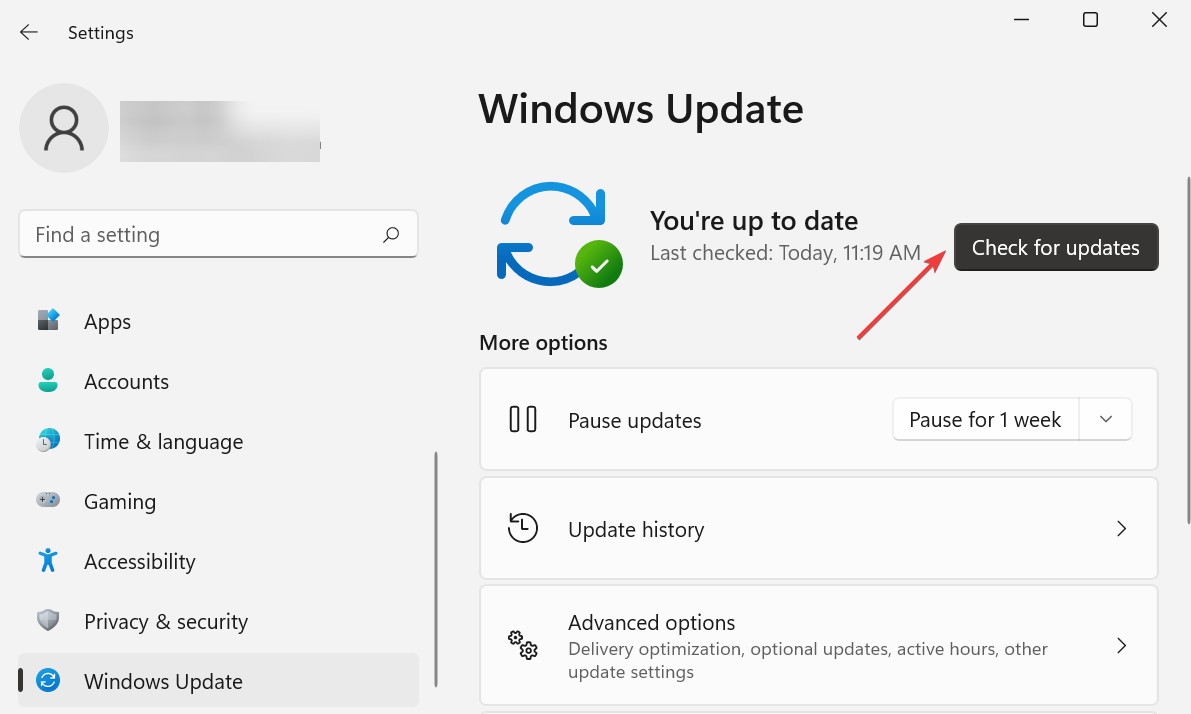
- Press Windows + I to launch the Settings app, and select Windows Update from the tabs listed in the navigation pane on the left.

- Click the Check for updates button on the right to scan for available newer versions.

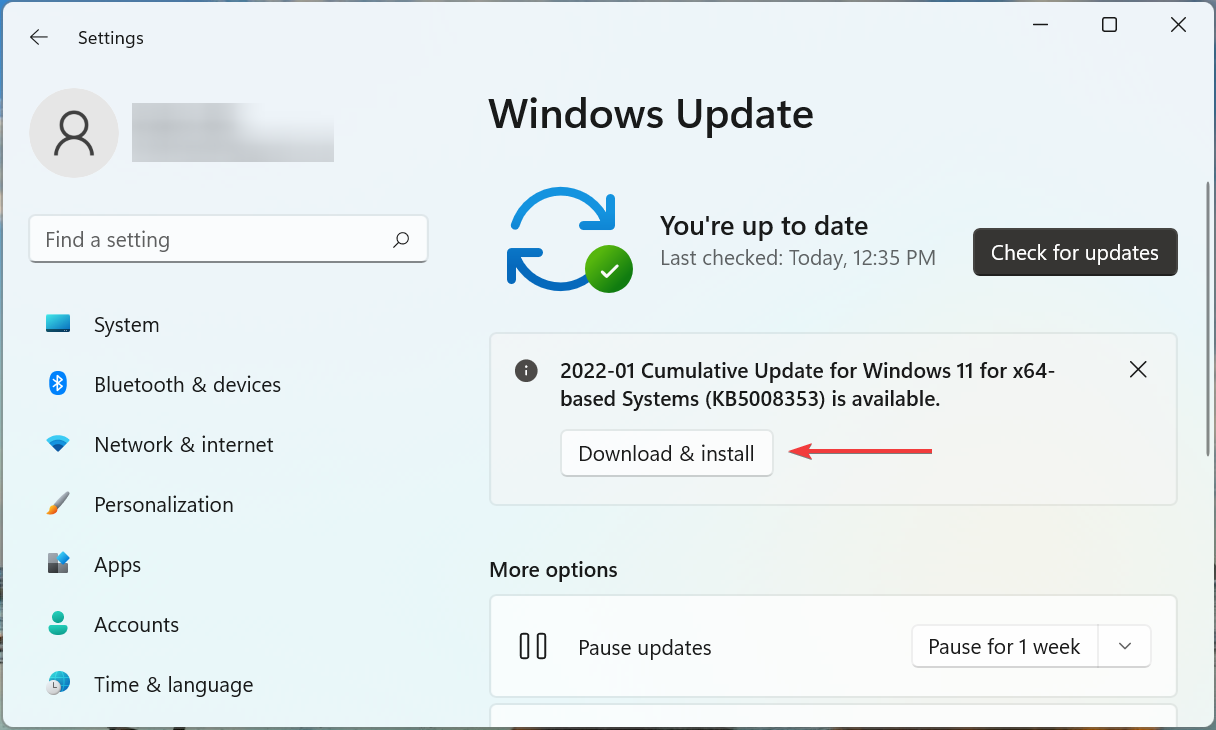
- If any are listed after the scan, click on Download & install to get them.

Often, it might be an issue with the current version of Windows 11, leading to network sharing not working in Windows 11. If that’s the case, updating the OS should fix the error.
2. Run the critical services
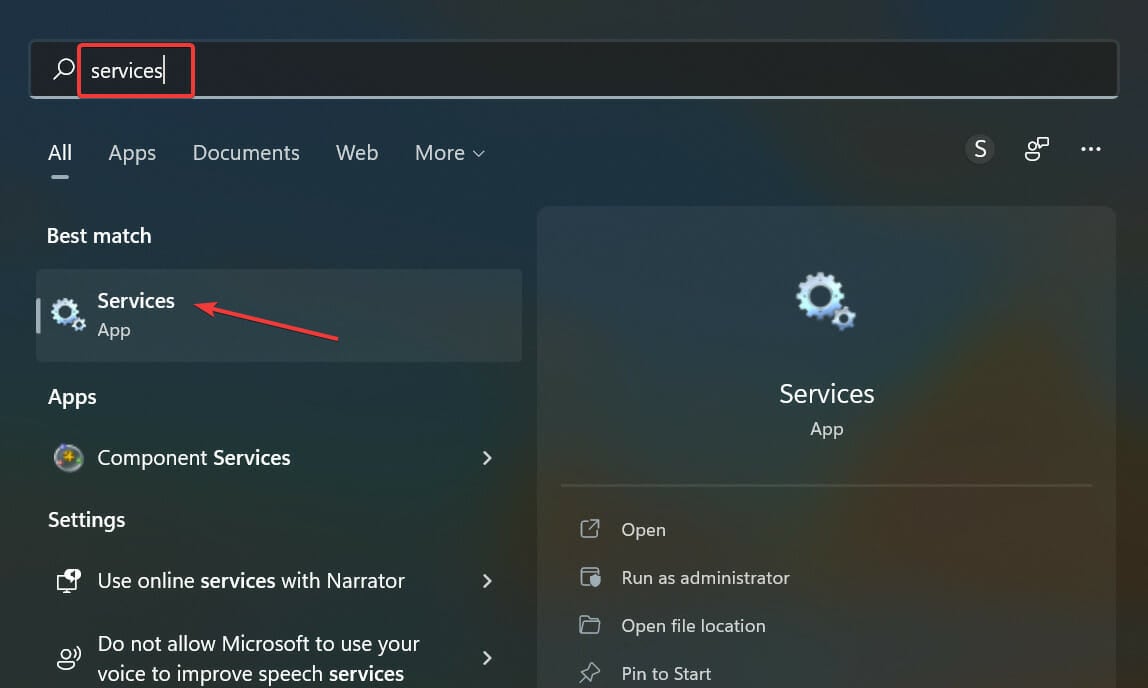
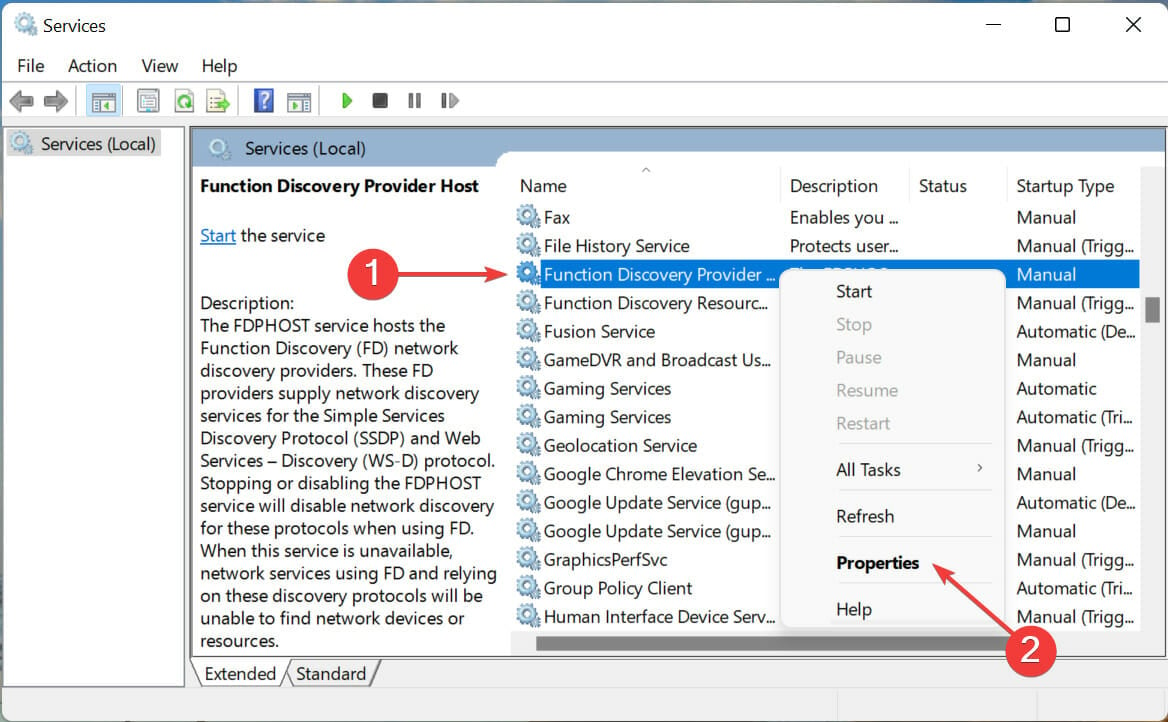
- Press Windows + S to launch the Search menu, enter Services in the text field at the top, and click on the relevant search result that appears.

- Locate the Function Discovery Provider Host service, right-click on it, and select Properties from the context menu.

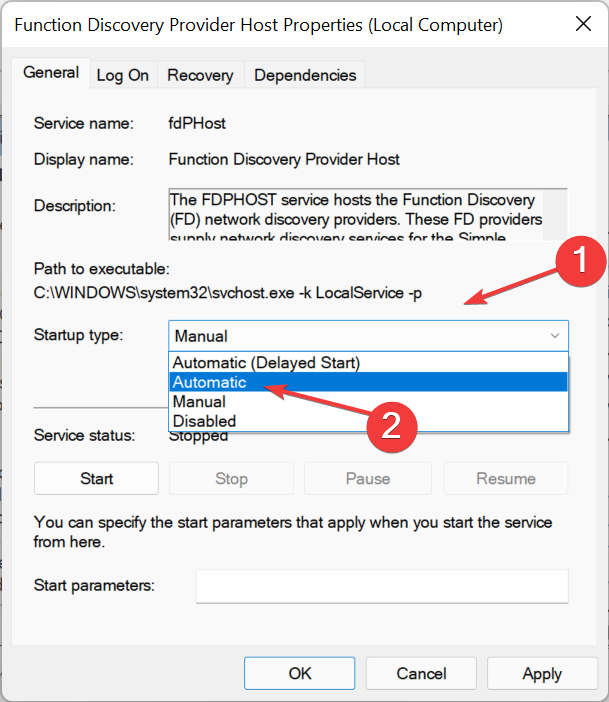
- Now, click on the Startup type dropdown menu, and select Automatic from the list of options.

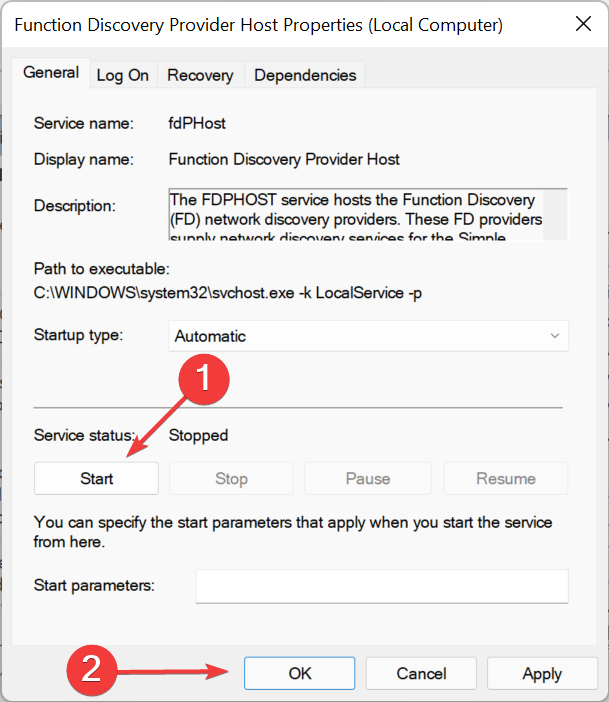
- Click on the Start button if the service is not running, and then click OK at the bottom to save the changes.

- Similarly, set the Function Discovery Resource Publication to Automatic and run the service.
Once done, check if the network sharing not working issue in Windows 11 is fixed.
3. Reconfigure sharing settings
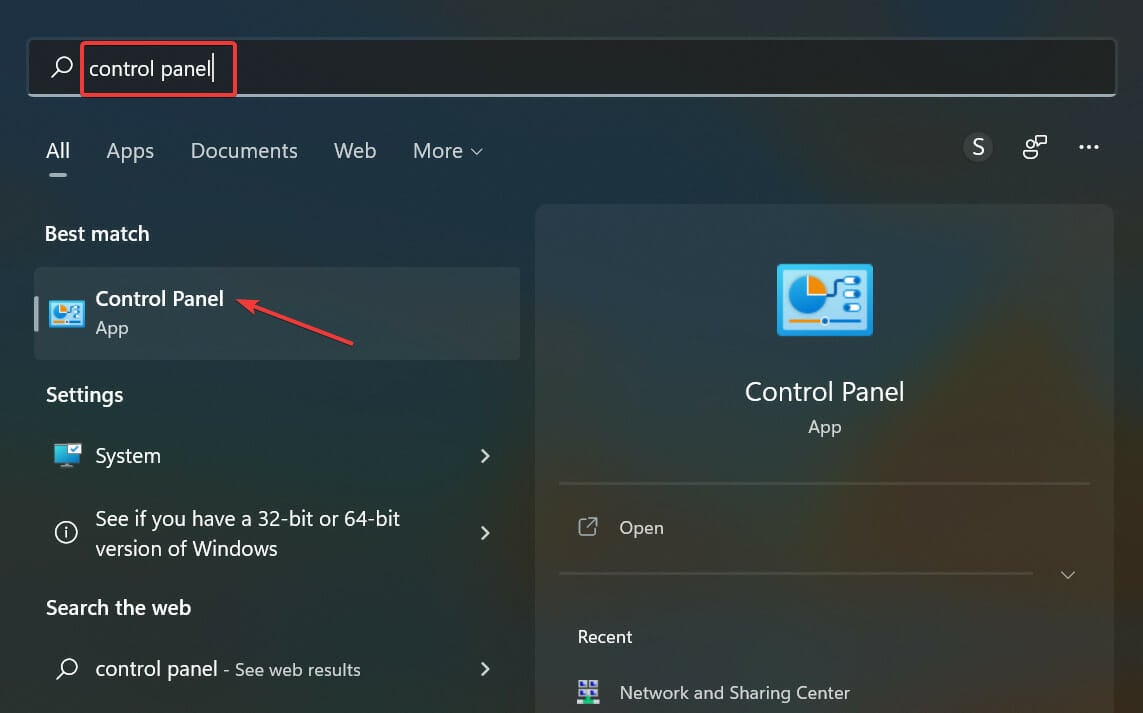
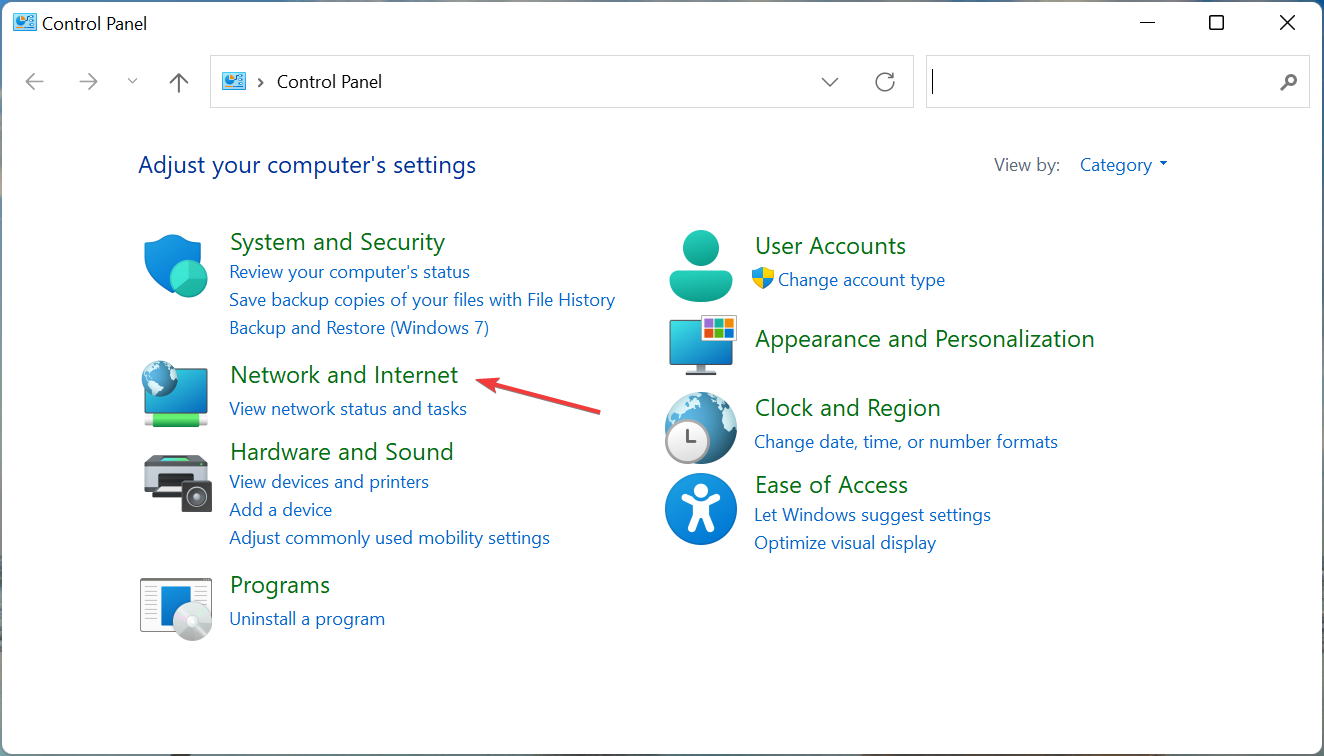
- Press Windows + S to launch the Search menu, enter Control Panel in the text field, and click on the relevant search result that appears.

- Click on Network and Internet.

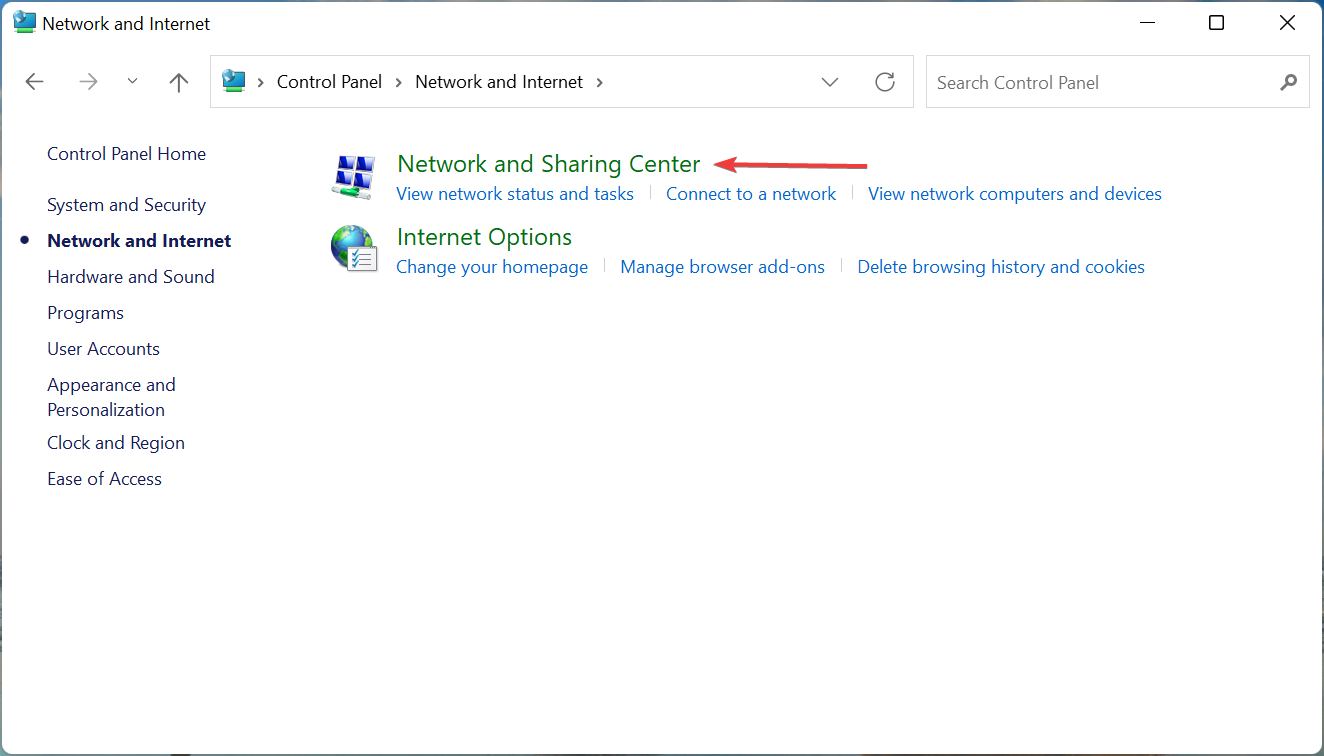
- Next, click on Network and Sharing Center.

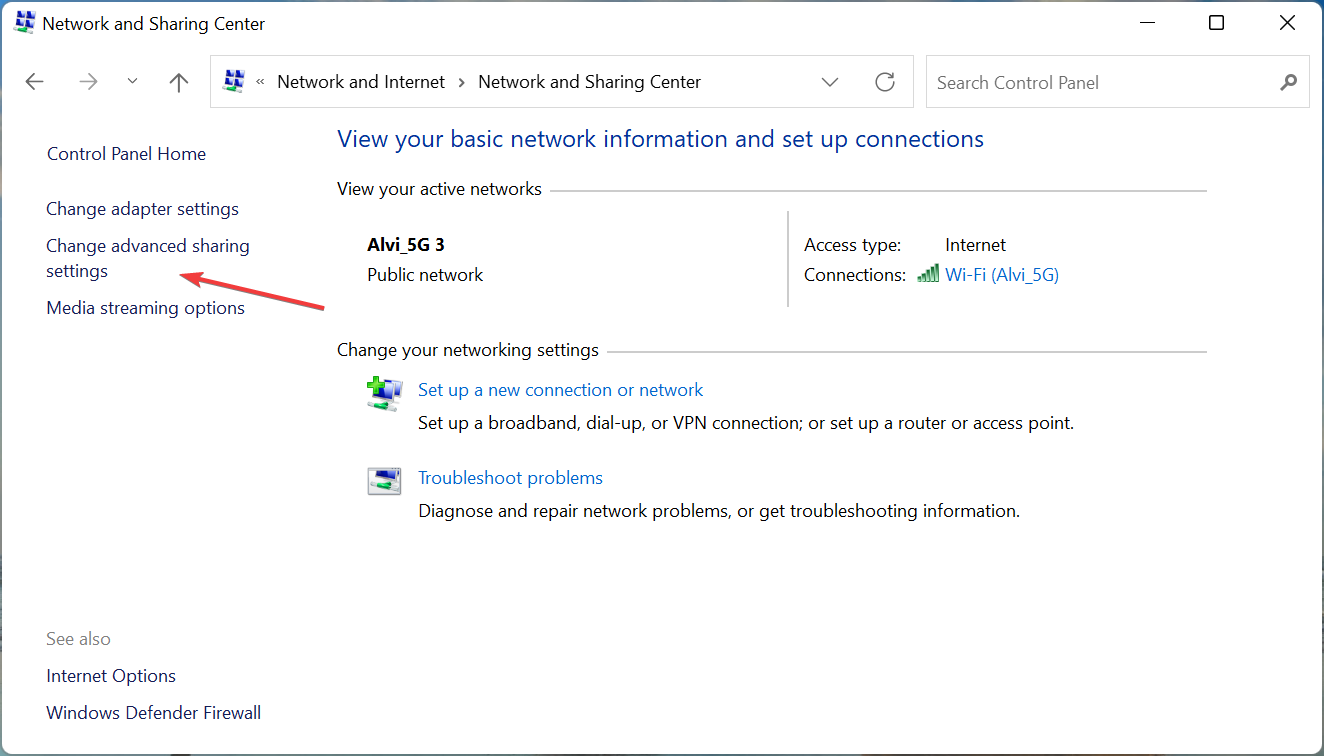
- Click on Change advanced sharing settings from the options listed on the left.

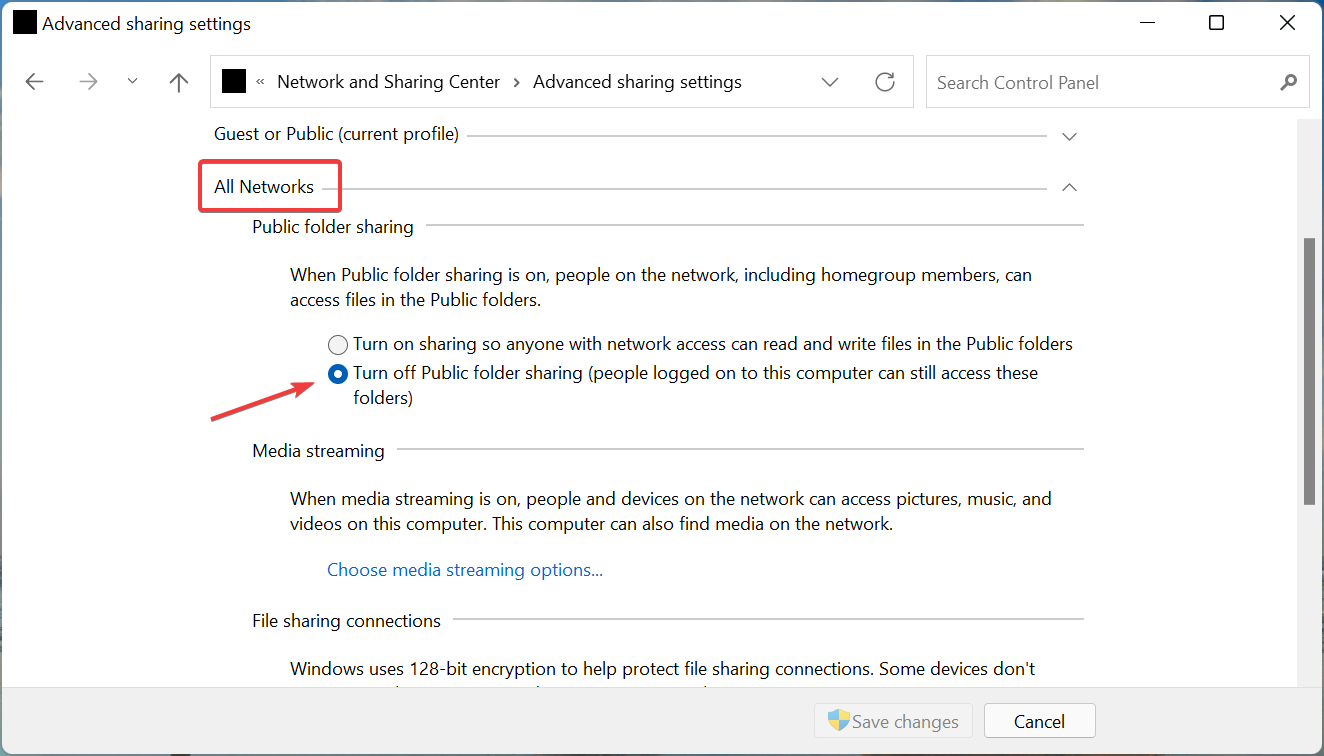
- Now, click All Networks, and then select Turn off Public folder sharing (people logged on to this computer can still access these folders) under Public folder sharing.

- Now, scroll down and select Turn off password protected sharing under Password protected sharing, and then click on Save changes at the bottom.


Once done, restart the computer for the changes to effect, and verify if the network sharing starts working in Windows 11.
You can troubleshoot access issues by using the Network and Sharing Center not opening guide, which helps you resolve problems that prevent the panel from launching in Windows 11.
4. Provide the necessary permissions
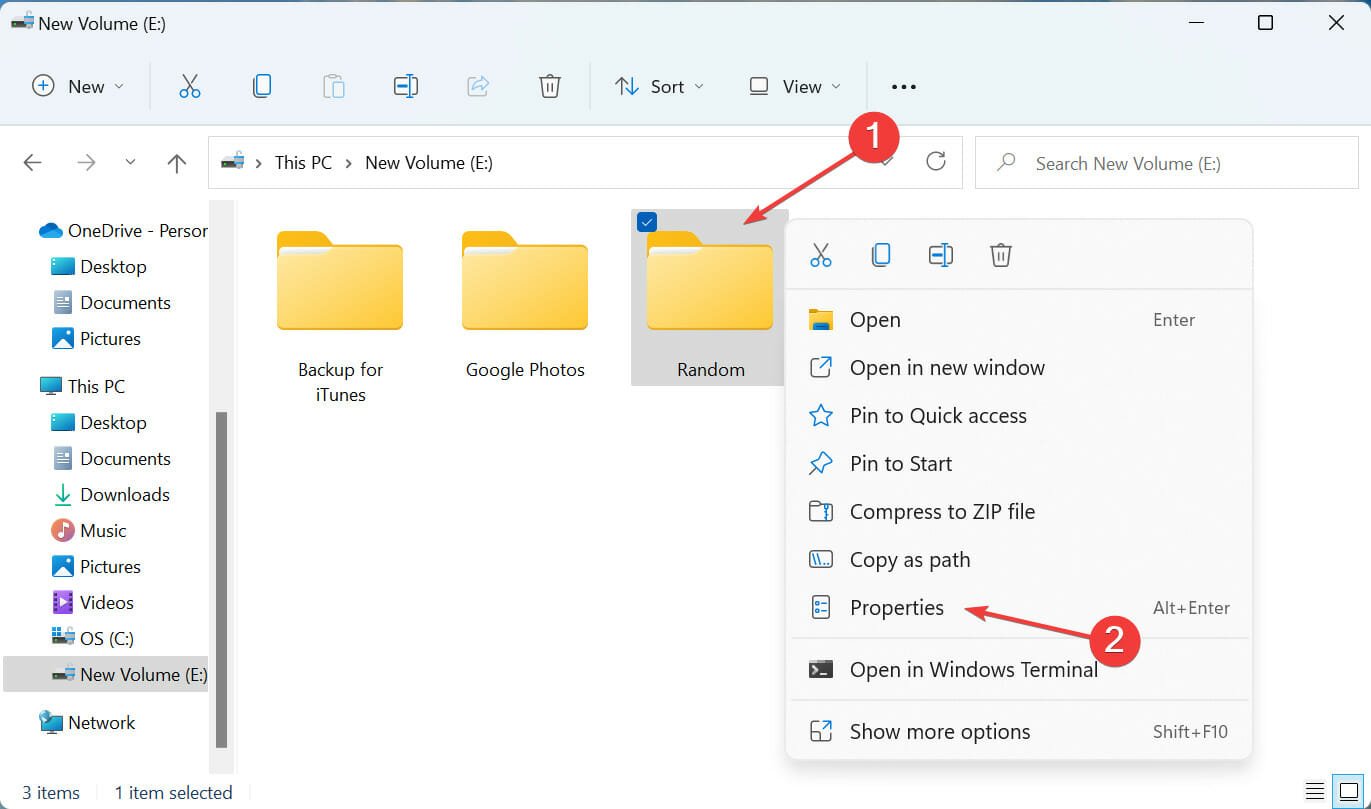
- Press Windows + E to launch File Explorer, locate the folder you are having trouble sharing, right-click on it, and select Properties from the context menu.

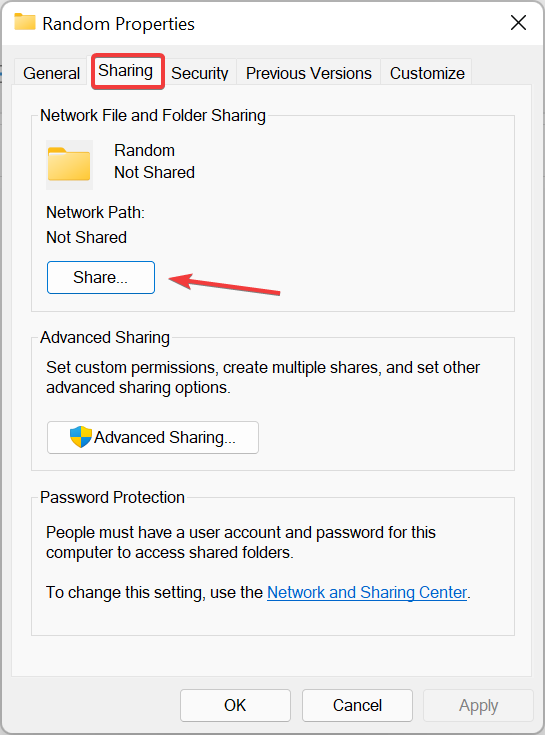
- Navigate to the Sharing tab and click on the Share button.

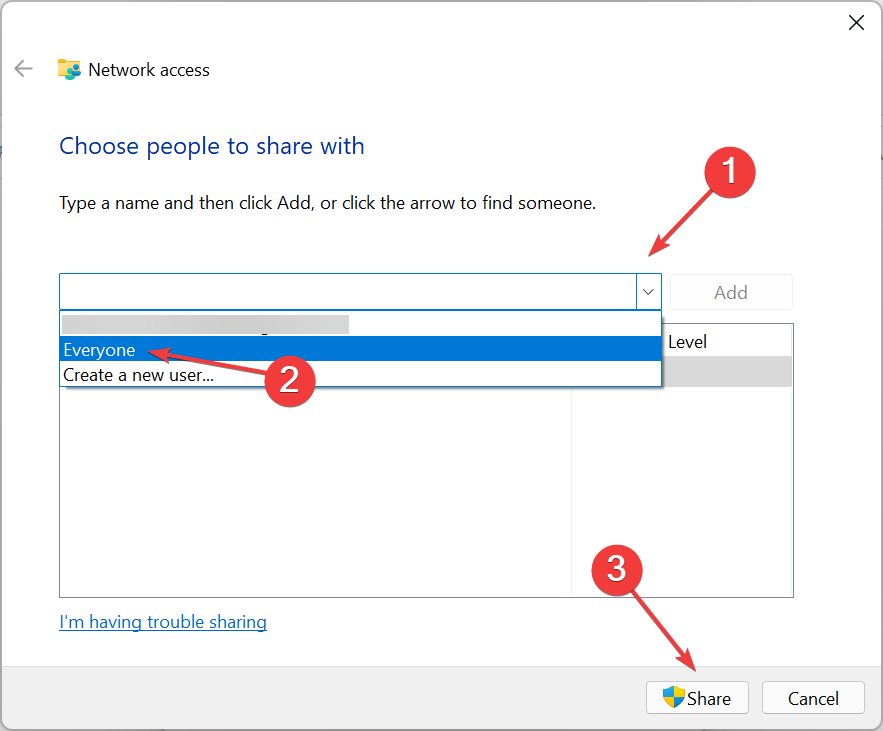
- Click on the dropdown menu, select Everyone from the list of options, and then click on Share at the bottom.

- Click Done on the next window.
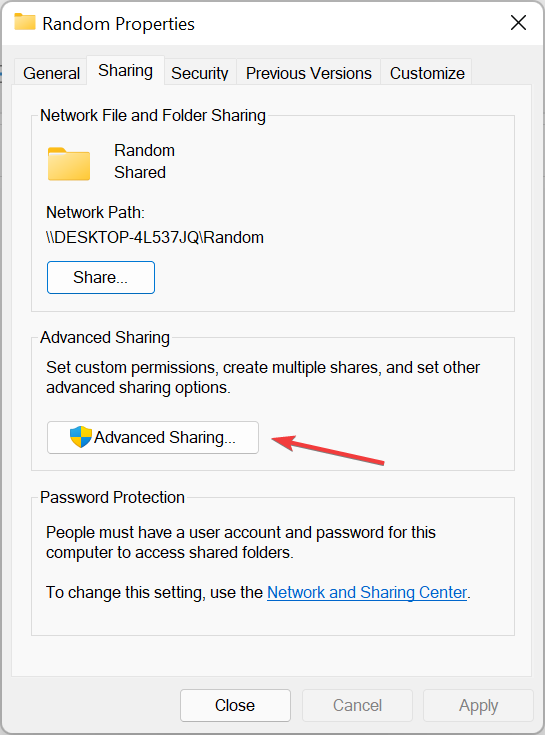
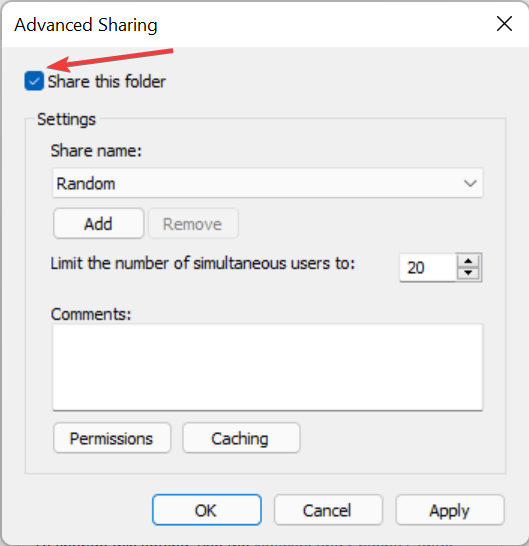
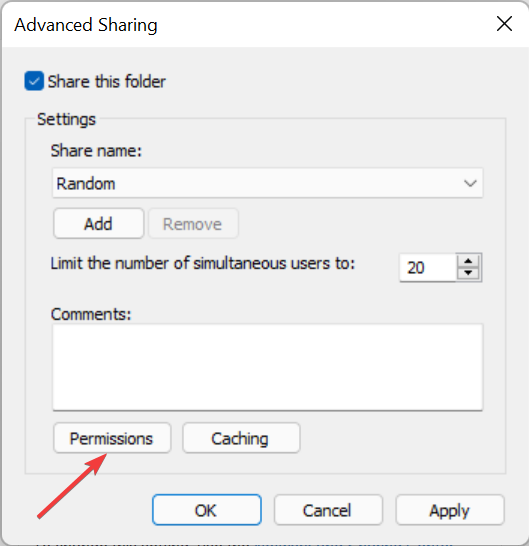
- Now, click on the Advanced Sharing button in the Sharing tab.

- Tick the checkbox for Share this folder.

- Click on the Permissions button.

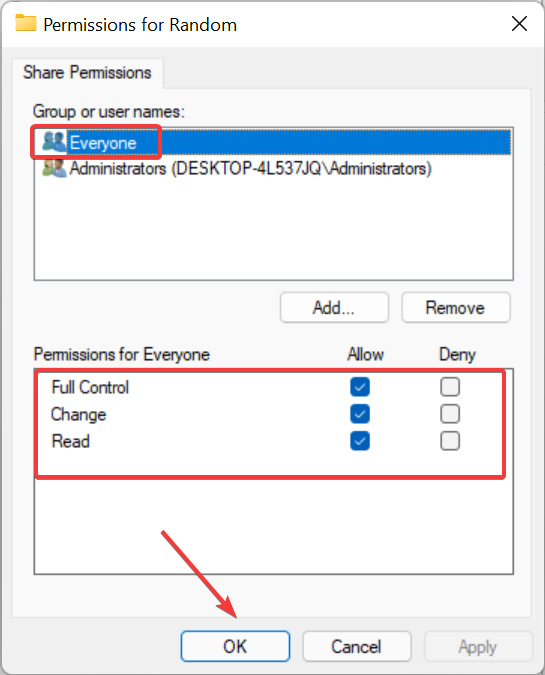
- Make sure that the Everyone option is selected and the relevant permissions granted. Once done, click on OK at the bottom to save the changes.

- Save the changes on all the subsequent windows, and restart the computer for these to effect.
Once done, the network sharing not working issue in Windows 11 should be fixed, and you can start sharing files with other devices on the local network.
Also, find out what to do if you cannot access the shared folder in Windows 11 since many reported encountering this issue.
Tell us which fix worked for you in the comments section below.
Read our disclosure page to find out how can you help Windows Report sustain the editorial team. Read more


Improve this guide

User forum
1 messages